-
×InformationNeed Windows 11 help?Check documents on compatibility, FAQs, upgrade information and available fixes.
Windows 11 Support Center. -
-
×InformationNeed Windows 11 help?Check documents on compatibility, FAQs, upgrade information and available fixes.
Windows 11 Support Center. -
- HP Community
- Printers
- Printing Errors or Lights & Stuck Print Jobs
- Officejet pro 8024 printer error on wireless

Create an account on the HP Community to personalize your profile and ask a question
Your account also allows you to connect with HP support faster, access a personal dashboard to manage all of your devices in one place, view warranty information, case status and more.
Check some of the most frequent questions about Instant Ink: HP INSTANT INK, HP+ PLANS: INK AND TONER.
Check out our Black or Color Ink Not Printing, Other Print Quality Issues info about: Print quality and Cartridge Issues.

It has been a while since anyone has replied. Simply ask a new question if you would like to start the discussion again.
08-29-2020 01:20 PM
 HP Recommended
Product: Officejet pro 8024
Operating System: Microsoft Windows 10 (64-bit)
Printer was printing fine wirelessly but then stopped printing from my HP Pavilion PC. Prints fine from other devices wirelessly and scans ok from the HP Pavilion wirelessly. Works fine with USB, Have followed every help step and run the print and scan doctor that cannot fix. Error has no number attached, Have deleted and reinstalled software and drivers, stopped print spooler and deleted all files in the print folder, I've turned printer off, pc off and restarted including router but nothing stops the error. Any help Please.
3 REPLIES 3
08-31-2020 05:52 PM
HP Recommended
@mumto3 Welcome to HP Community!
I understand that you are getting an error on the wireless.
Please perform the below steps.
Step 1: Restart your devices
To prepare your printer for a wireless connection, restart the printer, computer, and router.
-
Turn the printer off, and then wait 10 seconds.
-
Disconnect the printer power cord from the printer.
-
Turn off the computer or the device you are trying to print from.
-
Connect the printer power cord to the printer, and then turn on the printer.
-
Disconnect the power cord from your wireless router, and then wait 10 seconds.
-
Reconnect the power cord to the router.
note:
Wait until internet service is restored. Internet service is interrupted while the router is off.
-
Turn on the computer.
Your printer and network are ready to make a new connection. Continue to the next step.
Step 2: Connect the printer to your network
Connect the printer to your network using the HP wireless setup wizard (for printers with a touchscreen control panel), WPS (if supported by your router), or the HP Smart software.
note:You cannot connect to a printer over restricted guest networks, such as those in many hotels and dorm rooms. Instead, connect directly to the printer's Wi-Fi Direct connection, if available.
Connect a printer that has a touchscreen control panel
Use the Wireless Setup Wizard to establish a wireless connection between your printer and network.
-
From the home screen of your printer control panel, touch the Wireless icon
 .
. -
Touch the Setup icon
 .
. -
Touch Restore Network Defaults or Restore Network Settings, and then touch Yes to confirm your selection.
-
After the default network settings are restored, touch the back arrow, touch Wireless Settings, and then touch Wireless Setup Wizard.
The printer searches for available networks.
-
Touch the name of your wireless network.
-
If your wireless network does not display in the list of wireless networks, touch Enter New Network Name, and then type the name of your wireless network.
note:
Type the exact network name, including any uppercase and lowercase letters.
-
Type your network security password (WEP or WPA key), and then touch Done.
If you do not know your network password, go to Find Your Wireless WEP, WPA, WPA2 Password.
Once the printer is connected, the blue Wireless light (or wireless icon on the menu) stops blinking and remains on.
If the printer fails to connect, continue to the next step.
Connect a printer that does not have a touchscreen control panel
Use Wi-Fi Protected Setup (WPS), HP Smart, or temporarily connect a USB cable to establish a wireless connection between your printer and network.
Connect the printer with WPS
Wi-Fi Protected Setup (WPS) is an easy way to connect a Wi-Fi device to a Wi-Fi network that supports WPS.
-
Locate the WPS button on your router, but do not press it yet.
If your router does not support WPS, do not continue with these steps. Use another method such as connecting the printer with HP Smart app.
-
Turn on the printer. If the printer is in sleep mode, press the Cancel button to wake the printer.
-
Press and hold the Wi-Fi button on the printer for 5 seconds. For HP Tango printers, press and hold the Wireless button and Power button at the same time for 5 seconds.
-
On the router, press and hold the WPS button for 3 to 5 seconds or until it shows that the WPS connection process has started.
note:
The printer stops searching for a WPS connection two minutes after the wireless button is pressed. If you were unable to press the WPS button within that timeframe, attempt these steps again.
Once the printer is connected, the blue Wireless light stops blinking and remains on.
If the printer fails to connect to your wireless network, try another method.
Connect the printer with the HP Smart app (Windows 10)
Use the HP Smart app to connect the printer to your wireless network.
-
Make sure your computer is connected to your wireless network.
-
On your computer, download and install the HP Smart app (in English) from the Microsoft store.
-
Turn on the printer.
-
If the printer is in sleep mode, press the Cancel button on the control panel.
-
Reset the printer network settings. Press and hold the Wireless and Cancel buttons until the Power light blinks. Wait until the Wireless light blinks.
Any network settings on the printer are now reset. Your printer remains in setup mode for 2 hours.
note:
For HP Tango printers, press and hold the Wireless button on the back of the printer for 5 seconds. The Edge lighting flashes blue to indicate the printer is in wireless setup mode.
-
On your computer, open HP Smart, and then click the Printer icon
 .
. -
Click Set Up a New Printer, and then click Continue.
HP Smart searches for printers on your wireless network.
-
Select your printer, and then click Continue.
-
When prompted, type the WEP or WPA key (network password).
If you do not know your network password, go to Find Your Wireless WEP, WPA, WPA2 Password.
-
After the printer connects to your wireless network, click Continue, and then click Exit Setup.
Once the printer is connected, the blue Wireless light stops blinking and remains on.
If the printer fails to connect to your wireless network, try another method.
Connect the printer with the HP Smart app (Mac OS X)
Use the HP Smart app to connect the printer to your wireless network.
note:The HP Smart app is only available for select printer models with Mac computers.
-
Make sure your computer is connected to your wireless network.
-
Download and install the HP Smart app.
-
Turn on the printer. If the printer is in sleep mode, press the Cancel button on the control panel.
-
Reset the printer network settings. Press and hold the Wireless and Cancel buttons until the Power light blinks. Wait until the Wireless light blinks.
Any network settings on the printer are now reset. Your printer remains in setup mode for 2 hours.
note:
For HP Tango printers, press and hold the Wireless button on the back of the printer for 5 seconds. The Edge lighting flashes blue to indicate the printer is in wireless setup mode.
-
On your computer, open the HP Smart app.
-
If you are using the HP Smart app for the first time, the app automatically searches for new printers.
-
If you have used the HP Smart app before, click the Printers tab.
-
-
Click Set Up a New Printer, and then click Continue.
HP Smart searches for printers on your wireless network.
-
Select your printer, and then click Continue.
-
When prompted, type the WEP or WPA key (network password).
If you do not know your network password, go to Find Your Wireless WEP, WPA, WPA2 Password.
-
After the printer connects to your wireless network, click Continue, and then click Exit Setup.
Once the printer is connected, the blue Wireless light stops blinking and remains on.
If the printer fails to connect to your wireless network, try another method.
Connect the printer with the HP Smart app (Android mobile device)
Use the HP Smart app to connect the printer to your wireless network.
-
Make sure your Android device is connected to the same wireless network that you want to connect your printer to.
-
Go to 123.hp.com from a browser on your phone or tablet and install the HP Smart app.
-
Turn on the printer. If the printer is in sleep mode, press the Cancel button on the control panel.
-
Reset the printer network settings. Press and hold the Wireless and Cancel buttons until the Power light blinks. Wait until the Wireless light blinks.
Any network settings on the printer are now reset. Your printer remains in setup mode for 2 hours.
note:
For HP Tango printers, press and hold the Wireless button on the back of the printer for 5 seconds. The Edge lighting flashes blue to indicate the printer is in wireless setup mode.
-
Open the HP Smart app, and then tap the Plus sign
 .
. -
Tap Add Printer.
A list of available printers displays.
-
Tap your printer. The printer name contains 'Setup' and the model number, such as HP-Setup>A8-Deskjet 3700 series.
-
Follow the on-screen instructions to type the WEP or WPA key (network password).
If you do not know your network password, go to Find Your Wireless WEP, WPA, WPA2 Password.
-
After the printer connects to your wireless network, you can skip the remaining screens to complete the setup.
Once the printer is connected, the blue Wireless light stops blinking and remains on.
If the printer fails to connect to your wireless network, try another method.
Connect the printer with the HP Smart app (iOS devices)
Use the HP Smart app to connect the printer to your wireless network.
-
Make sure your Apple iOS device is connected to the same wireless network that your printer is connected to, or that you want to connect a new printer to.
-
Go to 123.hp.com from a browser on your phone or tablet and install the HP Smart app.
-
Turn on the printer. If the printer is in sleep mode, press the Cancel button on the control panel.
-
Reset the printer network settings. Press and hold the Wireless and Cancel buttons until the Power light blinks. Wait until the Wireless light blinks.
Any network settings on the printer are now reset. Your printer remains in setup mode for 2 hours.
note:
For HP Tango printers, press and hold the Wireless button on the back of the printer for 5 seconds. The Edge lighting flashes blue to indicate the printer is in wireless setup mode.
-
Open the HP Smart app.
-
If a printer setup notification displays, tap the notification. Otherwise, tap the Plus sign
to add your printer. -
Tap Set Up a New Printer.
-
Press the Home button, and then connect your Apple device to your printer's wireless network.
-
From the home screen on your Apple device, tap Settings, and then tap Wi-Fi.
-
Tap your printer. The printer name contains 'Setup' and the model number, such as HP-Setup>A8-Deskjet 3700 series.
Your Apple device is now on your printer's wireless network.
-
-
Press the Home button, and then tap the HP Smart app.
-
Follow the on-screen instructions to type the WEP or WPA key (network password).
If you do not know your network password, go to Find Your Wireless WEP, WPA, WPA2 Password.
-
After the printer connects to your wireless network, you can skip the remaining screens to complete the setup.
Once the printer is connected, the blue Wireless light stops blinking and remains on.
If the printer fails to connect to your wireless network, try another method.
Connect the printer with a temporary USB connection (Windows)
Temporarily connect the printer to the computer with a USB cable, and then change the connection to wireless in HP Printer Assistant.
-
Search Windows for HP, and then click your printer name from the list of results. If you do not have the printer software installed on your computer, to go 123.hp.com to download and install it.
HP Printer Assistant opens.
-
Click the Utilities tab.
-
Click Printer Setup & Software, and then click Reconfigure Wireless Settings.
-
Follow the on-screen instructions to change the wireless settings.
-
When prompted, connect the USB cable and type the WEP or WPA key (network password).
If you do not know your network password, go to Find Your Wireless WEP, WPA, WPA2 Password (Windows).
Once the printer is connected, the blue Wireless light stops blinking and remains on.
If the printer fails to connect to your wireless network, try another method.
Connect the printer with a temporary USB connection (macOS)
Temporarily connect the printer to the Mac with a USB cable, and then change the connection to wireless in HP Utility.
-
Connect a USB cable to the USB port on the rear of the printer
 and to the computer.
 -
Click the Apple
 menu, and then click System Preferences.
 -
Depending on your OS version, click Print & Scan or Printers & Scanners.
-
Click the Plus sign
 , and then click Add Printer or Scanner.
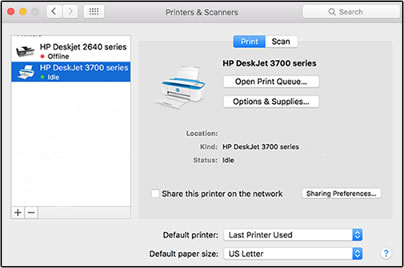
-
Click the name of your printer with USB under Kind.
-
On the Use menu, select the name of your printer, and then click Add.
note:
AirPrint is the default driver. To access all printer features, including HP Utility, select the HP printer name.
-
Click the name of your printer, and then click Options & Supplies.
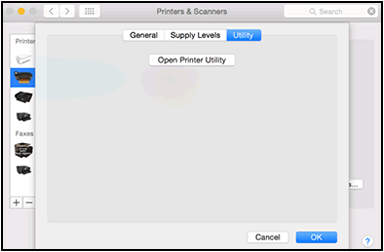
-
Click Utility, and then click Open Printer Utility.
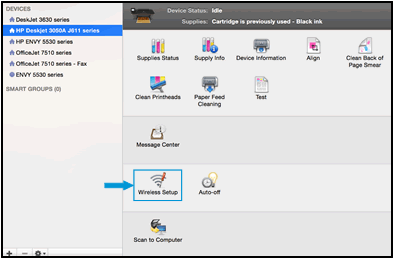
-
In HP Utility, click Wireless Setup.
-
Make sure your network displays on the Confirm Wireless Settings window, and then click Continue to complete the wireless configuration.
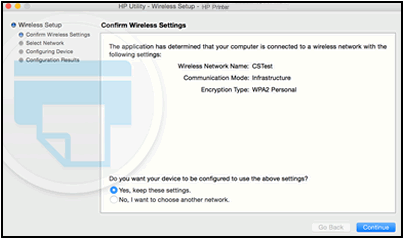
-
If your network does not display on the Confirm Wireless Settings window, connect to the correct network.
-
Select No, I want to choose another network, and then click Continue.
A list of available wireless networks displays.
-
Select your wireless network from the list or type your network SSID in the Wireless Network Name field, and then type your network password in the Password field.
If you do not know your network password, go to Find Your Wireless WEP, WPA, WPA2 Password.
-
Click Continue.
-
-
After the network connection is configured, click Done, and then disconnect the USB cable from the printer and the computer.
Once the printer is connected, the blue Wireless light stops blinking and remains on.
-
In the Printers & Scanners or Print & Scan window, click the name of your printer, click the Minus sign
 , and then delete the USB installed printer.
 -
Click the Plus sign
, and then click Add Printer or Scanner. -
Click the name of your printer with the text Bonjour listed under Kind, click the Use or Print Using box, and then select the name of your printer in the pop-up menu.
-
Click Add to add the printer to the list.
If the printer fails to connect to your wireless network, try another method.
Step 3: Print a Wireless Network Test Report
Go to HP Customer Support, select your printer model, and then search for "Printing Self-Test Pages." Print a Wireless Network Test Report, and then follow any instructions on the report to troubleshoot wireless connectivity problems. For more information, go to Using a Wireless Network Test Report.
If the wireless connection issue persists, go to the HP Wireless Print Center (in English) for more information.
Please refer to the below link as well.
https://support.hp.com/us-en/document/c06184808
Keep us posted,
If you would like to thank us for our efforts to help you,
Give us a virtual high-five by clicking the 'Thumbs Up' icon below, followed by clicking on the "Accept as solution" on this post,
Have a great day!
09-11-2020 10:40 AM
HP Recommended
Ok I have no problem with the printer. The printer will print wirelessly from all other house devices from Android to IOS to chromebooks. Only issue is with my HP Pavillion P since Windows 10 Update 2004, unfortunately, I cannot roll back has its been over 10 days and had no restore points. I have followed all the HP advice of deleting all software and drivers, Disconnected printer router etc deleted printer folder, stopped printer spool but continue to get error. Ran HP print doctor which is unable to fix but will wirelessly print a test sheet and then advises it is a software error and should delete and reinstall the HP printer sodtware. I did this and also removed the printer in devices etc as instructed and did a complete clean install but still not working. It will print with a USB lead attached; Thanks for your reply.
09-11-2020 01:13 PM
HP Recommended
Thanks for replying!
Add the printer using the TCP/IP-
1. Select “Start” and type “printers” in the search box.
2. Choose “Printers & scanners“.
3. elect “Add a printer or scanner“.
4. Wait for the “The printer that I want isn’t listed” option to appear, then select it.
5. Select “Add a printer using a TCP/IP address or hostname” , then select “Next“.
6. select “TCP/IP Device” in the “Device type” list.
7. Type the hostname or the IP address of the printer. Select “Next“. To find the IP address of the printer, touch the Wi-Fi icon on the printer's control panel.
8. Windows should find the printer if the printer is on and configured correctly. You may have to specify more information. If prompted, Select the type of network adapter installed in the printer in the “Device Type” drop-down list. You can also click “Custom” to specify custom settings for the network printer. Select “Next“.
Try printing.
Hope this helps! Keep me posted.
Please click “Accepted Solution” if you feel my post solved your issue, it will help others find the solution. Click the “Kudos/Thumbs Up" on the bottom right to say “Thanks” for helping!
TEJ1602
I am an HP Employee
Be alert for scammers posting fake support phone numbers and/or email addresses on the community.
If you think you have received a fake HP Support message, please report it to us by clicking on "Flag Post".
† The opinions expressed above are the personal opinions of the authors, not of HP. By using this site, you accept the Terms of Use and Rules of Participation.


Didn't find what you were looking for?
Ask the community
† The opinions expressed above are the personal opinions of the authors, not of HP. By using this site, you accept the <a href="https://www8.hp.com/us/en/terms-of-use.html" class="udrlinesmall">Terms of Use</a> and <a href="/t5/custom/page/page-id/hp.rulespage" class="udrlinesmall"> Rules of Participation</a>.