-
×InformationNeed Windows 11 help?Check documents on compatibility, FAQs, upgrade information and available fixes.
Windows 11 Support Center. -
-
×InformationNeed Windows 11 help?Check documents on compatibility, FAQs, upgrade information and available fixes.
Windows 11 Support Center. -
- HP Community
- Printers
- Printing Errors or Lights & Stuck Print Jobs
- Printer cartridge problems

Create an account on the HP Community to personalize your profile and ask a question
08-28-2018 04:59 AM
My printer intermittently refuses to print: error message on printer saying "Ink cartridge problems: the following ink cartridges must be replaced".
On the occasions it does print (after taking cartridges out, putting them back, turning everything off and on etc etc), the print-out is absolutely fine.
I've tried with new cartridges too and still get the same error message.
Any ideas how this can be fixed?
Solved! Go to Solution.
Accepted Solutions
08-29-2018 06:57 AM
Hey there! @Emma34, Thanks for stopping by the HP Support Forums!
I understand you are getting a problem with ink cartridge error on your printer.
Don't worry I'll try to help you out.
Did you make any changes to your printer?
Have you tried checking with a different ink cartridge?
Are you using HP genuine ink cartridge?
Replace low, empty or faulty ink cartridges on your printer.
Try updating the printer firmware and check if it helps.
Update the printer firmware using this link. Click Here
Try few steps recommended below.
Restarting the printer can sometimes resolve an ink cartridge error.
Press the Power button () to turn on the product.
With the product turned on, disconnect the power cord from the rear of the product.
Unplug the power cord from the wall outlet.
Wait at least 15 seconds.
Plug the power cord back into the wall outlet.
Reconnect the power cord to the rear of the product.
If the product does not turn on by itself, press the Power button () to turn it on.
Also, try the steps recommended below.
Follow these steps to make sure that the cartridges are inserted correctly.
-
Press the Power button to turn the printer on, if it is not already on.
-
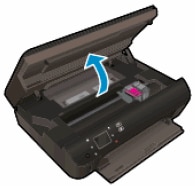
Open the cartridge access door. The carriage moves to the cartridge access area. Wait until the carriage is idle and silent before continuing.
Figure : Open the cartridge access door

-
To release the cartridge, lift the lid on the cartridge slot, and then gently push the lid back until it stops.
-
Pull up on the cartridge to remove it from the slot.
Figure : Remove the cartridge
-
Lift the lid
-
Gently push the lid back
-
Pull up on the cartridge
CAUTION:
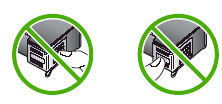
Do not touch the copper-colored contacts or the ink nozzles. Touching these parts can result in clogs, ink failure, and bad electrical connections.
Figure : Do not touch the contacts or nozzle

-
-
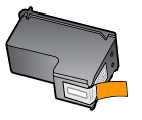
Remove any protective tape that still might be on the nozzles.
Figure : Remove any protective tape that still might be on the nozzles

CAUTION:
Do not try to remove the copper-colored electrical strip.
-
Hold the cartridge at a slight upward angle with the cartridge contacts facing the rear of the printer, and then slide the cartridge into the empty slot.
-
Close the lid on the cartridge slot to secure the cartridge into place.
NOTE:
Insert the color cartridge in the slot on the left. Insert the black cartridge in the slot on the right.
Figure : Insert the cartridge
-
Insert the cartridge
-
Close the lid
-
The color cartridge is on the left, and the black cartridge is on the right
-
-
Repeat the previous steps to remove, and then reinsert the other cartridge.
-
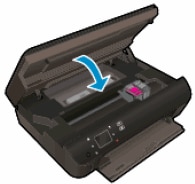
Close the cartridge access door.
Figure : Close the cartridge access door

Refer this article to further troubleshoot ink cartridge issues with your printer. Click Here
If the issue still persists after trying out the steps, It could be an issue with the ink cartridge or the printer itself.
Let me know if this helps!
I hope you have a great day! 🙂
Please click “Accept as Solution” if you feel my post solved your issue, it will help others find the solution.
Click the “Kudos, Thumbs Up" on the bottom right to say “Thanks” for helping!
A4Apollo
I am an HP Employee
08-29-2018 06:57 AM
Hey there! @Emma34, Thanks for stopping by the HP Support Forums!
I understand you are getting a problem with ink cartridge error on your printer.
Don't worry I'll try to help you out.
Did you make any changes to your printer?
Have you tried checking with a different ink cartridge?
Are you using HP genuine ink cartridge?
Replace low, empty or faulty ink cartridges on your printer.
Try updating the printer firmware and check if it helps.
Update the printer firmware using this link. Click Here
Try few steps recommended below.
Restarting the printer can sometimes resolve an ink cartridge error.
Press the Power button () to turn on the product.
With the product turned on, disconnect the power cord from the rear of the product.
Unplug the power cord from the wall outlet.
Wait at least 15 seconds.
Plug the power cord back into the wall outlet.
Reconnect the power cord to the rear of the product.
If the product does not turn on by itself, press the Power button () to turn it on.
Also, try the steps recommended below.
Follow these steps to make sure that the cartridges are inserted correctly.
-
Press the Power button to turn the printer on, if it is not already on.
-
Open the cartridge access door. The carriage moves to the cartridge access area. Wait until the carriage is idle and silent before continuing.
Figure : Open the cartridge access door

-
To release the cartridge, lift the lid on the cartridge slot, and then gently push the lid back until it stops.
-
Pull up on the cartridge to remove it from the slot.
Figure : Remove the cartridge
-
Lift the lid
-
Gently push the lid back
-
Pull up on the cartridge
CAUTION:
Do not touch the copper-colored contacts or the ink nozzles. Touching these parts can result in clogs, ink failure, and bad electrical connections.
Figure : Do not touch the contacts or nozzle

-
-
Remove any protective tape that still might be on the nozzles.
Figure : Remove any protective tape that still might be on the nozzles

CAUTION:
Do not try to remove the copper-colored electrical strip.
-
Hold the cartridge at a slight upward angle with the cartridge contacts facing the rear of the printer, and then slide the cartridge into the empty slot.
-
Close the lid on the cartridge slot to secure the cartridge into place.
NOTE:
Insert the color cartridge in the slot on the left. Insert the black cartridge in the slot on the right.
Figure : Insert the cartridge
-
Insert the cartridge
-
Close the lid
-
The color cartridge is on the left, and the black cartridge is on the right
-
-
Repeat the previous steps to remove, and then reinsert the other cartridge.
-
Close the cartridge access door.
Figure : Close the cartridge access door

Refer this article to further troubleshoot ink cartridge issues with your printer. Click Here
If the issue still persists after trying out the steps, It could be an issue with the ink cartridge or the printer itself.
Let me know if this helps!
I hope you have a great day! 🙂
Please click “Accept as Solution” if you feel my post solved your issue, it will help others find the solution.
Click the “Kudos, Thumbs Up" on the bottom right to say “Thanks” for helping!
A4Apollo
I am an HP Employee
09-01-2018 02:23 PM
I read the post. Thanks for the response. It is great to have you back and your efforts are appreciated. As @A4Apollo is out for the day, I am responding on his behalf. It looks like a hardware issue. I will send you a private message to assist you with the next course of action. Check your forum private message box in the upper right corner next to the bell icon.
Thanks and have a great day ahead.
DavidSMP
I am an HP Employee
