• ×
    Information
    Need Windows 11 help?
    Check documents on compatibility, FAQs, upgrade information and available fixes.
    Windows 11 Support Center.
  • post a message
  • ×
    Information
    Need Windows 11 help?
    Check documents on compatibility, FAQs, upgrade information and available fixes.
    Windows 11 Support Center.
  • post a message
Guidelines
Join the HP Community Solve‑a‑thon | Help Others & Share Your Solutions | Live on Zoom | 2:30 PM to 2:30 AM IST | Every Wednesday Click here to know more
Check some of the most frequent questions about Instant Ink: HP INSTANT INK, HP+ PLANS: INK AND TONER.


Check out our Black or Color Ink Not Printing, Other Print Quality Issues info about: Print quality and Cartridge Issues.
HP Recommended
Envy 5642

I use original cartridge, 1 black, 1 combined colours.

They are both Ok, and quite new.

The colours work well, but the black is very faded, and not easy to read

1 REPLY 1
HP Recommended

Hi! @Jette16, Thanks for stopping by the HP Support Forums!


I understand when you print from your printer the black ink is faded.


Don't worry I'll try to help you out.


Did you make any changes to your printer?


Have you tried printing using a different ink cartridge?


Does the issue persist when you make a copy from your printer?


Have you tried printing from a different application? Does the issue persist?


Please share the operating system you are running on your PC to assist you better.


Splendid analysis and remarkable patience shown. It is immensely appreciated.


Replace low, empty or faulty ink cartridges on your printer.


Try printing a Print Quality Diagnostic report and check if the issue persists.


If the copy works fine uninstall the printer software from root level on your PC and install the full feature printer software and check if it helps. (Windows Only)


In Windows, search for and open Programs and Features.

Select your HP printer.

Select Uninstall.

In Windows, search for and open Devices and Printers.

In the Devices and Printers window look for your HP Printer. If you see it listed, right-click on it and choose "Delete" or "Remove Device.”

Open up the run command with the "Windows Key + R" key combo.

Type printui.exe /s and click OK.

Click on Drivers tab.

Look for HP Printer driver. If you see it click on it and click remove at the bottom.

Select OK.

Select Apply and OK on the Print Server Properties windows.

Close Devices and Printers.


Update the full feature printer software using this link. Click Here


Try the steps recommended below.


Align the printer

For the best print quality, align the ink cartridges.

  1. Load plain white paper in the paper tray.

  2. On the printer control panel, touch the Settings icon .

  3. Touch Tools, and then touch the Down Arrow  once.

  4. Touch Align Printer.

    The printer prints a test page, and then prompts you to scan the page.

  5. Lift the scanner lid, and then place the page on the glass according to the instructions on the alignment page.

  6. Close the scanner lid, and then touch OK.

Print another Print Quality Diagnostic report, and examine the page.


Clean the area around the ink nozzles.

  1. Gather the following materials:

    • Dry foam-rubber swabs, lint-free cloth, or any soft material that does not come apart or leave fibers (coffee filters work well)

    • Distilled, filtered, or bottled water (tap water might contain contaminants that can damage the ink cartridges)

         CAUTION:

      Do not use platen cleaners or alcohol to clean the area. These can damage the ink cartridge or the printer.

  2. Make sure the printer is on.

  3. Open the scanner lid.

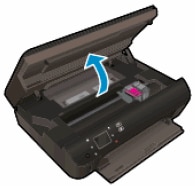
  4. Open the ink cartridge access door.

    The carriage moves to the ink cartridge access area.

    Figure : Open the cartridge access door

    Image: Open the cartridge access door.
  5. Wait until the carriage is idle and silent before continuing.

  6. To release the ink cartridge, lift the lid on the ink cartridge slot, and then gently push the lid back until it stops.

  7. Pull up on the ink cartridge to remove it from the slot.

    Figure : Remove the ink cartridge

    1. Lift the lid

    2. Gently push the lid back

    3. Pull up on the ink cartridge

       CAUTION:

    Do not remove both ink cartridges at the same time. Remove and clean each ink cartridge one at a time. Do not leave an ink cartridge outside the printer for more than 30 minutes.

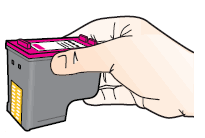
  8. Hold the ink cartridge by its sides.

    Figure : Hold the ink cartridge by its sides

    Image: Hold the ink cartridge by its sides.
  9. Inspect the ink cartridge contacts for ink and debris buildup.

       CAUTION:

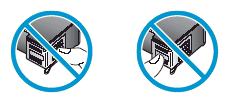
    Do not touch the copper-colored contacts or the ink nozzles. Touching these parts can result in clogs, ink failure, and bad electrical connections.

    Figure : Do not touch the contacts or nozzles

    Image: Do not touch the contacts or nozzles.
  10. Lightly moisten a clean, foam-rubber swab with distilled water, and then squeeze any excess water from it.

  11. Clean the face and edges around the ink nozzle with the swab.

       CAUTION:

    Do not clean the ink nozzle plate.

    Figure : Clean the area around the ink nozzle

    1. Nozzle plate - Do not clean

    2. Area surrounding ink nozzle - Do clean

    3. Ink cartridge contacts - Do not clean

  12. Either let the ink cartridge sit for 10 minutes to allow the cleaned area to dry, or use a new swab to dry it.

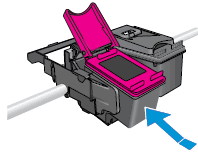
  13. Hold the ink cartridge at a slight upward angle with the ink cartridge contacts facing the rear of the printer, and then slide the ink cartridge into the empty slot.

    Figure : Reinstall the ink cartridge

    Image: Reinstall the ink cartridge.
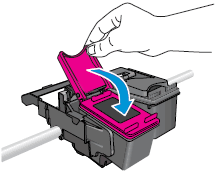
  14. Close the ink cartridge lid to secure the ink cartridge into place.

    Figure : Close the ink cartridge lid

    Image: Close the ink cartridge lid.
  15. Repeat these steps to clean the area surrounding the ink nozzle on the other ink cartridge.

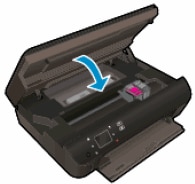
  16. Close the ink cartridge access door.

    Figure : Close the ink cartridge access door

    Image: Close the ink cartridge access door.
  17. Close the scanner lid.

  18. Try printing again.


Refer this article to further troubleshoot print quality issues with your printer. Click Here


Let me know if this helps!

Have a wonderful day ahead! 🙂


Please click “Accept as Solution” if you feel my post solved your issue, it will help others find the solution.

Click the “Kudos, Thumbs Up" on the bottom right to say “Thanks” for helping!

A4Apollo
I am an HP Employee

† The opinions expressed above are the personal opinions of the authors, not of HP. By using this site, you accept the <a href="https://www8.hp.com/us/en/terms-of-use.html" class="udrlinesmall">Terms of Use</a> and <a href="/t5/custom/page/page-id/hp.rulespage" class="udrlinesmall"> Rules of Participation</a>.