-
×InformationNeed Windows 11 help?Check documents on compatibility, FAQs, upgrade information and available fixes.
Windows 11 Support Center. -
-
×InformationNeed Windows 11 help?Check documents on compatibility, FAQs, upgrade information and available fixes.
Windows 11 Support Center. -
- HP Community
- Printers
- Printing Errors or Lights & Stuck Print Jobs
- Printer skips lines in text

Create an account on the HP Community to personalize your profile and ask a question
06-05-2018 03:16 PM
The issue you are described would generally be caused by a defective cartridge, or by an electrical connection issue between the printer and cartridge. You might try cleaning the cartridge contacts on the cartridge and printer as described here:
Clean the cartridge electrical contacts
Follow these steps in the order presented to clean the electrical contacts on the cartridges and inside the printer.
- Gather the following materials:
- Dry foam rubber swabs, lint-free cloth, or any soft material that will not come apart or leave fibers (coffee filters work well)
- Distilled, filtered, or bottled water (tap water might contain contaminants that can damage the print cartridges)
CAUTION:
Do not use platen cleaners or alcohol to clean the cartridge contacts. These can damage the cartridge or the printer.
- Press the Power button to turn on the printer, if it is not already on.
- Open the cartridge access door. The carriage moves to the center of the printer.Figure : Open the cartridge access door
 Figure : The carriage at the center of the printer
- Wait until the printer is idle and silent, and then disconnect the power cord from the rear of the printer.
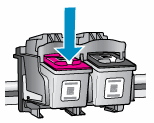
- Lightly press down on a cartridge to release it from its slot, and then pull the cartridge out to remove it from its slot.Figure : Press down on the cartridge

CAUTION:
Do not remove both cartridges at the same time. Remove and clean each cartridge one at a time. Do not leave a cartridge outside the printer for more than 30 minutes. - Hold the cartridge by its sides.
- Dip a clean foam rubber swab or lint-free cloth into distilled water, and then squeeze any excess water from it.
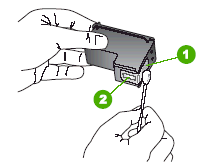
- Clean the copper-colored electrical contacts.
CAUTION:
Do not clean the ink nozzles on the bottom of the cartridge.Figure : Clean the contacts
- Copper-colored contacts
- Ink nozzles (do not clean)
- Allow the contacts to dry for about 10 minutes.
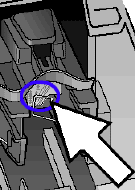
- Clean the contacts in the carriage inside the printer.Figure : Clean the carriage contacts

- Either let the carriage contacts sit for 10 minutes to allow the cleaned area to dry, or use a new swab to dry it.
- Hold the cartridge by its sides.
CAUTION:
Do not touch the cartridge contacts or nozzles.Figure : Do not touch the contacts or nozzles
- Slide the cartridge into its designated slot. The black parallelogram icon (
 ) designates the slot for the black cartridge, and the magenta half circle icon (
 ) designates the slot for the color cartridge.Figure : Insert the cartridge
 The cartridge rests in its slot at a slightly upward angle.
 - Repeat these steps to clean the contacts on the other cartridge.
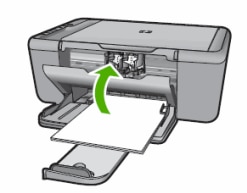
- When both cartridges are clean and reinserted, close the cartridge access door.Figure : Close the cartridge access door

- Reconnect the power cord to the rear of the printer.
- Press the Power button to turn on the printer.
- Load plain white paper in the tray.
- On the printer control panel, press and hold the Paper Type button and the Resize to Fit button at the same time.Figure : Press the Paper Type and Resize to Fit buttons

- Paper Type button
- Resize to Fit button
- Release both buttons at the same time. The printer prints a Printer Status Report.
If the above does not resolve the issue and the cartridge is a genuine HP (not refill or reman) the cartridges do have a warranty, see the document here for information. To get warranty coverage you will need to go to the Contact HP page, then enter the information for your printer. At this point it will likely say "Manufacturer's warranty has expired" To the right of this it will say "See details". Click the "See details" link, which will open another page with more details. Near the bottom of the text will be a paragraph that says:
HP has checked your product information, including the product and serial numbers, to determine your warranty results.The legal warranty expiration date is based on the date of purchase, as indicated on your receipt. If you feel these results are incorrect, you may submit a dispute for review. Dispute this >
Click on the "Dispute this" link which will ask for some additional contact information. Fill out the contact information, then in the bottom section select:
Dispute reason
I am not an employee of HP, I am a volunteer posting here on my own time.
If your problem is solved please click the "Accept as Solution" button
If my answer was helpful please click "Yes" to the "Was this post helpful" question.
