-
×InformationNeed Windows 11 help?Check documents on compatibility, FAQs, upgrade information and available fixes.
Windows 11 Support Center. -
-
×InformationNeed Windows 11 help?Check documents on compatibility, FAQs, upgrade information and available fixes.
Windows 11 Support Center. -
- HP Community
- Printers
- Printing Errors or Lights & Stuck Print Jobs
- Remove and Reinstall Ink Cartridge Message

Create an account on the HP Community to personalize your profile and ask a question
Your account also allows you to connect with HP support faster, access a personal dashboard to manage all of your devices in one place, view warranty information, case status and more.
Check some of the most frequent questions about Instant Ink: HP INSTANT INK, HP+ PLANS: INK AND TONER.
Check out our Black or Color Ink Not Printing, Other Print Quality Issues info about: Print quality and Cartridge Issues.

It has been a while since anyone has replied. Simply ask a new question if you would like to start the discussion again.
11-16-2018
07:57 PM
- last edited on
11-17-2018
08:09 AM
by
![]() rick-s
rick-s
 HP Recommended
Hi G. I have the exact same problem with my HP printer 4650 but with the volor cartridge. I have tried removing and reinstalling the cartridge, cleaning it , turning off the printer and all ,but it did not help . could you please order new replacement for my color cartridge? I appreciate that.
Solved! Go to Solution.
1 ACCEPTED SOLUTION
Accepted Solutions
11-17-2018 08:17 AM - edited 11-17-2018 08:18 AM
HP Recommended
Hi! @Yazdi, Welcome to HP forums.
I understand you are getting remove and reinstall the indicated ink cartridge error on your printer.
Don't worry I'll try to help you out.
Did you make any changes to your printer?
Does the issue persist when you make a copy from your printer?
Have you installed full feature printer software on your PC?
Have you tried printing from a different application?
Have you tried printing using a different ink cartridge?
Are you enrolled in the instant ink program?
Are you using regular ink cartridges or Instant ink cartridges on your printer?
Please share the product number of your PC to assist you better.
Splendid analysis and remarkable patience shown. It is immensely appreciated.
Check the ink levels on your printer and replace the low, empty or faulty ink cartridges.
Clean the electrical contacts on the ink cartridges.
Remove, inspect, then reseat the ink cartridges
The printer might display an error if the ink cartridges are not correctly installed.
NOTE:
If you are enrolled in the HP Instant Ink program, you receive special HP Instant Ink cartridges. Some HP Instant Ink cartridges are larger than standard ink cartridges, but they fit in the carriage in the same way. HP Instant Ink is not available in all countries/regions or for all printer models. For more information, go to HP Instant Ink.
Standard ink cartridge
HP Instant Ink cartridge
Turn on the printer, if it is not on already.
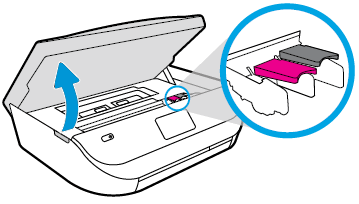
Gently grasp the handles on either side of the printer, then raise the ink cartridge access door until it locks into place.
The carriage moves to the center of the printer.
Figure : Opening the ink cartridge access door
Wait until the carriage is idle and silent before you proceed.
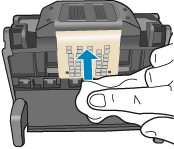
To release the ink cartridge, lift the lid on the ink cartridge slot, then gently push the lid back until it stops.
Pull up on the ink cartridge to remove it from the slot.
Figure : Removing the ink cartridge
Lift the lid
Gently push the lid back
Pull up on the ink cartridge
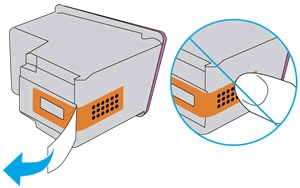
Inspect the contacts for any protective tape that still might be on the nozzles.
CAUTION:
Do not touch the copper-colored contacts or the ink nozzles. Touching these parts can result in clogs, ink failure, and bad electrical connections.
Remove the protective tape from the contacts, if necessary.
CAUTION:
Do not try to remove the copper electrical strip.
Figure : Removing the plastic tape
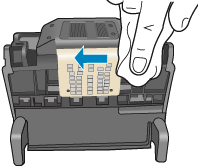
Hold the ink cartridge by its sides with the nozzles toward the printer, then slide the ink cartridge forward into the slot.
Close the lid on the ink cartridge slot to secure the ink cartridge into place.
Figure : Inserting the ink cartridges
Insert the ink cartridge
Close the lid
The color ink cartridge is on the left, and the black ink cartridge is on the right
Repeat the previous steps to remove, inspect, and reseat the other ink cartridge, if necessary.
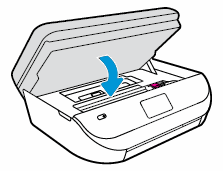
Close the ink cartridge access door.
Figure : Closing the ink cartridge access door.
Refer this article to further troubleshoot ink cartridge errors on your printer. Click Here
If the issue still persists after trying out the steps. Please share few details in a private message, So I can check the account details and ship you the replacement ink cartridges.
Instant ink account number-
Instant ink email address-
Printer serial number-
Cartridges needed (Colour or Black)-
Let me know if this helps!
Have a beautiful day ahead! 🙂
Please click “Accept as Solution” if you feel my post solved your issue, it will help others find the solution.
Click the “Kudos, Thumbs Up" on the bottom right to say “Thanks” for helping!
A4Apollo
I am an HP Employee
7 REPLIES 7
11-17-2018 08:17 AM - edited 11-17-2018 08:18 AM
HP Recommended
Hi! @Yazdi, Welcome to HP forums.
I understand you are getting remove and reinstall the indicated ink cartridge error on your printer.
Don't worry I'll try to help you out.
Did you make any changes to your printer?
Does the issue persist when you make a copy from your printer?
Have you installed full feature printer software on your PC?
Have you tried printing from a different application?
Have you tried printing using a different ink cartridge?
Are you enrolled in the instant ink program?
Are you using regular ink cartridges or Instant ink cartridges on your printer?
Please share the product number of your PC to assist you better.
Splendid analysis and remarkable patience shown. It is immensely appreciated.
Check the ink levels on your printer and replace the low, empty or faulty ink cartridges.
Clean the electrical contacts on the ink cartridges.
Remove, inspect, then reseat the ink cartridges
The printer might display an error if the ink cartridges are not correctly installed.
NOTE:
If you are enrolled in the HP Instant Ink program, you receive special HP Instant Ink cartridges. Some HP Instant Ink cartridges are larger than standard ink cartridges, but they fit in the carriage in the same way. HP Instant Ink is not available in all countries/regions or for all printer models. For more information, go to HP Instant Ink.
Standard ink cartridge
HP Instant Ink cartridge
Turn on the printer, if it is not on already.
Gently grasp the handles on either side of the printer, then raise the ink cartridge access door until it locks into place.
The carriage moves to the center of the printer.
Figure : Opening the ink cartridge access door
Wait until the carriage is idle and silent before you proceed.
To release the ink cartridge, lift the lid on the ink cartridge slot, then gently push the lid back until it stops.
Pull up on the ink cartridge to remove it from the slot.
Figure : Removing the ink cartridge
Lift the lid
Gently push the lid back
Pull up on the ink cartridge
Inspect the contacts for any protective tape that still might be on the nozzles.
CAUTION:
Do not touch the copper-colored contacts or the ink nozzles. Touching these parts can result in clogs, ink failure, and bad electrical connections.
Remove the protective tape from the contacts, if necessary.
CAUTION:
Do not try to remove the copper electrical strip.
Figure : Removing the plastic tape
Hold the ink cartridge by its sides with the nozzles toward the printer, then slide the ink cartridge forward into the slot.
Close the lid on the ink cartridge slot to secure the ink cartridge into place.
Figure : Inserting the ink cartridges
Insert the ink cartridge
Close the lid
The color ink cartridge is on the left, and the black ink cartridge is on the right
Repeat the previous steps to remove, inspect, and reseat the other ink cartridge, if necessary.
Close the ink cartridge access door.
Figure : Closing the ink cartridge access door.
Refer this article to further troubleshoot ink cartridge errors on your printer. Click Here
If the issue still persists after trying out the steps. Please share few details in a private message, So I can check the account details and ship you the replacement ink cartridges.
Instant ink account number-
Instant ink email address-
Printer serial number-
Cartridges needed (Colour or Black)-
Let me know if this helps!
Have a beautiful day ahead! 🙂
Please click “Accept as Solution” if you feel my post solved your issue, it will help others find the solution.
Click the “Kudos, Thumbs Up" on the bottom right to say “Thanks” for helping!
A4Apollo
I am an HP Employee
11-17-2018 10:07 AM
HP Recommended
Iremoved and replaced all color cartridges except balck.
Unfortuately, I released the gray lever in error while replaceing the cartridges.
My printer indictes a damaged print head or missing crtridges.
Model Officejet 6500, model E709n.
11-17-2018 01:08 PM
HP Recommended
@seeknova, thanks for your quick response and time.
I appriciate your efforts for writing back to us.
As you mentioned you released the grey lever while replacing the ink cartridges and you are getting missing or failed printhead.
Remove, clean, and then reinstall the printhead
-
Press the Power button to turn on the printer, if it is not already on.
-
Open the cartridge access door.
-
Remove all the cartridges and place them on a piece of paper with the ink opening pointing up.
NOTE:
Do not leave the cartridge outside of the printer longer than 30 minutes. This could damage both the printer and the cartridges.
Figure : Remove the cartridges

-
Lift the latch handle on the print carriage until it stops.
Figure : Lift the latch handle

-
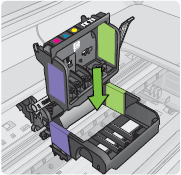
Lift up to remove the printhead.
Figure : Remove the printhead

-
Clean the printhead.
There are three areas of the printhead to clean: the plastic ramps on both sides of the ink nozzles, the edge between the nozzles, and the electrical contacts.
Figure : Three areas to clean
-
Plastic ramps on the sides of the nozzles
-
Edge between nozzles and contacts
-
Electrical contacts
CAUTION:
Do not touch the nozzles. Do not touch the electrical contact areas with your fingers. Touch the electrical contact areas only with cleaning materials.
To clean the printhead, follow these steps:
-
Gather cleaning materials:
-
Clean, lint-free cloth or paper (Coffee filters and eye-glass cleaning cloth work well.)
-
Distilled or bottled water
-
-
Lightly dampen a clean, lint-free cloth, and then wipe the electrical contact area from the bottom to the top. Do not clean beyond the edge between the nozzles and the electrical contacts. Clean until no new ink shows on the cloth.
Figure : Clean the printhead contacts
-
Use a fresh, lightly dampened, lint-free cloth to wipe any accumulated ink and debris from the edge between the nozzles and the contacts.
Figure : Clean the edge of the printhead
-
Use a fresh, lightly dampened, lint-free cloth to wipe the plastic ramps on both sides of the nozzles. Wipe away from the nozzles.
Figure : Clean the printhead ramps

-
Wipe the previously cleaned areas dry with a dry lint-free cloth before you proceed to the next step.
-
-
Clean the electrical contacts inside the printer:
-
Lightly dampen a clean, lint-free cloth with bottled or distilled water.
-
To clean the electrical contacts in the printer, wipe with the cloth from top to bottom. Use as many fresh, clean cloths as necessary. Clean until no ink shows on the cloth.
Figure : Clean contacts inside the printer

-
Wipe the area dry with a dry lint-free cloth before you proceed to the next step.
-
-
Make sure that the latch handle is up, and then install the printhead.
Figure : Install the printhead
-
Carefully lower the latch handle.
CAUTION:
Make sure that you lower the latch handle before you install the cartridges. If the latch handle remains raised, incorrectly seated cartridges and printer problems can occur.
Figure : Lower the latch handle

-
Use the colored shaped icons for a guide, and then slide each cartridge into its empty slot until it snaps securely into place.
Figure : Reinsert the cartridges

-
Close the cartridge access door.
Refer this article to further troubleshoot printhead issues with your printer. Click Here
If the issue still persists after trying out the steps. It is a hardware issue with your printer.
Let me know if this helps!
Take Care! 🙂
Please click “Accept as Solution” if you feel my post solved your issue, it will help others find the solution.
Click the “Kudos, Thumbs Up" on the bottom right to say “Thanks” for helping!
A4Apollo
I am an HP Employee
12-15-2018 01:33 PM
HP Recommended
Make sure both cartridges have ink. I don't use/need color printing, and color cartridge was empty. Printer worked for a while that way, but then this message appeared. Didn't say which cartridge was the problem. Replaced color cartridge and printer began working fine. Printer apparently will not work unless both cartridges have ink., even if you only use one. Also, cannot replace color cartridge with black one.
05-20-2019 07:24 AM
HP Recommended
After having installed update from HP, I continually get message to remove and reinstall my color 64XL ink cartridge in my HPP ENVY Photo Printer. No mattter what I don, including cleaning the cartridge, turning the printer off and then on again, the message continues!
Be alert for scammers posting fake support phone numbers and/or email addresses on the community.
If you think you have received a fake HP Support message, please report it to us by clicking on "Flag Post".
† The opinions expressed above are the personal opinions of the authors, not of HP. By using this site, you accept the Terms of Use and Rules of Participation.


Didn't find what you were looking for?
Ask the community
† The opinions expressed above are the personal opinions of the authors, not of HP. By using this site, you accept the <a href="https://www8.hp.com/us/en/terms-of-use.html" class="udrlinesmall">Terms of Use</a> and <a href="/t5/custom/page/page-id/hp.rulespage" class="udrlinesmall"> Rules of Participation</a>.