Guidelines
Experiencing 'Printer Blocked' or 'Printer Error' message? Click here for more information.
Check some of the most frequent questions about Instant Ink: HP INSTANT INK, HP+ PLANS: INK AND TONER.


Check out our Black or Color Ink Not Printing, Other Print Quality Issues info about: Print quality and Cartridge Issues.
HP Recommended
HP Envy 4516
Mac OS X 10.9 Mavericks

Message won't go away even after re-filling ink, using proper hp cartridges:


"Remove and install the indicated ink cartridge, making sure it is correctly installed."


I've removed and re-installed both the colour and black ink cartridges several times. At times it printed, but lately it doesn't at all. There is definitely ink in the cartridges themselves. Started to occur approximately 1 month ago.


Wondering if it's a software issue now! I've updated to the latest driver but still no resolution.


Any help would be appreciated, thx!

5 REPLIES 5
HP Recommended

The troubleshooting steps in the document here may help resolve the cartridge error on your Envy 4516.  I would suggest cleaning the printer and cartridge contacts as shown in step 3:


Step 3: Clean the electrical contacts
 
The printer might display an ink cartridge error if the ink cartridge contacts are dirty.
  1. Gather the following materials:
    • Dry foam-rubber swabs, lint-free cloth, or any soft material that does not come apart or leave fibers (coffee filters work well)
    • Distilled, filtered, or bottled water (tap water might contain contaminants that can damage the ink cartridges)
         CAUTION:
      Do not use platen cleaners or alcohol to clean the ink cartridge contacts. These can damage the ink cartridge or the printer.
  2. Turn on the printer, if it is not on already.
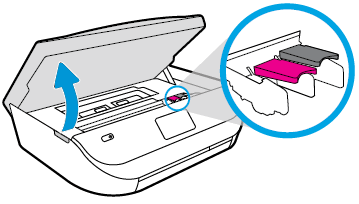
  3. Gently grasp the handles on either side of the printer, then raise the ink cartridge access door until it locks into place.
    The carriage moves to the center of the printer.
    Figure : Opening the ink cartridge access door
    Image: Opening the ink cartridge access door.
  4. Wait until the printer is idle and silent before you continue.
  5. Disconnect the power cord from the rear of the printer.
  6. Disconnect the USB cable, if it is connected.
  7. To release the ink cartridge, lift the lid on the ink cartridge slot, then gently push the lid back until it stops.
  8. Pull up on the ink cartridge to remove it from the slot.
       CAUTION:
    Do not remove both ink cartridges at the same time. Remove and then clean each ink cartridge one at a time. Do not leave an ink cartridge outside the printer for more than 30 minutes.
    Figure : Removing the ink cartridge
    Image: Removing the ink cartridge.
    1. Lift the lid
    2. Gently push the lid back
    3. Pull up on the ink cartridge
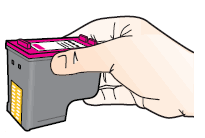
  9. Hold the ink cartridge by its sides.
    Figure : Hold the ink cartridge by its sides
    Image:  Hold the ink cartridge by its sides
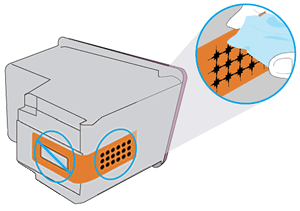
  10. Inspect the contacts for ink and debris buildup.
       CAUTION:
    Do not touch the copper-colored contacts or the ink nozzles. Touching these parts can result in clogs, ink failure, and bad electrical connections.
    Figure : Do not touch the contacts or nozzles
    Image: Do not touch the contacts or nozzles
  11. Wipe the contacts with a dry swab or other lint-free material until no debris remains on them.
       CAUTION:
    Be careful to wipe only the contacts. Do not smear any ink or debris elsewhere on the ink cartridge.
  12. Dip a clean foam-rubber swab or lint-free cloth into distilled water, then squeeze any excess water from it.
  13. Clean only the copper-colored contacts, then allow the ink cartridge to dry for approximately 10 minutes.
    Figure : Clean the contacts
    Image: Clean the contacts
  14. Lightly moisten another foam-rubber swab with distilled water, then squeeze any excess water from the swab.
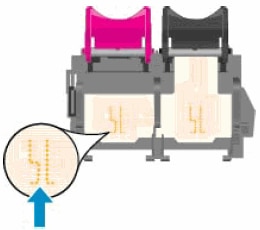
  15. Use the swab to clean the electrical contacts in the carriage, located inside the printer.
  16. Clean the carriage contacts.
    Figure : The carriage contacts
    Image: The carriage contacts
  17. Let the ink cartridge sit for 10 minutes to allow the cleaned area to dry, or use a new swab to dry it.
  18. Hold the ink cartridge by its sides with the nozzles toward the printer, then slide the ink cartridge forward into the slot.
  19. Close the lid on the ink cartridge slot to secure the ink cartridge into place.
    Figure : Inserting the ink cartridges
    Image: Inserting the ink cartridges
    1. Insert the ink cartridge
    2. Close the lid
    3. The color ink cartridge is on the left, and the black ink cartridge is on the right
  20. Repeat these steps to clean, then reinsert the other ink cartridge.
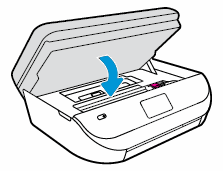
  21. Close the ink cartridge access door.
    Figure : Closing the ink cartridge access door.
    Image: Closing the ink cartridge access door.
  22. Reconnect the power cord to the rear of the printer.
  23. Reconnect the USB cable, if you previously disconnected it.
  24. Turn on the printer if it does not turn on automatically.
    If the error persists, continue to the next step.

Bob Headrick,  HP Expert

I am not an employee of HP, I am a volunteer posting here on my own time.

If your problem is solved please click the "Accept as Solution" button 

If my answer was helpful please click "Yes" to the "Was this post helpful" question.


HP Recommended

Thx kindly for the reply Bob!


I've tried the other steps (unplugging/replugging) found in that document but I haven't tried the cleaning contacts yet (admittedly, a little tied up at the moment).


Does this usually resolve the issue in your experience or will I be wasting my time here, needing to get it looked at by a pro instead? I've had the printer for less than a year and use it very infrequently.


Cheers!

HP Recommended

Cleaning the cartridge and printer contacts will liklely resolve the issue, unless the cartridge is defective.  If the cartridige is defective it would need to be replaced.  It is not likely the printer is at fault.  


The cartridge and printer contact cleaning can be done in five minutes or less.  If you do not have foam Q-tips you can use a lint free wipe - a clean damp coffee filter would work.


Bob Headrick,  HP Expert

I am not an employee of HP, I am a volunteer posting here on my own time.

If your problem is solved please click the "Accept as Solution" button 

If my answer was helpful please click "Yes" to the "Was this post helpful" question.


HP Recommended

Thx Bob - I will give it a try and let you know!

HP Recommended

Soooo...I tried all the steps in the troubleshooting guide to fix this issue and none of them worked. Cleaning the contacts,  as was recommended, did not make the issue go away and my printer is now unusable after less than 2 years of moderate use.


I called HP customer support which ended up being in India. The rep asked me if I follwed all the steps, such as wiping the contacts with paper towel and tap water. I had to correct him and refer him to the guide that warns against using tap water and things like paper towels which can leave lint that damages the contacts. What kind of customer support is this?


Further to that, since my warranty was expired, his only solution was to to try and sell me a re-furbished HP printer for more than what I paid my original Envy 4516. Why should I have to pay for a used printer that replaces a relatively new and moderately-used printer which is clearly defective? 


I'm bemused by HP's lack of "service" and doubly as disappointed with the product itself.


† The opinions expressed above are the personal opinions of the authors, not of HP. By using this site, you accept the <a href="https://www8.hp.com/us/en/terms-of-use.html" class="udrlinesmall">Terms of Use</a> and <a href="/t5/custom/page/page-id/hp.rulespage" class="udrlinesmall"> Rules of Participation</a>.