-
×InformationNeed Windows 11 help?Check documents on compatibility, FAQs, upgrade information and available fixes.
Windows 11 Support Center. -
-
×InformationNeed Windows 11 help?Check documents on compatibility, FAQs, upgrade information and available fixes.
Windows 11 Support Center. -
- HP Community
- Printers
- Printing Errors or Lights & Stuck Print Jobs
- Stampante multifunzione HP Photosmart Plus - B209c

Create an account on the HP Community to personalize your profile and ask a question
Your account also allows you to connect with HP support faster, access a personal dashboard to manage all of your devices in one place, view warranty information, case status and more.
Check some of the most frequent questions about Instant Ink: HP INSTANT INK, HP+ PLANS: INK AND TONER.
Check out our Black or Color Ink Not Printing, Other Print Quality Issues info about: Print quality and Cartridge Issues.

It has been a while since anyone has replied. Simply ask a new question if you would like to start the discussion again.
07-15-2019 08:38 AM
 HP Recommended
Product: Stampante multifunzione HP Photosmart Plus - B209c
Operating System: Microsoft Windows 7 (64-bit)
Salve ho una Stampante multifunzione HP Photosmart Plus - B209c non stampa più il nero ho provato tutte le procedure riportate sul sito ma nulla. Non riesco a trovare una soluzione.
Solved! Go to Solution.
1 ACCEPTED SOLUTION
6 REPLIES 6
07-15-2019 09:29 AM
HP Recommended
Thank you for visiting our English HP Support Community. We are only able to reply to posts written in English. To insure a quick response it would be advisable to post your question in English. The following links are here to assist you if you prefer to post in the following Language Community.
German: HP Gemeinschaft
Spanish: HP Comunidad
French: HP Communauté
Portuguese: HP Comunidade
Chinese: HP 社区
Korean: HP 커뮤니티
Thank you for your understanding
I work on behalf of HP
07-16-2019 01:39 PM
HP Recommended
Welcome to HP support community.
Did you make a copy and check if that prints in black?
If it does not print in black, follow the below steps:
Clean the printhead
-
Load plain white paper into the input tray.
-
From the Home screen on the printer control panel, touch the right arrow
 .
. -
Touch Setup.
-
Touch the down arrow
 , and then touch Tools.
 -
Touch the down arrow
, and then touch Clean Printhead.The printer cleans the printhead, and then prints a test page.
-
Evaluate the test page for print quality.
Figure : Example of a Print Quality Diagnostic Report

-
If the print quality on the test page is satisfactory, touch No to return to the current print job.
-
If the print quality on the test page is unsatisfactory, touch Yes to perform a secondary cleaning of the printhead.
-
Make sure the ink cartridges are properly vented and seated correctly
-
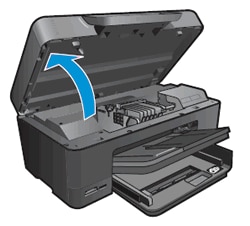
Lift to open the ink cartridge access door.
The carriage moves into the carriage access area.
Figure : Opening the ink cartridge access door
-
Wait until the carriage is idle and silent before you continue.
-
Press the tab on the front of the ink cartridge inward to release it, and then pull up on the ink cartridge to remove it from the slot.
Figure : Remove the ink cartridge from the slot

CAUTION:
Do not lift the latch to the side of the carriage to remove the ink cartridge. Lifting the latch might result in incorrectly seated ink cartridges.
-
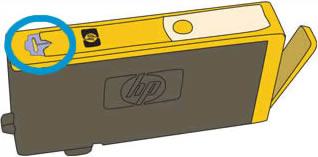
Locate and then examine the vent area on the top of the ink cartridge.
Figure : Vent area on the top of the ink cartridge
-
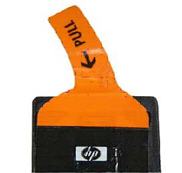
If the ink cartridge still has the orange pull-tab attached, pull to remove it.
Figure : Orange pull tab
-
If the vent is clogged, use a straight pin to gently remove excess adhesive from the vent.
Figure : Clean the clogged vent with a pin
-
-
Clogged vent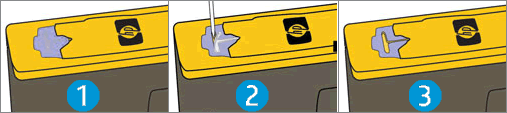
-
With a straight pin, gently remove excess adhesive from the vent
-
Unclogged vent
-
-
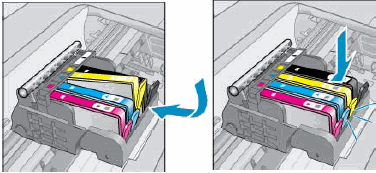
Face the nozzle and contacts down, and then slide the ink cartridge into its slot. Press down on the ink cartridge until it snaps into place.
NOTE:
Make sure each ink cartridge is installed in the correct slot. Match the shape of the icon and the color of the ink cartridge with the slot that has the same shaped icon and color.
Figure : Reinserting the ink cartridge
-
Repeat these steps to inspect the vents on each of the ink cartridges.
-
Make sure each ink cartridge is firmly in place in its slot. Run your finger along the top of the ink cartridges to feel for any that are protruding, and if any are, press down firmly until each ink cartridge snaps into place.
-
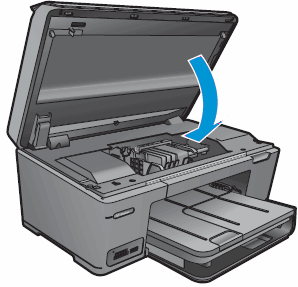
Close the ink cartridge access door.
Figure : Closing the ink cartridge access door
You can refer this HP document for more assistance:- Click here
Let me know how it goes.
To thank me for my efforts to help you, please mark my post as an accepted solution so that it benefits several others.
Cheers.
Sandytechy20
I am an HP Employee
07-16-2019 06:41 PM
HP Recommended
This seems to be hardware issue.
I request you to talk to HP support.
They might have multiple options to help you with this.
- Click on this link - https://support.hp.com/us-en/contact-hp?openCLC=true
- Select the country.
- Enter the serial of your device.
- Select the country from the drop-down.
- Click on "Show Options".
- Fill the web-form. A case number and phone number will now populate for you.
To thank me for my efforts to help you, please mark my post as an accepted solution so that it benefits several others.
Cheers.
Sandytechy20
I am an HP Employee
Be alert for scammers posting fake support phone numbers and/or email addresses on the community.
If you think you have received a fake HP Support message, please report it to us by clicking on "Flag Post".
† The opinions expressed above are the personal opinions of the authors, not of HP. By using this site, you accept the Terms of Use and Rules of Participation.


Didn't find what you were looking for?
Ask the community
† The opinions expressed above are the personal opinions of the authors, not of HP. By using this site, you accept the <a href="https://www8.hp.com/us/en/terms-of-use.html" class="udrlinesmall">Terms of Use</a> and <a href="/t5/custom/page/page-id/hp.rulespage" class="udrlinesmall"> Rules of Participation</a>.