-
×InformationNeed Windows 11 help?Check documents on compatibility, FAQs, upgrade information and available fixes.
Windows 11 Support Center. -
-
×InformationNeed Windows 11 help?Check documents on compatibility, FAQs, upgrade information and available fixes.
Windows 11 Support Center. -
- HP Community
- Printers
- Printing Errors or Lights & Stuck Print Jobs
- different top and bottom margins

Create an account on the HP Community to personalize your profile and ask a question
12-13-2017 12:48 PM
I tried to print from Word and Acrobat Reader. The top margin is much larger than the bottom margin even though I set the margin to be equal.
And I also tried to align printer and the alignment page has the same problem - there is no bottom margin and the top one is quite large.
Can anyone help fix this?
Thank you!
12-14-2017 06:05 PM
Welcome to the HP Forums, this is a great location to get assistance! I read your post and see that you are getting margins issue while printing. I would like to help you resolve this issue.
However, I will need a few details to provide an accurate solution,
- When did this issue start?
- Did you do any hardware or software changes?
Meanwhile:
Adjust the paper size setting
-
In the program you want to print from, click File, and then click Print.
-
Make sure your printer is in the Name or Printers drop-down list box, and then click Properties, Printer Properties or Preferences.
-
Click the Paper/Quality tab.
-
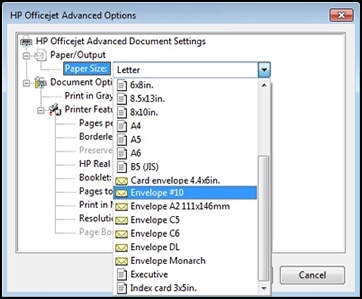
Click Advanced, if necessary, and then click Paper Size.
Figure : Selecting the correct paper size

-
Select the paper size that matches the size and type of paper loaded in the printer tray, and then click OK. If there are no matching paper sizes, select the size from the list that is closest to the size of the paper loaded in the tray.
-
Click OK, and then try to print.
Check the print settings for your print job
-
In the software application you are trying to print from, click File, and then click Print.
The Print window opens.
-
Open the Properties dialog box.
Depending on the software application, the button might be Properties, Options, Printer Setup, Printer, or Preferences.
-
Depending on your print job, you might consider modifying the following settings:
-
Paper Type: If you are printing on photo paper, select the type of photo paper you are attempting to print on.
-
Paper Size: If you are printing on a different size of paper than you normally print on, select the correct paper size.
-
After selecting the print settings, click OK to apply the settings, and then click Print.
-
Print a Print Quality Diagnostic report.
-
Make sure to load the input tray with plain, white paper.
-
On the printer control panel, swipe the display to the left, then touch Setup
 .
. -
Touch Tools, then touch Clean Cartridges.
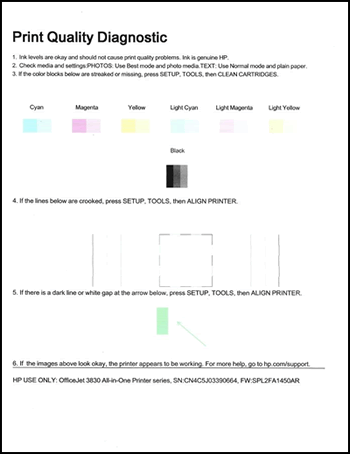
The printer prints a Print Quality Diagnostic report.
Figure : Example of the Print Quality Diagnostic report

-
Examine the print quality on the Print Quality Diagnostic report.
-
If the print quality is acceptable, click No. You can stop troubleshooting.
-
If the print quality is unacceptable, click Yes when prompted to perform the next level of cleaning.
-
Align the printer.
-
Make sure to load the input tray with plain, white paper.
-
On the printer control panel, swipe the display to the left, and then touch Setup
 .
. -
Touch Tools.
-
Swipe up on the display, then touch Align Printer.
An alignment page prints.
-
Wait for the alignment page to fully eject from the printer.
NOTE:
Before a print job, the printer automatically extends the output tray extender. Do not push in the output tray extender until the print job is complete.
-
Lift the scanner lid.
-
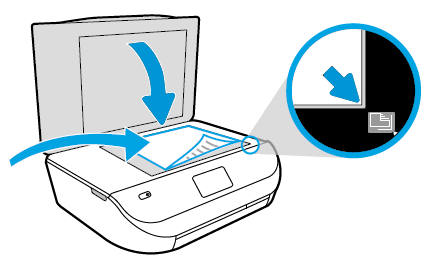
Place the alignment page with the print side down on the scanner glass. Position it according to the engraved guides around the glass.
Figure : Placing the alignment page on the scanner glass

-
Close the scanner lid, then touch OK
The printer aligns the ink cartridges.
-
Try to print again.
Let me know if that helps.
Cheers.
Sandytechy20
I am an HP Employee
