-
×InformationNeed Windows 11 help?Check documents on compatibility, FAQs, upgrade information and available fixes.
Windows 11 Support Center. -
-
×InformationNeed Windows 11 help?Check documents on compatibility, FAQs, upgrade information and available fixes.
Windows 11 Support Center. -
- HP Community
- Printers
- Printing Errors or Lights & Stuck Print Jobs
- how do i lift the latch handle on my print cartridge

Create an account on the HP Community to personalize your profile and ask a question
12-20-2018 08:27 AM
I received the following message on my printer ~~ The printhead appears to be missing, not detected, or incorrectly installed
on the reinstall printhead instructions it is telling me to lift the latch handle on the print cartridge but I am not sure what the latch handle looks like.
12-21-2018 04:16 PM
Good Day. A warm welcome to the HP community.
I reviewed the case regarding issues with the printer. I will be delighted to assist you here.
Superb description, brilliant troubleshooting and terrific observations made before posting. Kudos to you for that. 😉
Here you go. 🙂
Remove the printhead:
If there is paper obstructing the printhead or if the printhead is not seated correctly, it might cause an error message. Turn on the printer, and then remove the printhead.
-
Press the Power button to turn on the printer, if it is not already on. Wait until the warm-up period finishes and your printer is idle and silent before you proceed.
-
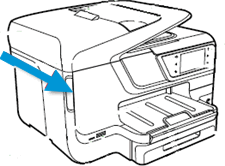
Place your fingers into the slot on the left side of the printer, and then pull to open the cartridge access door. Allow the carriage to move to the cartridge access area, and the carriage stops moving.
Figure : The slot on the side of the printer

-
Disconnect the power cord from the rear of the printer. Unplugging the printer prevents the carriage from moving.
WARNING:
You must disconnect the power cord before reaching inside the printer to avoid risk of injuries or electric shock.
-
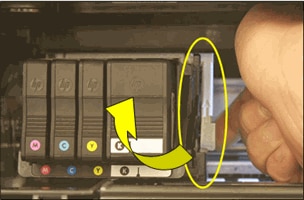
Lift the carriage latch.
Figure : Lift the carriage latch

-
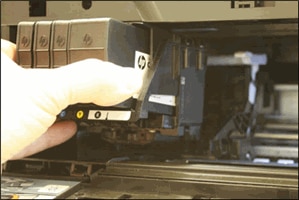
Grasp the sides of the printhead, gently lift and remove the printhead from the carriage.
NOTE:
Do not remove the cartridges from the printhead. You can safely remove the printhead with all of the cartridges inserted.
Figure : Remove the printhead

CAUTION:
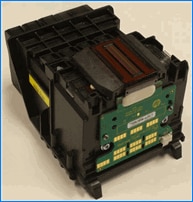
The nozzle area on the bottom of the printhead is fragile! Make sure that the bottom of the printhead does not bump or rub on the printer. Do not touch the nozzles or electrical contacts. Touching these areas can cause electrical failures or print quality problems.
Figure : Nozzles and electrical contacts
-
Nozzles
-
Electrical contacts
-
-
Place the printhead assembly (with the cartridges still installed) upside down on a clean sheet of paper.
CAUTION:
Do not leave the printhead assembly outside of the printer for an extended period. Doing so can result in damage to the printhead or the printer.
Figure : Printhead upside down on a clean sheet of paper

The trick is to remain patient, Going by your technical expertise and competence I am sure you will be able to perform these steps without breaking a sweat. 🙂
Hope this helps. Let me know how it goes. 😉
Barachiel
I am an HP Employee
