-
×InformationNeed Windows 11 help?Check documents on compatibility, FAQs, upgrade information and available fixes.
Windows 11 Support Center. -
-
×InformationNeed Windows 11 help?Check documents on compatibility, FAQs, upgrade information and available fixes.
Windows 11 Support Center. -
- HP Community
- Printers
- Printing Errors or Lights & Stuck Print Jobs
- ink cartridge 61XL not working error message

Create an account on the HP Community to personalize your profile and ask a question
03-04-2018 12:09 AM
hi have a officejet 2620 and have replaced my ink cartridge with the 61XL. nothing i have trried with get it to work. the printer just gives me an error message that the cartridge has failed and needs to be replaced.
i do not have the docket to return to the strore so now have waste $48.
i have put the original cartridge (61) back into the printer and it is recognised but of cause tells me the cartridge is empty. i replaced the black ink (61) and it also works fine ( operating on this single cartridge mode)
i would like this stupid cartridge replaced but how?
03-05-2018 06:09 AM
Hey there! @chrispi, Thanks for stopping by the HP Support Forums!
I understand you have issues using 61XL ink cartridge on your printer.
Don't worry I'll try to help you out.
Did you make any changes to your printer?
Have you tried checking with a different ink cartridge?
As you mentioned when you use 61XL ink cartridge on your printer you are getting ink cartridge empty on your printer.
Replace low or empty ink cartridges on your printer.
Try few steps recommended below.
Clean the cartridge contacts
caution:
Clean the cartridges one at a time. Do not leave a cartridge outside the printer for more than 30 minutes.
-
Gather the following materials:
-
Dry foam-rubber swabs, lint-free cloth, or any soft material that does not come apart or leave fibers (coffee filters work well)
-
Distilled, filtered, or bottled water (tap water might contain contaminants that can damage the cartridges)
caution:
Do not use platen cleaners or alcohol to clean the cartridge contacts. These can damage the cartridge or the printer.
-
-
Press the Power button to turn on the printer.
-
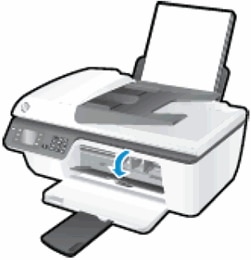
Open the cartridge access door. The carriage moves to the center of the printer. Wait until the carriage is idle and silent before continuing.
Figure : Open the cartridge access door
-
Disconnect the power cord from the rear of the printer.
-
Press down on the cartridge to release it, and then pull the cartridge out to remove it from its slot.
Figure : Remove the cartridge

caution:
Do not remove both cartridges at the same time. Remove and clean each cartridge one at a time. Do not leave a cartridge outside the printer for more than 30 minutes.
-
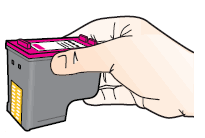
Hold the cartridge by its sides.
Figure : Hold the cartridge by its sides
-
Inspect the contacts for ink and debris buildup.
-
Wipe the contacts with a dry swab or other lint-free material until no debris remains on them.
caution:
Be careful to wipe only the contacts. Do not smear any ink or debris elsewhere on the cartridge.
-
Dip a clean foam-rubber swab or lint-free cloth into distilled water, and then squeeze any excess water from it.
-
Clean only the copper-colored contacts, and then allow the cartridge to dry for approximately 10 minutes.
Figure : Clean the contacts
-
Ink nozzles (do not clean)
-
Copper-colored contacts
-
-
Lightly moisten another cotton swab with distilled water, and then squeeze any excess water from the swab.
-
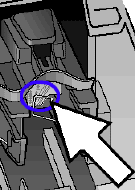
Use the swab to clean the electrical contacts in the carriage, located inside the printer.
Figure : The carriage contacts
-
Either let the cartridge sit for 10 minutes to allow the cleaned area to dry, or use a new swab to dry it.
note:
Make sure that the cartridge is not left out of the printer for more than 30 minutes.
-
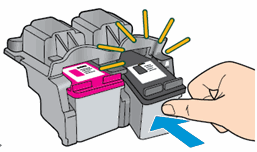
Hold the cartridge by its sides with the nozzles toward the printer, and then insert the cartridge into its slot. Make sure that the cartridge is inserted in the proper slot.
Figure : Insert the cartridge into the slot
-
Push the cartridge forward into its slot until it snaps into place.
-
Repeat these steps to clean and then reinsert the other cartridge if necessary.
-
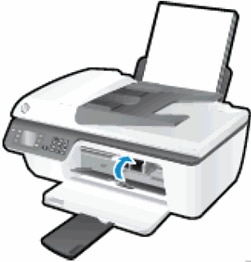
Close the cartridge access door.
Figure : Close the cartridge access door
-
Reconnect the power cord to the rear of the printer.
-
Press the Power button to turn on the printer if it does not turn on automatically.
Refer this article to further troubleshoot ink cartridge issues with your printer.
If the issue still persists after trying out the steps.
It is a cartridge issue with your printer, please contact HP support and get a replacement ink cartridge.
Link to contact HP.
If the solution provided worked for you, please mark accepted solution for this post.
Hope this helps!
Take Care! 🙂
Please click “Accept as Solution” if you feel my post solved your issue, it will help others find the solution.
Click the “Kudos, Thumbs Up" on the bottom right to say “Thanks” for helping!
A4Apollo
I am an HP Employee
