-
×InformationNeed Windows 11 help?Check documents on compatibility, FAQs, upgrade information and available fixes.
Windows 11 Support Center. -
-
×InformationNeed Windows 11 help?Check documents on compatibility, FAQs, upgrade information and available fixes.
Windows 11 Support Center. -
- HP Community
- Printers
- Printing Errors or Lights & Stuck Print Jobs
- missing or failed printerhead

Create an account on the HP Community to personalize your profile and ask a question
10-19-2020 11:47 AM
printer head error missing or undetected.
I have brought extra genuine HP ink cartridges this did not fix my issue so i now have 2 sets 1 full and one set just below half full.
I have followed all the steps provided on several occasions now i have updated all software and firmware still not working.
printer was working fine before lock down and now it is not has not been moved and only spent 3 weeks of not being used by myself.
extremely disappointed
please advise of how to fix this
Many Thanks
Martin
10-22-2020 01:27 PM
@MHartwill Welcome to HP Community!
I understand that you are getting missing or failed printhead message
Step 1: Check the carriage for a printhead latch
Look at the carriage to see if it has a latch. The carriage is the part inside the printer that holds the printhead and cartridges. If the carriage does not have a latch (fixed printhead), then the only option is to service the printer.
-
Open the door to access the cartridges.
-
Wait until the carriage stops moving before you continue.
-
Look at the right side of the carriage to see if the carriage has a printhead latch (a handle that can be raised, which allows the printhead to be removed).
-
If your carriage has a printhead latch, continue to the next step.
-
If your carriage does not have a printhead latch (fixed printhead), skip to Service the printer. If the printhead is fixed, then there are no additional troubleshooting steps available.
-
Example of a carriage with a printhead latch
Example of a carriage without a printhead latch


Step 2: Clean the printhead
There are three areas on the printhead that need to be cleaned: the plastic ramps on both sides of the ink nozzles, the edge between the ink nozzles and the electrical contacts, and the electrical contacts.
-
Plastic ramps on the sides of the nozzles
-
Edge between nozzles and contacts
-
Electrical contacts
-
Open the door to access to the cartridges.
-
Wait until the carriage stops moving before you continue.
-
Push the tab on a cartridge, and then pull the cartridge from its slot. Perform these steps for all the cartridges.
caution:
Do not leave the cartridges outside the printer longer than 30 minutes. Doing so can result in damage to both the printer and the cartridges.

-
Lift the latch handle on the carriage until it stops.
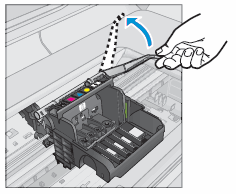
-
Lift the printhead to remove it from the carriage.
caution:
Do not touch the copper-colored contacts. Do not let the contacts touch any surface, and be careful not to scratch the contacts while inserting the cartridges.

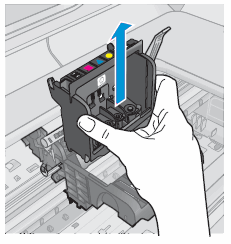
-
Lightly dampen a clean, lint-free cloth with bottled or distilled water.
-
Use the damp cloth to wipe the electrical contacts from the bottom to the top. Do not go past the edge between the electrical contacts and the ink nozzles. Repeat this motion until no ink appears on the cloth.
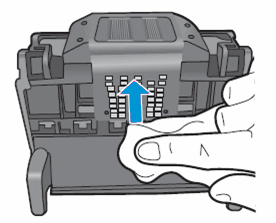
-
Use a new, lightly dampened, lint-free cloth to wipe any accumulated ink and debris from the edge between the ink nozzles and the electrical contacts.
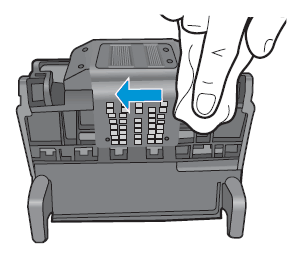
-
Use a new, lightly dampened, lint-free cloth to wipe the plastic ramps on both sides of the ink nozzles. Wipe away from the nozzles only.
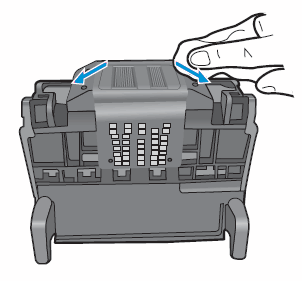
-
Dry the previously cleaned areas with a clean, dry, lint-free cloth.
-
Use a new, lightly dampened, lint-free cloth to wipe the electrical contacts inside the printer by wiping them from top to bottom. Repeat this motion until no ink appears on the cloth.
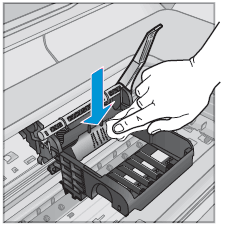
-
Dry the area with a clean, dry, lint-free cloth.
-
Lower the printhead into the carriage.
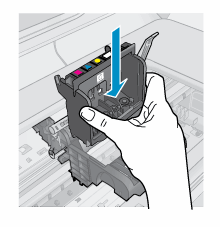
-
Lower the latch handle.
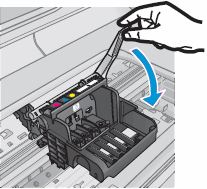
-
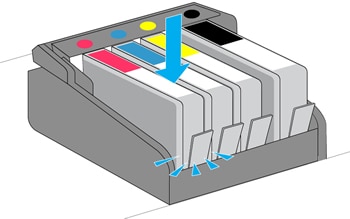
Slide the cartridge into its slot, and then press down on the cartridge until it snaps into place. Repeat these steps for the remaining cartridges.
-
Make sure each cartridge is firmly inserted in its slot. If any are protruding, press down until the cartridge snaps into place.
-
Close the cartridge access door.
Step 3: Replace the printhead
Replace the printhead.
If you have a defective cartridge or printhead, it might be under warranty. To check the warranty on your ink or toner supplies, go to Printer and Page Yield Overview, and then review the limited warranty information for your supplies.
-
Determine your printhead part number.
-
Printers that use 4 ink cartridges:CN643A.
-
Printers that use 5 ink cartridges: CN642A.
-
-
Search a parts-replacement website for your printhead part number.
-
Search the internet to find a qualified HP parts supplier.
or
-
Search HP Parts Store.
-
-
Follow the instructions to order the printhead assembly.
Keep us posted,
If you would like to thank us for our efforts to help you,
Give us a virtual high-five by clicking the 'Thumbs Up' icon below, followed by clicking on the "Accept as solution" on this post,
Have a great day!
