-
×InformationNeed Windows 11 help?Check documents on compatibility, FAQs, upgrade information and available fixes.
Windows 11 Support Center. -
-
×InformationNeed Windows 11 help?Check documents on compatibility, FAQs, upgrade information and available fixes.
Windows 11 Support Center. -
- HP Community
- Printers
- Printing Errors or Lights & Stuck Print Jobs
- officejet 7510 "Problem with Printer or ink system"

Create an account on the HP Community to personalize your profile and ask a question
03-23-2019 05:57 PM
Only had it from new 2 months, 1st time i change the Black ink with Genuine HP 932XL date Mar 2020 it shows
"Problem with Printer or ink system" ? and does anyone know how to contact HP to get it fixed under warranty Please
03-25-2019 04:20 PM
Welcome to HP support community.
Check the cartridges for leaks
-
Open the cartridge access door. The carriage moves to the left side of the product. Wait until the carriage is idle and silent before proceeding.
-
Push in on the front of the cartridge to release it, and then pull it toward you to remove it from its slot.
Figure : Press the cartridge and remove it from its slot

-
Check the cartridge for leaking ink. Be careful not to get ink on your skin or clothing. If a cartridge is leaking, do not continue troubleshooting. Return the cartridge to your retailer, or click Contact HP (
 ) on this page for support options.
Important: To avoid startup failures, you must use the SETUP cartridges that came with the product.
-
Hold the cartridge so that the cartridge contacts are facing toward the product.
-
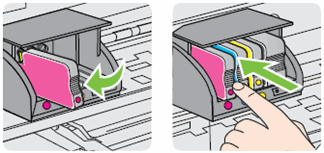
Reinsert the cartridge into its slot, and then gently push it forward until it clicks into place.
NOTE:
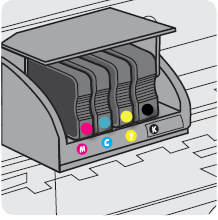
Make sure that the colored dot on the cartridge label matches the colored dot on the slot.
Figure : Insert the cartridge into its color-coded slot

-
Repeat these steps to check the other cartridges for leaking ink.
-
Close the cartridge access door.
Clean the ink cartridges, and then check the error message.
-
Gather the following materials:
-
A clean, lint-free cloth
-
A clean, dry cotton swab
-
Distilled or bottled water
CAUTION:
Do not use tap water because it might contain contaminants that can damage the printhead.
-
-
Lightly dampen a clean, lint-free cloth with bottled or distilled water.
-
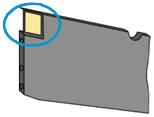
Gently wipe the copper-colored contact on one of the ink cartridges.
Figure : Wiping the copper-colored contact

-
Wipe the contact with a dry, lint-free cloth before proceeding to the next step.
-
Repeat these steps for the three remaining ink cartridges.
-
Carefully reinsert one of the ink cartridges into its slot, and then push the ink cartridge forward until it clicks into place.
Figure : Reinserting the ink cartridge

-
Make sure each colored dot on the ink cartridge label matches the colored dot on the print carriage.
Figure : Matching the colored dot on the print carriage

-
Close the ink cartridge access door.
-
Check the printer control panel to see if the error message persists.
-
If the message is to Replace the
 ,
,  ,
,  , or
, or  Ink Cartridge, remove the specified ink cartridge(s) and clean the copper-colored contact again, and then reinsert the ink cartridge(s).
-
You can refer this HP document for more assistance:- Click here
Let me know how it goes.
To thank me for my efforts to help you, please mark my post as an accepted solution so that it benefits several others.
Cheers.
Sandytechy20
I am an HP Employee
