• ×
    Information
    Windows update impacting certain printer icons and names. Microsoft is working on a solution.
    Click here to learn more
    Information
    Need Windows 11 help?
    Check documents on compatibility, FAQs, upgrade information and available fixes.
    Windows 11 Support Center.
  • post a message
  • ×
    Information
    Windows update impacting certain printer icons and names. Microsoft is working on a solution.
    Click here to learn more
    Information
    Need Windows 11 help?
    Check documents on compatibility, FAQs, upgrade information and available fixes.
    Windows 11 Support Center.
  • post a message
Guidelines
Experiencing 'Printer Blocked' or 'Printer Error' message? Click here for more information.
Check some of the most frequent questions about Instant Ink: HP INSTANT INK, HP+ PLANS: INK AND TONER.


Check out our Black or Color Ink Not Printing, Other Print Quality Issues info about: Print quality and Cartridge Issues.
HP Recommended
B4LO3A

I tried to follow directions on what come up under this issue. I could only get the color ink out as the ink was on right side & never moved, so I couldn't access the blank ink cartridge. When I plugged the power cord back into printer, the power came back on, the ink cartriges never moved & the same error message still came up. I need help.....i need to be able to print. Please help me.

3 REPLIES 3
HP Recommended

@mom2abrat


Welcome to the HP Forums, this is a great location to get assistance! I read your post and see that you are getting carriage jam issue on HP Officejet 4630 Printer. I would like to help you resolve this issue.


However, I will need a few details to provide an accurate solution,

When did this issue start?

Did you do any hardware or software changes?

How is the printer connected to computer, wired or wireless?

Which operating system is installed on the computer?


Meanwhile


Check the carriage path for obstructions


  1. Press the Power button to turn on the printer, if it is not on already.

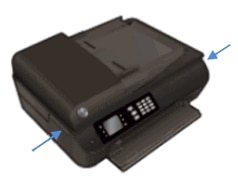
  2. Locate the slots on the left and right sides of the printer.

    Figure : Locate the slots on the sides of the printer

    Image: Locate the slots on the sides of the printer
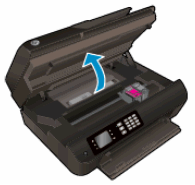
  3. Slide your fingers into the two slots, and then gently lift up to open the cartridge access door. The carriage moves to the cartridge access area. Wait until the carriage is idle and silent before continuing.

    Figure : Open the cartridge access door

    Image: Open the cartridge access door
  4. With the printer turned on, disconnect the power cord from the rear of the printer.

       WARNING:

    To avoid the risk of electrical shock, you must unplug the power cord before moving the carriage by hand and resetting the paper feed mechanism.

  5. Check for and remove any loose paper or objects that might be restricting the carriage.

       NOTE:

    Use a flashlight to thoroughly check for torn pieces of paper that might remain inside the printer. If any torn pieces of paper remain inside the printer, more jams are likely to occur.

  6. Reach into the cartridge access area, and then manually move the carriage.

    • If the carriage is stuck on the right side of the printer, move the carriage to the left side of the printer.

    • If the carriage is stuck on the left side of the printer, move the carriage to the right side of the printer.

    • If the carriage is stuck in the middle of the printer, move the carriage to the right side of the printer.

  7. Remove any loose paper or objects found.

  8. Make sure that the carriage can move freely across the width of the printer by gently pushing the carriage to the left, and then pushing it to the right.

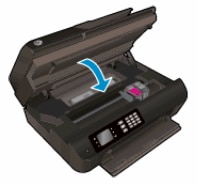
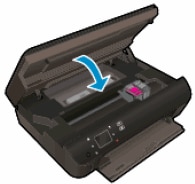
  9. Close the cartridge access door.

    Figure : Close the cartridge access door

    Image: Close the cartridge access door
  10. Reconnect the power cord to the rear of the printer.

  11. Press the Power button to turn on the printer.

  12. Press OK to clear any messages on the printer control panel.

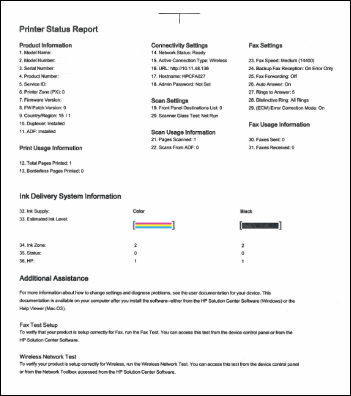
Print a Print a Printer Status Report

  1. On the printer control panel, press the Down Arrow () to select Tools, and then press OK.
  2. Press the Down Arrow () to select Printer Status Report, and then press OK. The printer prints the test page.

    Figure : Example of a Printer Status Report

    Image: Example of a Printer Status Report

Remove, and then reinsert the cartridges


  1. Press the Power button to turn on the printer, if it is not already on.

  2. Locate the slots on the left and right sides of the printer.

    Figure : Locate the slots on the sides of the printer

    Image: Locate the slots on the sides of the printer.
  3. Slide your fingers into the two slots, and then gently lift up to open the cartridge access door.

    Figure : Open the cartridge access door

    Image: Open the cartridge access door
  4. To release the cartridge, lift the lid on the cartridge slot, and then gently push the lid back until it stops.

  5. Pull up on the cartridge to remove it from the slot.

    Figure : Remove the cartridge

    1. Lift the lid

    2. Gently push the lid back

    3. Pull up on the cartridge

       CAUTION:

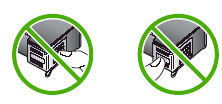
    Do not touch the copper-colored contacts or the ink nozzles. Touching these parts can result in clogs, ink failure, and bad electrical connections.

    Figure : Do not touch the contacts or nozzle

    Image:  Do not touch the contacts or nozzle.
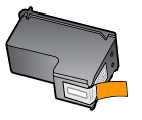
  6. Remove any protective tape that still might be on the nozzles.

    Figure : Remove any protective tape

    Image:  Remove any protective tape.

       CAUTION:

    Do not try to remove the copper-colored electrical strip.

  7. Hold the cartridge at a slight upward angle with the cartridge contacts facing the rear of the printer, slide the cartridge into the empty slot, and then close the lid on the cartridge slot to secure the cartridge into place.

       NOTE:

    Insert the color cartridge in the slot on the left. Insert the black cartridge in the slot on the right.

    Figure : Insert the cartridge

    1. Insert the cartridge

    2. Close the lid

    3. The color cartridge is on the left, and the black cartridge is on the right

  8. Repeat the previous steps to remove, and then reinsert the other cartridge.

  9. Close the cartridge access door.

    Figure : Close the cartridge access door

    Image: Close the cartridge access door.


Click here and refer the HP Document for more assistance.


Keep me                                                                                                                                                                                                                                                                                                                                                                                                                                                                                                                                                                                                                                                                                                                                                                                                                                                                                                                                                                                                                                                                                                                                                                                                                                                                                                                                                                                                                                                                                                     

Sandytechy20
I am an HP Employee

HP Recommended

I have this same issue and your help response does not work. This is an hp 4630 printer. Error code 0X83C0000A. This means that the printer will not fully turn on, only the error code shows in the screen. The you open the thing up, the carriage does not move! Therefore I am not able to move the carriage or take the cartridges out. So the printer is stuck solid and all of the help that I have pursued from HP does not come close to fixing this problem. Very frustrating! Please share the fix for this so that all of these many people who have this problem don't have to resort to throwing their printers into the garbage. Than k you.

HP Recommended

@Lars2020


Welcome to the HP Support Community.


Are you able to move the carriage manually?


If you've tried all the steps from here: https://support.hp.com/us-en/product/hp-officejet-4630-e-all-in-one-printer-series/5305049/model/530..., I recommend you to contact the HP Support Team regarding this as this could be a hardware issue.


Link: www.hp.com/contacthp/


Note:  Select the country accordingly to get the contact details for support.


Let me know if this helps.


If the information I've provided was helpful, give us some reinforcement by clicking the Accepted Solution button, that'll help us and others see that we've got the answers!


Thanks!

Have a great day!


I am an HP Employee

† The opinions expressed above are the personal opinions of the authors, not of HP. By using this site, you accept the <a href="https://www8.hp.com/us/en/terms-of-use.html" class="udrlinesmall">Terms of Use</a> and <a href="/t5/custom/page/page-id/hp.rulespage" class="udrlinesmall"> Rules of Participation</a>.