-
×InformationNeed Windows 11 help?Check documents on compatibility, FAQs, upgrade information and available fixes.
Windows 11 Support Center. -
-
×InformationNeed Windows 11 help?Check documents on compatibility, FAQs, upgrade information and available fixes.
Windows 11 Support Center. -
- HP Community
- Printers
- Scanning, Faxing, and Copying
- Digital fax wizard not available in OfficeJet 4650 HP Printe...

Create an account on the HP Community to personalize your profile and ask a question
Your account also allows you to connect with HP support faster, access a personal dashboard to manage all of your devices in one place, view warranty information, case status and more.
Common problems HP Solution Center not working : Adobe Flash Player Error and Unable to scan
We would like to share some of the most frequently asked questions about HP Solution Center not working : Adobe Flash Player Error and Unable to Scan.

It has been a while since anyone has replied. Simply ask a new question if you would like to start the discussion again.
02-03-2020 08:31 AM
 HP Recommended
Product: HO OfficeJet 4650
Operating System: Microsoft Windows 10 (64-bit)
I've never been able to get the digital fax wizard to come up on my printer assistant page and I assumed it had to do with my computer running an old version of Windows 7. I've just upgraded to Windows 10 and uninstalled the printer and then reinstalled hoping the option would be there now, but alas, it is not. Does the OfficeJet 4650 series not allow for digital faxing to scan the incoming fax to my email or should it be available and there's another issue going on?
If it's not available on the 4650 is there a list of printers that it IS available on so I can upgrade my printer?
Solved! Go to Solution.
1 ACCEPTED SOLUTION
Accepted Solutions
02-07-2020 11:59 AM
HP Recommended
Hey guys,
Apologies for jumping in, but to clarify - the HP Digital Fax Setup Wizard is not listed as the HP Officejet 4650 printer simply does not provide such capabilities.
You may find the Manual of the printer as a reference, the Recieve a fax section does not indicate any such functionality as such isn't offered for the printer:
http://h10032.www1.hp.com/ctg/Manual/c04783165
Just to compare, as an example, here is a manual of the HP Officejet 5200 Series which supports HP Digital Fax:
Page 45 clearly indicate such functionality for the product:
http://h10032.www1.hp.com/ctg/Manual/c05648843
Regards,
Shlomi


Click the Yes button to reply that the response was helpful or to say thanks.
If my post resolve your problem please mark it as an Accepted Solution 🙂
11 REPLIES 11
02-05-2020 01:44 PM
HP Recommended
@jlanguedoc Welcome to HP Community!
I understand that the Digital fax wizard not available in OfficeJet 4650 HP Printer Assistant.
Do not worry. I will try to fix the issue.
HP fax-capable printers are designed to work with traditional landline (analog) telephone services. Although not designed for digital and web-based phone services, faxing might work with the appropriate setup and equipment.
Use HP Digital Fax to automatically save incoming faxes to your computer, a folder on the network, or forward them to an email account. This feature helps save paper and ink as an alternative to printing faxes and can provide access to faxes when away from the printer. A traditional phone line (landline) connection is required to use HP Digital Fax.
Step 1: Prepare for the setup
To use HP Digital Fax, confirm the fax connection is set up, the HP software is installed, and that you have access to the folder where incoming fax files will be sent.
-
Set up the fax connection to the phone line: Confirm your printer is connected to your landline or digital telephone service and can send and receive faxes. Go to HP Printers - How to Fax for steps to set up your printer for faxing.
-
Install HP software and drivers: Go to 123.hp.com (in English) to install the full-feature software and driver package that includes HP Digital Fax.
-
Confirm administrator rights: The administrator computer needs a username and password, and if saving to a network, make sure the folder has full read and write access.
-
Computer must be on at all times: The destination folder's computer or server must be turned on and awake at all times. Faxes cannot be saved if the computer is off or in a hibernate state.
-
Load paper in the printer input tray: Make sure paper is loaded before you begin, and that it does not run out of paper.
Step 2: Run the Digital Fax setup tool
Run the guided HP Digital Fax Wizard or Digital Fax Archive tool in the HP software to set up Digital Fax.
NOTE:
Available options during setup vary by printer model and how it connects to the computer. USB-connected printers can save faxes to a local folder only. Network-connected printers support saving to a folder on the network and fax to email.
Search Windows for your printer model name and number, and then click the name in the search results. Depending on your printer, HP Printer Assistant or HP Solution Center opens.
-
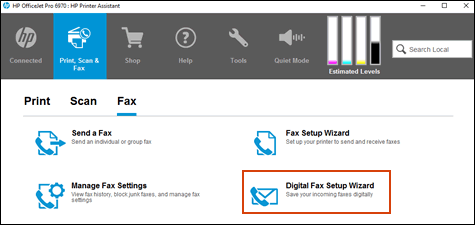
In Printer Assistant, click the Print, Scan & Fax tab, and then click Digital Fax Setup Wizard.
-
In Solution Center, click Settings > Fax Settings > More Fax Settings > Digital Fax Setup.
Follow the on-screen instructions for the selected setup type. To see if your printer supports additional Digital Fax options, look in the Fax or Setup menus on the printer control panel.
Use this link: https://support.hp.com/in-en/product/hp-officejet-pro-6830-e-all-in-one-printer-series/5390307/model... and follow Fx issue with the Digital phone services for Resolving Fax Problems.
Keep us posted,
If you would like to thank us for our efforts to help you,
Give us a virtual high-five by clicking the 'Thumbs Up' icon below, followed by clicking on the "Accept as solution" on this post,
Have a great day!
02-06-2020 06:29 AM
HP Recommended
These instructions are what I used to try to set up the digital fax numerous times, but if you'll read my post you'll see that the Digital Fax Setup Wizard option is MISSING from my printer assistant. If it were there I wouldn't be having this problem because I can follow directions and I'm very tech savy, but I can't follow a wizard that isn't there! I've uninstalled and reinstalled the drivers and printer several times to no avail.
02-06-2020 09:11 AM
HP Recommended
Please update the firmware.
After updating the firmware perform the clean reinstalling of Pre-installed HP drivers
1. In Windows, search for and open Programs and features
2. Select your HP Printer
3. Select Uninstall
4. In Windows, search for and open Devices and printers
5. In the Devices and Printers windows look for your HP printer. If you see it listed right-click on it and choose ‘Delete’ or ‘Remove Device’
6. Open up the run command with the “Windows key + R” key combo.
7. Type printui.exe /s and click Ok. (Note: there is a space in between “printui.exe” and “/s”)
8. Click on the “Drivers” tab
9. Look for the HP Printer driver. If you see it Click on it and click Remove at the bottom
10. Select Ok
11. Select Apply and Ok on the Print Server Properties windows
12. Close Devices and Printers, restart the computer.
Click here to download the HP Full-featured driver.
Once downloaded, make sure to run the file to start the installation and follow the on-screen instructions.
Have a nice day!!

02-06-2020 01:38 PM
HP Recommended
However, we seem to have exhausted all the steps we had to fix the issue as of now, hence we would like to research on the same.
We will get back to you with another solution,
I suggest you give us about 72hrs, while we test this situation on our lab rats (devices),
And get back to you with a working solution.
02-06-2020 07:48 PM - edited 02-06-2020 07:50 PM
HP Recommended
Hello,
I see in the HP Printer Assistant you have a Fax section, please access it.
Try the following:
- Click on the Start menu in the taskbar.
- Click HP, then click HP OfficeJet 4650 series. The HP Printer Assistant opens.
- In HP Printer Assistant, click the Print, Scan & Fax tab.
- Under Print, Scan & Fax, click the Fax tab, and then click the Digital Fax Setup Wizard.
Digital Fax Setup Wizard
Do not hesitate to contact us in case of need.
Best regards,
I'm not an HP employee. Did this message answer your question? Include it below as an Accept As Solution! Did you find this message useful? Click on the thumbs up set to give a Compliment! Follow us on Facebook Assistance customers HP.


02-07-2020 11:59 AM
HP Recommended
Hey guys,
Apologies for jumping in, but to clarify - the HP Digital Fax Setup Wizard is not listed as the HP Officejet 4650 printer simply does not provide such capabilities.
You may find the Manual of the printer as a reference, the Recieve a fax section does not indicate any such functionality as such isn't offered for the printer:
http://h10032.www1.hp.com/ctg/Manual/c04783165
Just to compare, as an example, here is a manual of the HP Officejet 5200 Series which supports HP Digital Fax:
Page 45 clearly indicate such functionality for the product:
http://h10032.www1.hp.com/ctg/Manual/c05648843
Regards,
Shlomi
Click the Yes button to reply that the response was helpful or to say thanks.
If my post resolve your problem please mark it as an Accepted Solution 🙂
Be alert for scammers posting fake support phone numbers and/or email addresses on the community.
If you think you have received a fake HP Support message, please report it to us by clicking on "Flag Post".
† The opinions expressed above are the personal opinions of the authors, not of HP. By using this site, you accept the Terms of Use and Rules of Participation.


Didn't find what you were looking for?
Ask the community
† The opinions expressed above are the personal opinions of the authors, not of HP. By using this site, you accept the <a href="https://www8.hp.com/us/en/terms-of-use.html" class="udrlinesmall">Terms of Use</a> and <a href="/t5/custom/page/page-id/hp.rulespage" class="udrlinesmall"> Rules of Participation</a>.