-
×InformationNeed Windows 11 help?Check documents on compatibility, FAQs, upgrade information and available fixes.
Windows 11 Support Center. -
-
×InformationNeed Windows 11 help?Check documents on compatibility, FAQs, upgrade information and available fixes.
Windows 11 Support Center. -
- HP Community
- Printers
- Scanning, Faxing, and Copying
- Scan to Email - Change Host Email Address on Printer

Create an account on the HP Community to personalize your profile and ask a question
05-18-2022 02:37 PM
Hello!
I need to erase the former work email that is the host address on my scan to email function - and put in a new one. I have no idea how to change it - there is no prompt to do so, and I've even done a factory reset but it's still there. Is it possible to do this in HP Smart? Any help much appreciated.
Solved! Go to Solution.
Accepted Solutions
05-21-2022 10:03 AM
Hi @JJN33,
Welcome to the HP Support Community
I'd like to help!
I understand you would like to change the scan to email address.
Follow the below instructions -
--->Touch the wifi icon ((i)) on the printer, and take down the IP address
--->Open a web browser (ex Chrome or Mozilla) and type in the printer's IP
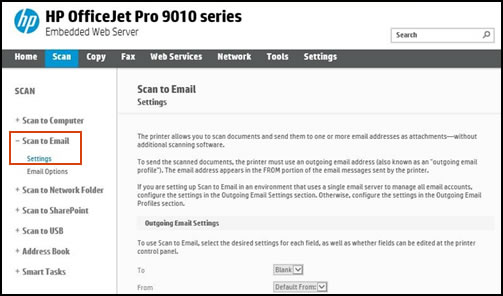
--->On the Scan tab, click Scan to Email, and then click Settings.

Click the Add New Profile icon  to create an outgoing email profile.
NOTE:
If you are setting up Scan to Email in an environment that uses a single email server to manage all email accounts, configure the settings in the Outgoing Email Settings section. Otherwise, configure the settings in the Outgoing Email Profiles section.
Type the outgoing email address and a display name, and then click Next.
NOTE:
If you want to restrict the use of this outgoing email address, add a PIN.
Type or select server options, such as SMTP server, SMTP port and maximum email size, and server authentication, and then click Next.
To automatically send a copy of all emails to your email address, select the Include sender in all email messages sent out successfully from the printer check box, and then click Next.
Confirm the settings, and then click Save and Test or Save Only.
If a minus sign in a red circle displays, the printer cannot validate the settings on your network. Click Edit to change settings, and then test again. Repeat this step until the settings are correct. Contact your network or service provider to check your settings, if necessary.
In the menu bar on the left side of the window, click Email Options, select default scan and file settings, and then click Apply.
In the menu bar, click Address Book to add email destinations.
Click Contacts to configure a local address book.
Click Address Book Settings to configure a Network Directory Server (LDAP) and search for users within a company.
Click Apply to complete the contacts list.
You may refer - Set Up and Use Scan to Email
Note - The product on the document might be different but the steps remain the same
Hope this helps! Keep me posted.
Please click “Accept as Solution” if you feel my post solved your issue, it will help others find the solution.
Click the “Yes" on the bottom right to say “Thanks” for helping
05-21-2022 10:03 AM
Hi @JJN33,
Welcome to the HP Support Community
I'd like to help!
I understand you would like to change the scan to email address.
Follow the below instructions -
--->Touch the wifi icon ((i)) on the printer, and take down the IP address
--->Open a web browser (ex Chrome or Mozilla) and type in the printer's IP
--->On the Scan tab, click Scan to Email, and then click Settings.

Click the Add New Profile icon  to create an outgoing email profile.
NOTE:
If you are setting up Scan to Email in an environment that uses a single email server to manage all email accounts, configure the settings in the Outgoing Email Settings section. Otherwise, configure the settings in the Outgoing Email Profiles section.
Type the outgoing email address and a display name, and then click Next.
NOTE:
If you want to restrict the use of this outgoing email address, add a PIN.
Type or select server options, such as SMTP server, SMTP port and maximum email size, and server authentication, and then click Next.
To automatically send a copy of all emails to your email address, select the Include sender in all email messages sent out successfully from the printer check box, and then click Next.
Confirm the settings, and then click Save and Test or Save Only.
If a minus sign in a red circle displays, the printer cannot validate the settings on your network. Click Edit to change settings, and then test again. Repeat this step until the settings are correct. Contact your network or service provider to check your settings, if necessary.
In the menu bar on the left side of the window, click Email Options, select default scan and file settings, and then click Apply.
In the menu bar, click Address Book to add email destinations.
Click Contacts to configure a local address book.
Click Address Book Settings to configure a Network Directory Server (LDAP) and search for users within a company.
Click Apply to complete the contacts list.
You may refer - Set Up and Use Scan to Email
Note - The product on the document might be different but the steps remain the same
Hope this helps! Keep me posted.
Please click “Accept as Solution” if you feel my post solved your issue, it will help others find the solution.
Click the “Yes" on the bottom right to say “Thanks” for helping
