-
×InformationNeed Windows 11 help?Check documents on compatibility, FAQs, upgrade information and available fixes.
Windows 11 Support Center. -
-
×InformationNeed Windows 11 help?Check documents on compatibility, FAQs, upgrade information and available fixes.
Windows 11 Support Center. -
- HP Community
- Printers
- Scanning, Faxing, and Copying
- after upgrade to macOS Mojave scan does not go to iPhoto

Create an account on the HP Community to personalize your profile and ask a question
11-16-2018 01:23 PM
Hi! @Easy638, Welcome to HP forums.
I understand you have scan to computer issues with your MAC.
Don't worry I'd like to help you out.
Did you make any changes to your printer?
Are you able to print from your printer?
Please share the complete model name of the printer to assist you better
Excellent description and a great diagnosis done. It is greatly appreciated.
Try restarting your router, Mac and printer at once and join the printer to the network and check if it helps.
Try updating your MAC and printer firmware to the latest version.
Try the steps recommended below to scan to iPhoto.
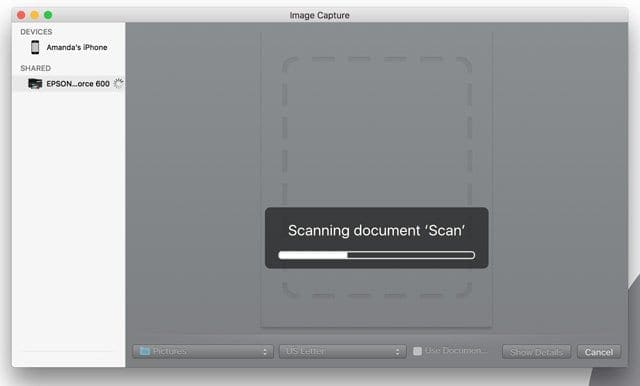
- Open Image Capture
- Select Your Scanner in the Left Column
- Look in Shared for WiFi and Ethernet Connected Printers
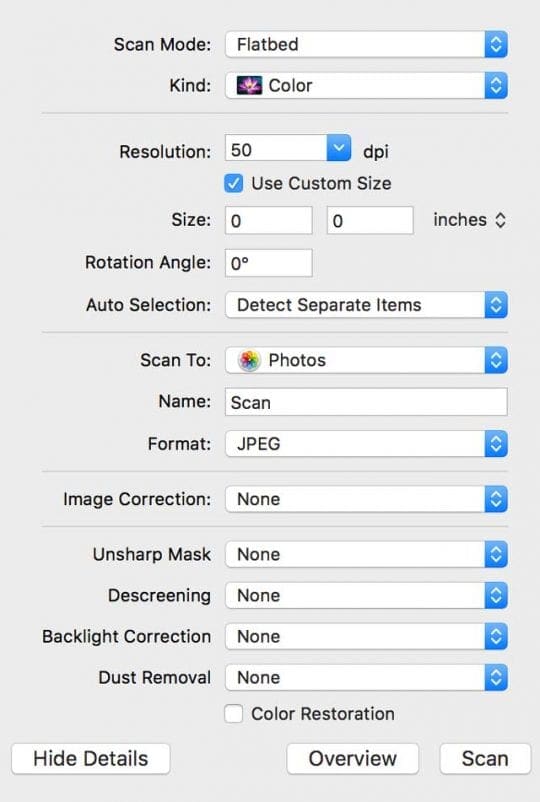
- To change DPI and other settings, select the Show Details button
- Place the photo or content you want to scan face down on the glass in the scanner and choose the Scan button
- Once completed, a Scan Results Window pops-up with your current scan
- Tap the magnifying glass to locate the scanned image, then rename and open it
- Image Capture works with your System Photo Library
- Check if the scan is performed as intended
- Check file details, dimensions, and the pixels (DPI)
- If not acceptable, delete the current scan and rescan with any revised settings
- Tap the magnifying glass to locate the scanned image, then rename and open it
- To change the location of scans, select the Show Details button and change the Scan To Folder to your desktop or location of choice or create a Scanned Photos folder
- Open Photos from your dock or your Applications folder
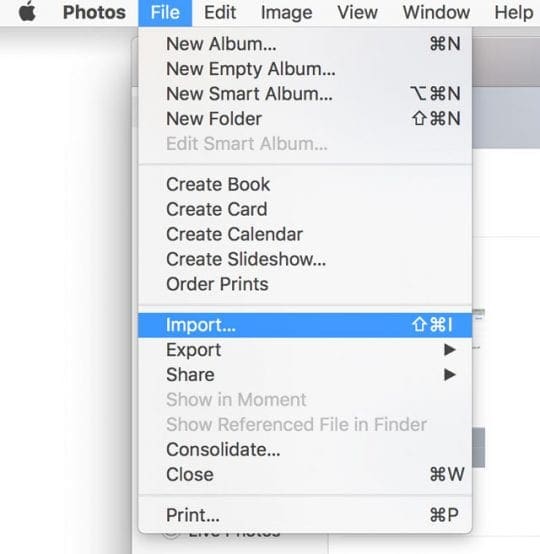
- Click on the Photos menu File > Import, select the image(s) you want to import and click Review for Import
- Your scanned Photo is now in your Photos Library
Use Image Capture to scan images directly into iPhoto
- Open Image Capture from your dock or the Applications folder.
- Select Show Details and change the Scan To: to Photos
- Place the photo you want to scan face down on the glass in the scanner
- If you want to adjust the settings like DPI, size, and format, hit the button ‘Show Details.’ The scanner shows you a preview, and you adjust the settings as you wish
- Hit the button Scan
Refer this article to know more information about scanning to MAC. Link: Click Here
Let me know how it goes!
Have a great day ahead! 🙂
Please click “Accept as Solution” if you feel my post solved your issue, it will help others find the solution.
Click the “Kudos, Thumbs Up" on the bottom right to say “Thanks” for helping!
A4Apollo
I am an HP Employee