-
×InformationNeed Windows 11 help?Check documents on compatibility, FAQs, upgrade information and available fixes.
Windows 11 Support Center. -
-
×InformationNeed Windows 11 help?Check documents on compatibility, FAQs, upgrade information and available fixes.
Windows 11 Support Center. -

Create an account on the HP Community to personalize your profile and ask a question
Your account also allows you to connect with HP support faster, access a personal dashboard to manage all of your devices in one place, view warranty information, case status and more.
Common problems HP Solution Center not working : Adobe Flash Player Error and Unable to scan
We would like to share some of the most frequently asked questions about HP Solution Center not working : Adobe Flash Player Error and Unable to Scan.

It has been a while since anyone has replied. Simply ask a new question if you would like to start the discussion again.
02-23-2019 01:31 PM - edited 02-23-2019 02:02 PM
 HP Recommended
Product: photosmart D110
Operating System: Microsoft Windows 10 (64-bit)
after installing new print cartriges. it won't align. Says it does not recognize the page that was printed when I installed cartriges. They are all black, no color printed. Help!!!
I just tried printing a very colorful photo. It was only 3 colors, mostly yellow , some black, pink streaks. I have had the cartridge for some time, but it was sealed in the foil container. Think the cartridge is just bad? They are so expnsive!
5 REPLIES 5
02-27-2019 10:33 AM
HP Recommended
Welcome to the HP Support Community.
Are you able to copy in color? If the ink cartridges are not used for some months, they do tend to dry up.
Clean the cartridge contacts
Follow these steps to clean the cartridge contacts.
-
Gather the following materials:
-
Dry foam-rubber swabs, lint-free cloth, or any soft material that will not come apart or leave fibers (coffee filters work well)
-
Distilled, filtered, or bottled water (tap water might contain contaminants that can damage the cartridges)
caution:
Do not use platen cleaners or alcohol to clean the cartridge contacts. These can damage the cartridge or the product.
-
-
Press the Power button (
 ) to turn on the product.
 -
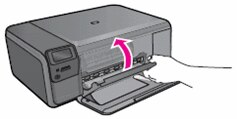
Open the cartridge door. The carriage moves to the center of the product. Wait until the carriage is idle and silent before continuing.
Figure : Open the cartridge door

-
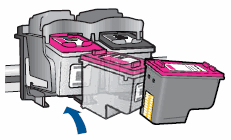
Press down on the cartridge to release it, and then pull the cartridge toward you to remove it from its slot.
Figure : Remove the cartridge

caution:
Do not remove both cartridges at the same time. Remove and clean each cartridge one at a time. Do not leave a cartridge outside the product for more than 30 minutes.
-
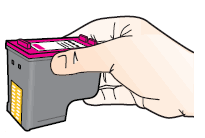
Hold the cartridge by its sides.
Figure : Hold the cartridge by its sides
-
Dip a clean foam-rubber swab or lint-free cloth into distilled water, and then squeeze any excess water from it.
-
With the damp swab or cloth, clean the copper-colored contacts on the cartridge.
warning:
Do not clean the ink nozzles on the cartridge. Clean only the copper-colored contacts.
Figure : Clean the contacts
-
Copper-colored contacts
-
Ink nozzles (do not clean)
-
-
Allow the cartridge contacts to dry for approximately 10 minutes.
-
Lightly moisten another cotton swab with distilled water, and then squeeze any excess water from the swab.
-
Use the swab to clean the contacts in the carriage, located inside the product. Allow the contacts to dry for approximately 10 minutes.
-
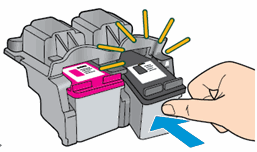
Hold the cartridge by its sides with the nozzles toward the product, and then insert the cartridge into its slot at a slight upward angle. Make sure that the icon on the cartridge matches the icon on the slot.
Figure : Insert the cartridge into its slot
-
Push the cartridge forward into its slot, and then press it upward until it snaps into place.
Figure : Snap the cartridge into place
-
Repeat these steps for the other cartridge.
-
Close the cartridge door.
Figure : Close the cartridge door
Print and evaluate a Print Quality Diagnostic Report and troubleshoot defects
Follow these steps to print, and then evaluate the Print Quality Diagnostic Report.
Step 1: Print a Print Quality Diagnostic Report
-
Load plain white paper in the input tray.
-
Touch the ATM button (
 ) next to the Setup icon (
 ) in the lower-left corner of the control panel.
 -
Touch the right arrow button (
 ) to select Tools, and then touch OK.
 -
Touch the right arrow button (
) to select Print Quality Report, and then touch OK. The printer prints the report.
Let me know how this report looks.
If the information I've provided was helpful, give us some reinforcement by clicking the Accepted Solution and Kudos buttons, that'll help us and others see that we've got the answers!
Thanks!
Have a great day!
I am an HP Employee
02-28-2019 12:01 PM
HP Recommended
Thank you for all the great info! It will only print a faded yellow and the page has some pink lines. Have not done anything yet. I suppose an eyeglass cleaning cloth would work, don't want to ust a q-tip.
If I just bought a new cartride (this one was very old, but sealed in the fiol pack) will it work? or will I beed to clean the contacts inside the printer. Hate to waste the money unnecessarily (rarely print anything color).
Has been a great printer for me for years. Got It on a black friday deal for around $25.00! But you have to spend tons more than that on ink!! Thanks again
Frank
02-28-2019 02:36 PM
HP Recommended
I suggest that you first try out the troubleshooting steps given to you. If it does not help the situation, please do buy new ink cartridges and then try printing.
If the information I've provided was helpful, give us some reinforcement by clicking the Accepted Solution and Kudos buttons, that'll help us and others see that we've got the answers!
Thanks!
I am an HP Employee
Be alert for scammers posting fake support phone numbers and/or email addresses on the community.
If you think you have received a fake HP Support message, please report it to us by clicking on "Flag Post".
† The opinions expressed above are the personal opinions of the authors, not of HP. By using this site, you accept the Terms of Use and Rules of Participation.


Didn't find what you were looking for?
Ask the community
† The opinions expressed above are the personal opinions of the authors, not of HP. By using this site, you accept the <a href="https://www8.hp.com/us/en/terms-of-use.html" class="udrlinesmall">Terms of Use</a> and <a href="/t5/custom/page/page-id/hp.rulespage" class="udrlinesmall"> Rules of Participation</a>.