-
×InformationNeed Windows 11 help?Check documents on compatibility, FAQs, upgrade information and available fixes.
Windows 11 Support Center. -
-
×InformationNeed Windows 11 help?Check documents on compatibility, FAQs, upgrade information and available fixes.
Windows 11 Support Center. -
- HP Community
- Printers
- Scanning, Faxing, and Copying
- hp photosmart 7520 scan to email will not connect to server

Create an account on the HP Community to personalize your profile and ask a question
Your account also allows you to connect with HP support faster, access a personal dashboard to manage all of your devices in one place, view warranty information, case status and more.
Common problems HP Solution Center not working : Adobe Flash Player Error and Unable to scan
We would like to share some of the most frequently asked questions about HP Solution Center not working : Adobe Flash Player Error and Unable to Scan.

It has been a while since anyone has replied. Simply ask a new question if you would like to start the discussion again.
11-15-2018 01:19 PM
 HP Recommended
Product: hp photosmart 7520
Operating System: Microsoft Windows 8.1 (64-bit)
No recent changes, the printer has been working fine, on occaision the connection to routers is dropped. When this happens have to reset router, laptop, printer. but now it will not connect to server, yet all the print test pages show connection is great and working, but when i try to scan a document to my email it says "unable to connect to server".
5 REPLIES 5
11-17-2018 04:38 PM
HP Recommended
Welcome to HP forums, I see that you are getting "unable to connect to server" error.
Turn on Web Services from the Embedded Web Server (EWS)
- Print a Network Configuration Page, print the page from the Wireless, Network Settings or Setup menu.
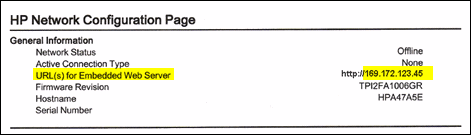
- On the Network Configuration Page, locate the URL(s) for Embedded Web Server address.
- NOTE:
-
If the URL for the EWS is http://0.0.0.0, the printer is not connected to a network. Reconnect your printer to the network, and then continue troubleshooting.
- Figure : Locating the URL(s) for Embedded Web Server address
- On your computer, open an Internet browser.
- Type the URL address for the EWS in the browser address bar, and then press Enter.
-
Make sure to type the IP address into the Internet browser's address box. If typed into a toolbar search box or search engine, the EWS does not open.
- If a website security certificate displays in the Internet browser, click Continue.
- The EWS webpage for the printer opens, which confirms that the printer is on the same network as the computer.
- On the EWS webpage, click the Web Services tab.
- On the Web Services Setup page, click Continue, Turn On, or Enable, and then follow the on-screen instructions
- Figure : Example of clicking Continue

You can refer to this HP document for more assistance:- Click here
Let me know how it goes.
To thank me for my efforts to help you, please mark my post as an accepted solution so that it benefits several others.
Cheers.
Sandytechy20
I am an HP Employee
11-18-2018 05:48 PM
HP Recommended
Sandy,
thanks for getting back, i went to the hp printer and printed off the network config page.
my url reads as follows:
URL(s) for embedded web server http://HP1A1673
both these items
thxs
Dan
11-19-2018 02:46 PM
HP Recommended
Thanks for the reply.
I appreciate your time and effort.
It is a valid IP address.
Just type that IP address in the browser to open the EWS page.
Let me know if that helps.
Cheers.
Sandytechy20
I am an HP Employee
11-21-2018 01:00 PM
HP Recommended
It looks like you were interacting with @sandytechy20, but he is out for the day & I'll be glad to help you out.
I'm Raj1788 & I'm at your service.
Make sure the printer is connected to the network and the wireless light should be steady blue.
We can try and fix this issue by assigning a public DNS address. It’s very simple as explained below:
- Obtain the IP address of the printer – You can touch the “wireless” icon on the printer control panel to get the IP address.
- Type the IP address on your web browser to obtain the printer EWS page on your computer.
- Go to "Network" tab - General - Select "Network protocols" - Select "Enable IPv4 only" (or similar) - Apply the settings.
- Go to the “Network” tab – Click on “Wireless (802.11) – Then click on “Network address (IPv4)
- Click on the radio button which says “Manual IP” and then click “Suggest a manual IP address” to give a manual IP address to your printer.
- Click on radio button which says “Manual DNS Server” and under manual preferred type 8.8.8.8 and under manual alternate type 8.8.4.4 (This is Google DNS server address)
Now restart the printer and then try to perform a scan to email. You can also check https://support.hp.com/in-en/document/c03953891 and follow the steps under “Scan directly to email (wireless Internet connections only)” for setting up the scan to email again.
If the issue persists, Try updating the printer firmware and then try the steps mentioned in my above post. You can download and install the printer firmware from here: https://support.hp.com/us-en/product/hp-photosmart-7520-e-all-in-one-printer-series/5199461/document...
Once done, restart the printer and check.
Also, try creating a new scan to email profile and then try to check. You can follow the steps below:
-
Obtain the IP address of the printer – You can touch the “wireless” icon on the printer control panel to get the IP address.
-
Type the IP address on your web browser to obtain the printer EWS page on your computer.
-
From the EWS, click the Scan tab.
-
Click Scan to Email Setup.
-
Click Outgoing Email Profile, click New, and then enter the email address you intend to use with this profile.
-
Enter a display name that will appear on the printer's control panel to identify this email profile.
-
Enter or confirm the correct SMTP server and SMTP port information.
-
If you typically have to enter a username and password to log into your email account, you will want to enter this information into the email authentication fields, and then click Next.
-
Enter a security PIN to restrict access to this email profile, if desired.
-
Set the size for email files and specify Auto CC, if desired.
-
Click Save or Save and test to complete the profile
Hope that helps!
If the information I've provided was helpful, give us some reinforcement by clicking the Accepted Solution and Kudos buttons, that'll help us and others see that we've got the answers!
Have a great day!
Cheers:)
Raj1788
I am an HP Employee
Be alert for scammers posting fake support phone numbers and/or email addresses on the community.
If you think you have received a fake HP Support message, please report it to us by clicking on "Flag Post".
† The opinions expressed above are the personal opinions of the authors, not of HP. By using this site, you accept the Terms of Use and Rules of Participation.


Didn't find what you were looking for?
Ask the community
† The opinions expressed above are the personal opinions of the authors, not of HP. By using this site, you accept the <a href="https://www8.hp.com/us/en/terms-of-use.html" class="udrlinesmall">Terms of Use</a> and <a href="/t5/custom/page/page-id/hp.rulespage" class="udrlinesmall"> Rules of Participation</a>.