-
×InformationNeed Windows 11 help?Check documents on compatibility, FAQs, upgrade information and available fixes.
Windows 11 Support Center. -
-
×InformationNeed Windows 11 help?Check documents on compatibility, FAQs, upgrade information and available fixes.
Windows 11 Support Center. -
- HP Community
- Printers
- Scanning, Faxing, and Copying
- Re: machine will scan from the document feeder , but not pri...

Create an account on the HP Community to personalize your profile and ask a question
Your account also allows you to connect with HP support faster, access a personal dashboard to manage all of your devices in one place, view warranty information, case status and more.
Common problems HP Solution Center not working : Adobe Flash Player Error and Unable to scan
We would like to share some of the most frequently asked questions about HP Solution Center not working : Adobe Flash Player Error and Unable to Scan.

It has been a while since anyone has replied. Simply ask a new question if you would like to start the discussion again.
07-06-2021 09:56 AM
 HP Recommended
Product: officejet pro 8630
my 8630 will not print from the document feeder, but will scan from the feeder
Solved! Go to Solution.
1 ACCEPTED SOLUTION
Accepted Solutions
07-10-2021 03:55 AM
HP Recommended
HI@rfalaschi, Welcome to the HP Support Community!
We reviewed your post and I understand that the printer feeder does not pick up the paper.
Don’t worry, I assure you I will try my best to get this sorted.
I recommend you follow the below steps and check if it help
Reset the printer
- Turn on the printer, if it is not already on.
- Wait until the printer is idle and silent before you continue.
- With the printer turned on, disconnect the power cord from the rear of the printer.
- Wait at least 30 seconds.
- Plug back the power cable straight to a wall outlet without any surge protector and printer.
- Turn on the printer.
Check the condition of the paper
-
Press the Power button to turn off the printer.
WARNING:
You must disconnect the power cord before reaching inside the printer to avoid risk of injuries or electric shock.
-
Disconnect the USB or Ethernet cable from the rear of the printer.
-
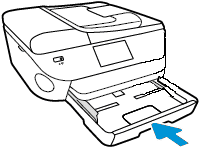
Pull the output tray toward you to remove it, and then pull the input tray toward you to open it.
Figure : Pull to open the input tray

-
Remove any paper from the photo tray.
-
With the input tray pulled out, push in the photo tray as far as possible.
Figure : Push in the photo tray
-
Remove any paper from the input tray, and then examine the condition of the paper or photo paper:
-
Replace any ripped, curled, wrinkled, or bent paper.
-
Avoid printing on paper that is dusty. Reload paper that has been in the photo tray for a time.
-
Make sure that all the paper in the stack is the same size and type. The printer can only process one type of paper at a time.
-
Clean the paper feed and pick rollers
Step 1: Clean the paper feed rollers
Follow these steps to clean the paper feed rollers.
-
Remove any paper in the printer before you clean the rollers.
-
Press the Power button to turn off the printer, if it is not off already.
-
Disconnect the power cord from the rear of the printer.
WARNING:
You must disconnect the power cord before reaching inside the printer to avoid risk of injuries or electric shock.
-
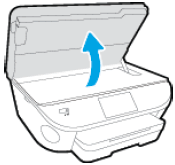
Open the cartridge access door.
Figure : Open the cartridge access door
-
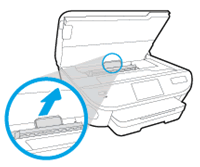
Locate the paper path cover, grasp the handle, and then lift up to remove it.
Figure : Remove the paper path cover
-
Lightly dampen a clean swab with the water, and then squeeze any excess liquid from the swab.
-
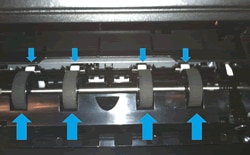
Press the swab against the rollers inside the printer, and then rotate the rollers upwards with your fingers. Apply a moderate amount of pressure to remove any dust or dirt buildup.
Figure : Clean the rollers in the paper path access area
-
Replace the paper path cover, and then close the cartridge access door.
Figure : Close the cartridge access door

-
Gently turn the printer onto its right side, and then pull open the input tray so that you can access its underside.
Figure : Turn the printer onto its right side

-
Lightly dampen a clean swab with the water, and then squeeze any excess liquid from the swab.
-
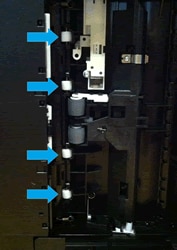
Clean the rollers in the gap behind the input tray. Make sure that none of the rollers are not missing, that they turn easily, and that they are springy when you press them.
Figure : Clean the rollers behind the input tray
-
Before you turn the printer over to its normal position, continue to the next step to clean the paper pick rollers.
Step 2: Clean the paper pick rollers
Follow these steps to clean the paper pick rollers.
-
Make sure that the printer is turned off, the power cord is disconnected, and the printer is turned onto its right side with the input tray open.
-
Lightly dampen a clean swab with the water, and then squeeze any excess liquid from the swab.
-
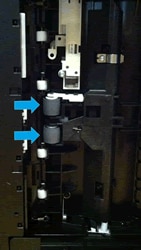
Press the swab against the rollers inside the printer, and then rotate the rollers upwards with your fingers. Apply a moderate amount of pressure to remove any dust or dirt buildup.
Figure : Clean the paper pick rollers
-
Make sure that the rollers turn easily when you press them.
-
Allow the rollers to dry for 10 to 15 minutes.
-
Turn the printer over to its normal position.
-
Reconnect the power cord to the rear of the printer, and then press the Power button to turn on the printer.
You can refer to this HP document for more assistance:- Click here
Hope this helps! Keep me posted.
Please click “Accept as Solution” if you feel my post solved your issue, it will help others find the solution.
Click the “Kudos, Thumbs Up" on the bottom right to say “Thanks” for helping!
Have a great day!
5 REPLIES 5
07-06-2021 11:03 AM
HP Recommended
I have just purchase a hp printer on my old printer I could scan a document and it would go into document file so the when I email someone I can get the doc I scanned from my document file and attach to the email don"t seem to be able to do this with this printer any suggestions
07-06-2021 11:37 AM
HP Recommended
My 8630 office jet will scan from the document feeder, but has now stopped printing from the document feeder. When trying to print, the document feeder runs all the sheets through, and then asks to reload and start again.
07-10-2021 03:55 AM
HP Recommended
HI@rfalaschi, Welcome to the HP Support Community!
We reviewed your post and I understand that the printer feeder does not pick up the paper.
Don’t worry, I assure you I will try my best to get this sorted.
I recommend you follow the below steps and check if it help
Reset the printer
- Turn on the printer, if it is not already on.
- Wait until the printer is idle and silent before you continue.
- With the printer turned on, disconnect the power cord from the rear of the printer.
- Wait at least 30 seconds.
- Plug back the power cable straight to a wall outlet without any surge protector and printer.
- Turn on the printer.
Check the condition of the paper
-
Press the Power button to turn off the printer.
WARNING:
You must disconnect the power cord before reaching inside the printer to avoid risk of injuries or electric shock.
-
Disconnect the USB or Ethernet cable from the rear of the printer.
-
Pull the output tray toward you to remove it, and then pull the input tray toward you to open it.
Figure : Pull to open the input tray
-
Remove any paper from the photo tray.
-
With the input tray pulled out, push in the photo tray as far as possible.
Figure : Push in the photo tray
-
Remove any paper from the input tray, and then examine the condition of the paper or photo paper:
-
Replace any ripped, curled, wrinkled, or bent paper.
-
Avoid printing on paper that is dusty. Reload paper that has been in the photo tray for a time.
-
Make sure that all the paper in the stack is the same size and type. The printer can only process one type of paper at a time.
-
Clean the paper feed and pick rollers
Step 1: Clean the paper feed rollers
Follow these steps to clean the paper feed rollers.
-
Remove any paper in the printer before you clean the rollers.
-
Press the Power button to turn off the printer, if it is not off already.
-
Disconnect the power cord from the rear of the printer.
WARNING:
You must disconnect the power cord before reaching inside the printer to avoid risk of injuries or electric shock.
-
Open the cartridge access door.
Figure : Open the cartridge access door
-
Locate the paper path cover, grasp the handle, and then lift up to remove it.
Figure : Remove the paper path cover
-
Lightly dampen a clean swab with the water, and then squeeze any excess liquid from the swab.
-
Press the swab against the rollers inside the printer, and then rotate the rollers upwards with your fingers. Apply a moderate amount of pressure to remove any dust or dirt buildup.
Figure : Clean the rollers in the paper path access area
-
Replace the paper path cover, and then close the cartridge access door.
Figure : Close the cartridge access door
-
Gently turn the printer onto its right side, and then pull open the input tray so that you can access its underside.
Figure : Turn the printer onto its right side
-
Lightly dampen a clean swab with the water, and then squeeze any excess liquid from the swab.
-
Clean the rollers in the gap behind the input tray. Make sure that none of the rollers are not missing, that they turn easily, and that they are springy when you press them.
Figure : Clean the rollers behind the input tray
-
Before you turn the printer over to its normal position, continue to the next step to clean the paper pick rollers.
Step 2: Clean the paper pick rollers
Follow these steps to clean the paper pick rollers.
-
Make sure that the printer is turned off, the power cord is disconnected, and the printer is turned onto its right side with the input tray open.
-
Lightly dampen a clean swab with the water, and then squeeze any excess liquid from the swab.
-
Press the swab against the rollers inside the printer, and then rotate the rollers upwards with your fingers. Apply a moderate amount of pressure to remove any dust or dirt buildup.
Figure : Clean the paper pick rollers
-
Make sure that the rollers turn easily when you press them.
-
Allow the rollers to dry for 10 to 15 minutes.
-
Turn the printer over to its normal position.
-
Reconnect the power cord to the rear of the printer, and then press the Power button to turn on the printer.
You can refer to this HP document for more assistance:- Click here
Hope this helps! Keep me posted.
Please click “Accept as Solution” if you feel my post solved your issue, it will help others find the solution.
Click the “Kudos, Thumbs Up" on the bottom right to say “Thanks” for helping!
Have a great day!
Be alert for scammers posting fake support phone numbers and/or email addresses on the community.
If you think you have received a fake HP Support message, please report it to us by clicking on "Flag Post".
† The opinions expressed above are the personal opinions of the authors, not of HP. By using this site, you accept the Terms of Use and Rules of Participation.


Didn't find what you were looking for?
Ask the community
† The opinions expressed above are the personal opinions of the authors, not of HP. By using this site, you accept the <a href="https://www8.hp.com/us/en/terms-of-use.html" class="udrlinesmall">Terms of Use</a> and <a href="/t5/custom/page/page-id/hp.rulespage" class="udrlinesmall"> Rules of Participation</a>.