• ×
    Information
    Windows update impacting certain printer icons and names. Microsoft is working on a solution.
    Click here to learn more
    Information
    Need Windows 11 help?
    Check documents on compatibility, FAQs, upgrade information and available fixes.
    Windows 11 Support Center.
  • post a message
  • ×
    Information
    Windows update impacting certain printer icons and names. Microsoft is working on a solution.
    Click here to learn more
    Information
    Need Windows 11 help?
    Check documents on compatibility, FAQs, upgrade information and available fixes.
    Windows 11 Support Center.
  • post a message
Guidelines
Note: From May 1, 2024, the HP Scan and Capture app will no longer be available (retired) in the Microsoft Store and HP will not release any further app updates. Alternatively, you can download HP Smart from the Microsoft Store. For more information on how to set up your printer using the HP Smart app, go to HP printer setup (HP Smart app).
Common problems HP Solution Center not working : Adobe Flash Player Error and Unable to scan
We would like to share some of the most frequently asked questions about HP Solution Center not working : Adobe Flash Player Error and Unable to Scan.
HP Recommended
HP color Laser jet MFP m281 fdw
Microsoft Windows 10 (64-bit)

How do I open the scan to network wizard feature. I was scannining nicely after using the ews to set up my scan to nework . Then for some reason it no longer works I still have the folders with all the nescessary permissions but can't scan from my printer to them I need to set it up again but using the same paths I get nowhere can you give some light on this for me what could be wrong  other than a faulty printer?

1 REPLY 1
HP Recommended

Hi @Webbstevenator,


I'd like to help!


Configuring Scan to Network Folder Using the Scan to Network Folder Wizard

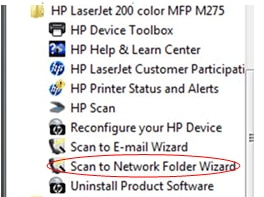
  1. From the Windows desktop click StartAll Programs and then select the HP program group.

  2. Click the HP LaserJet Pro M200, M300 or M400 (example shown is the HP TopShot M275) and choose Scan to Network Folder Wizard.

    Figure : Scan to Network Folder Wizard

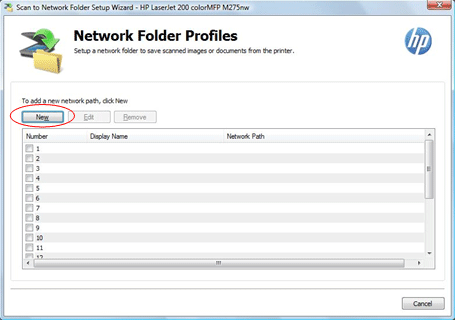
  3. Click New to setup and create a new network folder to save scanned images.

    Figure : Adding a new network path

  4. In the Scan to Network Folder wizard click Browse.

    Figure : Selecting a destination folder to save scanned files

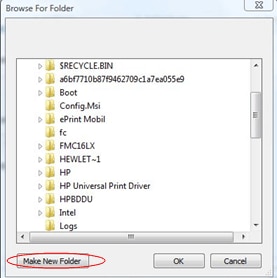
  5. Select a destination folder if a folder already exists or click the Make New Folder button to create a new folder to save the scanned images in.

    Figure : Creating a new folder to save the scanned images

  6. Assign a name for the folder in the Display Name field. This name will appear on the printer control panel. Optionally, check the box to create a Windows desktop shortcut for the network folder. Click Next.

    Figure : Assigning a name for the folder

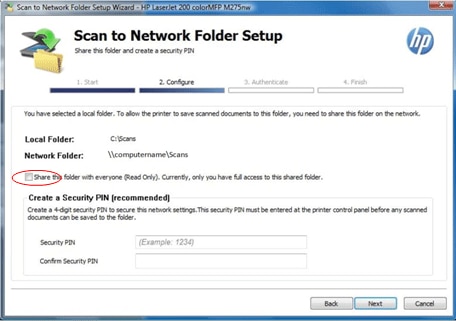
  7. Click the Share this folder with everyone… if you want others on the network to have access to the folder. A security PIN can also be created if desired to prevent unauthorized persons from saving scans to the network folder. If a PIN has been set for the network folder, it must be entered at the products control panel each time a scan is performed .

    Figure : Sharing the folder on the network

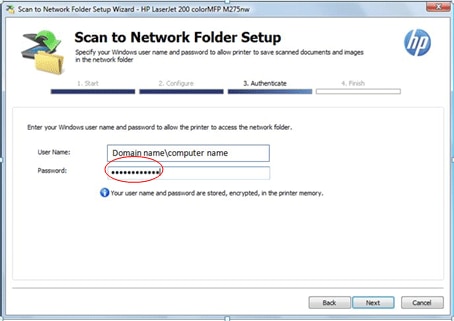
  8. If the system requires a Windows user password enter the password and then click Next.

    Figure : Allowing the printer to access the network folder

  9. Click the Save and Test button to test the configuration and save the settings.

    Figure : Confirming your settings

  10. Click Finish to close the Scan to Network Folder Wizard.

    Figure : Scan to Network Folder Wizard

Method 2: Configuring Scan to Network Folder Using the Embedded Web Server

  1. On a Mac or Windows computer the Embedded Web Server can be accessed by entering the product's IP Address into a web browser and press the Enter key to open the Embedded Web Server. Then proceed to step 2.

    Figure : Entering the product's IP Address

    Or (for Mac only)

    1. Click the HP Utility icon on the dock or in the Utilities folder.

      Figure : HP Utility

    2. In the HP Utility click Additional Settings.

      Figure : HP Utility - Additional Settings

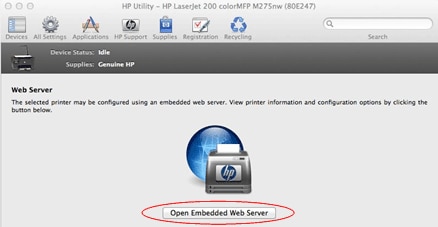
    3. Next, select Open Embedded Web Server.

      Figure : Opening Embedded Web Server

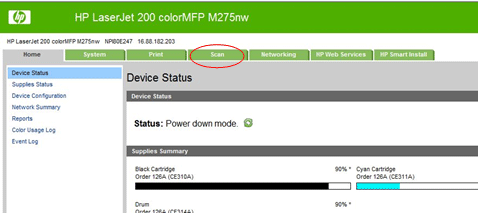
  2. Select the Scan tab in the Embedded Web Server.

    Figure : Embedded Web Server - Selecting Scan tab

  3. On the left navigation area select Network Folder Setup and then click New.

    Figure : Network Folder Setup

  4. In the Network Folder Information section enter the following information:

    1. Display Name – this is the name that will appear on the printer control panel.

    2. Network Path – this is the path to the folder where the scan images will be saved. The folder must already exist; the folder cannot be created from the setup within the embedded web server.

    3. User Name – this is the name used to log into the computer.

    4. Password – this is the password used to log into the computer.

    NOTE: 

    If desired a PIN number can be setup to prevent unauthorized persons from saving scans to the network folder. The PIN must be entered at the products control panel each time a scan is performed if a PIN has been set for the network folder.

    Figure : Network Folder Information

  5. Click Save and Test to complete the setup.

    Figure : Completing the setup

you may also refer to -Set up the Scan to Network Folder feature


Hope this helps! Keep me posted. 


And, Welcome to the HP Support Community. 


Please click “Accept as Solution” if you feel my post solved your issue, it will help others find the solution.

Click the “Kudos, Thumbs Up" on the bottom right to say “Thanks” for helping

† The opinions expressed above are the personal opinions of the authors, not of HP. By using this site, you accept the <a href="https://www8.hp.com/us/en/terms-of-use.html" class="udrlinesmall">Terms of Use</a> and <a href="/t5/custom/page/page-id/hp.rulespage" class="udrlinesmall"> Rules of Participation</a>.