• ×
    Information
    Need Windows 11 help?
    Check documents on compatibility, FAQs, upgrade information and available fixes.
    Windows 11 Support Center.
  • post a message
  • ×
    Information
    Need Windows 11 help?
    Check documents on compatibility, FAQs, upgrade information and available fixes.
    Windows 11 Support Center.
  • post a message
Guidelines
Note: From May 1, 2024, the HP Scan and Capture app will no longer be available (retired) in the Microsoft Store and HP will not release any further app updates. Alternatively, you can download HP Smart from the Microsoft Store. For more information on how to set up your printer using the HP Smart app, go to HP printer setup (HP Smart app).
Common problems HP Solution Center not working : Adobe Flash Player Error and Unable to scan
We would like to share some of the most frequently asked questions about HP Solution Center not working : Adobe Flash Player Error and Unable to Scan.
HP Recommended
Envy 7640
Microsoft Windows 10 (64-bit)

server connection error on printer, print and scan doctor says fixed

1 REPLY 1
HP Recommended

@PhilipJ


Welcome to HP support community.


Restart the computer, printer, and router.

  1. Turn off the router by pressing the power button or disconnecting the power cord.

  2. Turn off the printer.

  3. Close all running programs on your computer, and then shut down the computer.

  4. Press the power button or reconnect the power cord to the router, and then wait for the Internet activity light to display a normal connected status.

  5. Turn on the printer.

  6. Turn on the computer.

  7. Try to turn on Web Services..

Turn on Web Services from the Embedded Web Server (EWS)

  1. Print the Network Configuration page from the Wireless, Network Settings or Setup menu.
  2. On the Network Configuration Page, locate the URL(s) for Embedded Web Server address.

  3. Figure : Locating the URL(s) for Embedded Web Server addressLocating the URL(s) for Embedded Web Server address

  4. On your computer, open an Internet browser.

  5. Type the URL address for the EWS in the browser address bar, and then press Enter.

  6. If a website security certificate displays in the Internet browser, click Continue.

  7. The EWS webpage for the printer opens, which confirms that the printer is on the same network as the computer.

  8. On the EWS webpage, click the Web Services tab.

  9. On the Web Services Setup page, click Continue, Turn On, or Enable, and then follow the on-screen instructions

  10. Figure : Example of clicking Continue

    Example of clicking Continue.

Check the Internet proxy server settings

  1. Locate the Internet proxy settings.

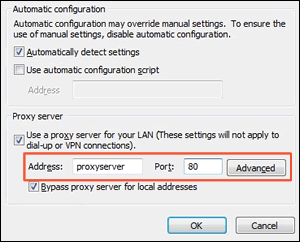
    • Windows: Search Windows for Internet, and then click Internet Options in the list of results. On the Internet Properties window, click the Connections tab, select your network, if necessary, and then click Settings.

      The network settings menu displays with the proxy settings.

    • Figure : Example of proxy settings in Windows

      • Example of proxy settings in Windows
      Write down the Address and Port values for your proxy server connection.
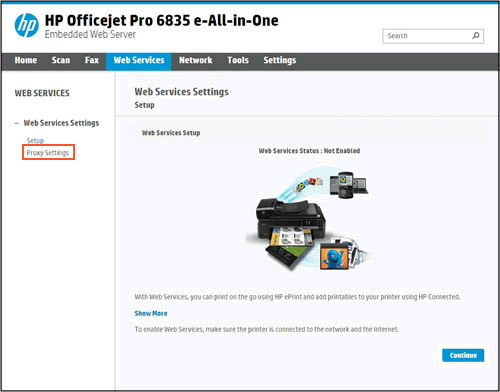
  2. From the EWS, click the Web Services tab, and then click Proxy Settings.

  3. Figure : Clicking Proxy Settings

  4. Clicking Proxy Settings

  5. Type the Address and Port values for your proxy server connection, and then click Apply.

  6. Try to turn on Web Services.

Update the printer firmware

  1. Make sure the printer is on and connected to the computer through your local network or USB cable.

  2. Go to HP Customer Support - Software and Driver Downloads.

  3. If a Let's identify your product to get started page displays, click Printer.

  4. Type your printer model number, and then click Submit.

    The software results page for your printer displays with the default operating system selected.

  5. If you need to change the version of Windows, click Change, select your version, and then click Change.

  6. Click Firmware, and then click Download.

    If a Firmware section is not listed, an update is not currently available for your printer.

  7. Save the file to your computer.

  8. Locate and then open the file to start the installation process.

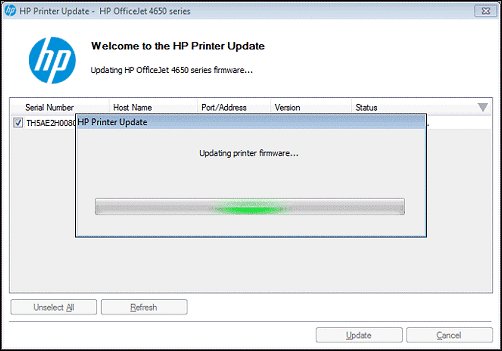
  9. When the HP Printer Update window opens, see if the printer serial number displays.

    • If the serial number displays, select the checkbox next to it, and then click Update.

    • If the serial number displays but the status is 'not applicable' (grayed out), you do not need the firmware update. Click Cancel.

    • If the serial number does not display and your printer uses a network connection, connect a USB cable to the printer and computer. Wait 20 seconds, and then click Refresh. When the serial number displays, select the checkbox next to it, and then click Update.

     The HP Printer Update utility window showing a serial number selected for an HP OfficeJet 4650 and an activity bar showing that the update is in progress.

  10. When the update completes, click OK.

  11. If you connected a USB cable to update your network printer, remove the USB driver installed by Windows.

    1. Search Windows for control panel, and then click Control Panel in the results.

    2. Click View Devices and printers.

    3. Right-click the USB printer device that matches your printer model, and then select Remove Device.

    4. Disconnect the USB cable from the printer and the computer, and then restart the computer.

You can refer this HP document for more assistance:- Click  here


Let me know how it goes.

To thank me for my efforts to help you, please mark my post as an accepted solution so that it benefits several others.

Cheers.

Sandytechy20
I am an HP Employee

† The opinions expressed above are the personal opinions of the authors, not of HP. By using this site, you accept the <a href="https://www8.hp.com/us/en/terms-of-use.html" class="udrlinesmall">Terms of Use</a> and <a href="/t5/custom/page/page-id/hp.rulespage" class="udrlinesmall"> Rules of Participation</a>.