• ×
    Information
    Need Windows 11 help?
    Check documents on compatibility, FAQs, upgrade information and available fixes.
    Windows 11 Support Center.
  • post a message
  • ×
    Information
    Need Windows 11 help?
    Check documents on compatibility, FAQs, upgrade information and available fixes.
    Windows 11 Support Center.
  • post a message
Guidelines
Note: From May 1, 2024, the HP Scan and Capture app will no longer be available (retired) in the Microsoft Store and HP will not release any further app updates. Alternatively, you can download HP Smart from the Microsoft Store. For more information on how to set up your printer using the HP Smart app, go to HP printer setup (HP Smart app).
Common problems HP Solution Center not working : Adobe Flash Player Error and Unable to scan
We would like to share some of the most frequently asked questions about HP Solution Center not working : Adobe Flash Player Error and Unable to Scan.
HP Recommended
HP photosmart 7520
Microsoft Windows 7 (32-bit)

print quality went from great tp spewing our blank pages. REplaced all the ink cartridges and uder the tool setting I cleaned the printhead and aligned the printer. first quarter of printed page is OK the dwindles down to awful and illegible.

The printer is a HPphotoprint 7520

1 REPLY 1
HP Recommended

Hi @Roz11


Welcome to HP Support Forums. A really great platform for posting all your questions and finding solutions.
 

I understand that the print quality has gone bad and you have already replaced the cartridges.


I'd like to help.


Please clean the Printhead Manually.


Gather the following items:

  • A clean disposable container capable of holding enough water to submerge the printhead

  • Two clean lint free cloths such as coffee filters

  • Filtered or distilled water (tap or mineral water may contain contaminants that could damage the printhead)

  • A pan and stove or other means of heating water

  • Disposable gloves

  • Paper towels

When manually cleaning the printhead, the printhead nozzles are soaked in very warm water for no longer than ten minutes. Use these steps only as a last resort and if the printhead would be disposed of otherwise.

   CAUTION:Manually cleaning the printhead should only be performed if the printhead is no longer under warranty.

  1. Set the pan on the stove, and then fill the pan with filtered or distilled water.

       CAUTION:Do not use alcohol or other solvents. This might damage the printhead, causing the printhead layers to separate, requiring replacement of the printhead.

  2. Heat the water until the water is very warm to the touch, but do not boil the water.

  3. Stack the paper towels at the bottom of the disposable container until the stack is about 6.5 mm (1/4 inch) deep.

  4. Pour the warm water from the pan into the disposable container so that it is 5 cm (2 inches) deep and covering the paper towels.

  5. Put on disposable gloves to prevent ink from transferring to your skin or clothes.

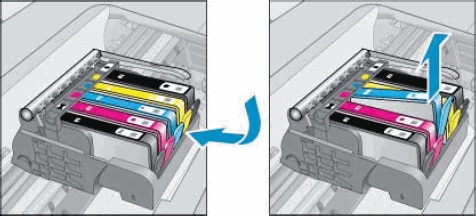
  6. Press the tab on the front of the ink cartridges to release them, and then lift the ink cartridges out of the printhead.

       NOTE:Do not leave the ink cartridge outside the printer for longer than 30 minutes. The printhead and ink cartridges can be damaged by being exposed to air outside of the printer.

    Figure : Removing the ink cartridges

    Image: Remove the ink cartridge from the slot.
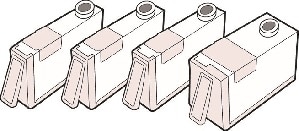
  7. Set the ink cartridges upside down on a paper towel.

    Figure : Placing the ink cartridges upside down

    Image: Place the ink cartridges upside down
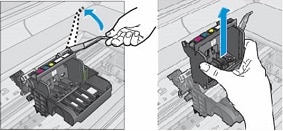
  8. Lift the latch handle on the carriage until it stops, and then carefully lift up on the printhead to remove it from the printer.

    Figure : Removing the printhead

    Image: Remove the printhead
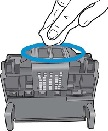
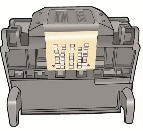
  9. Moisten one of the clean, lint-free cloths with some of the warm water and use it to clean the underside of the printhead. Repeatedly wipe the nozzle area gently until excess black or color ink does not transfer to the cloth. Do not press into the nozzle area as this can cause damage.

       CAUTION:Do not force water into the printhead, this can cause printhead delamination.

    Figure : Wiping the nozzles

    Image: Wipe the nozzles
  10. Place the printhead into the disposable container so that the bottom rests on the paper towels, and then let it soak for 10 minutes.

    Figure : Soaking the printhead

    1. Paper towels

    2. Water level

  11. Remove the printhead, and then gently wipe the excess water with a dry lint free cloth.

       CAUTION:Do not use a hair dryer to dry off the printhead. This could cause the nozzles to dry out and clog.

  12. Let the printhead air-dry on a paper towel for 15 minutes with the nozzles facing up.

       CAUTION:Do not use compressed air to blow out the printhead. This can cause delamination of the printhead.

    Figure : Printhead drying with the nozzles up

    Image: Printhead drying with the nozzles up
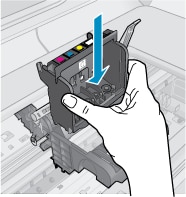
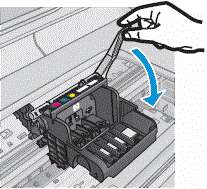
  13. Lower the printhead into the carriage, and then carefully lower the latch handle.

       NOTE:Make sure the colored shapes on the sides of the printhead line up with the colored shapes on the carriage.

    Figure : Installing the new printhead

    Image: Install the new printhead

    Figure : Lowering the latch handle

    Image: Lower the latch handle
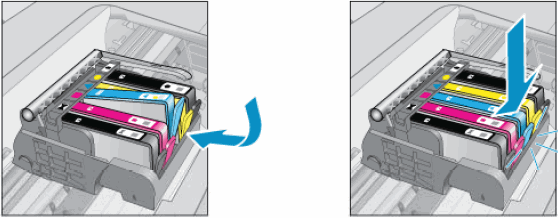
  14. With the ink cartridge contacts facing the printhead, slide the ink cartridge into the correct slot. The color-coded icons on the ink cartridge and in the printhead indicate the correct slot.

    Press down on the ink cartridge until it snaps firmly into place.

    Figure : Inserting the ink cartridge

    Image: Insert the ink cartridge.
  15. Repeat these steps for each ink cartridge.

   NOTE:If you encounter the 'Printhead Problem' error message, turn the printer off and back on again.

If the issue persists, please contact our Phone Support for upgrade options.


Step 1. Open link: www.hp.com/contacthp/
Step 2. Enter Product number or select to auto detect 
Step 3. Scroll down to "Still need help? Complete the form to select your contact options"
Step 4. Scroll down and click: HP contact options - click on Get phone number and phone number appear.


Thank you. 🙂


If the information I've provided was helpful, give us some reinforcement by clicking the "Solution Accepted" and "Kudos" Buttons.


KrazyToad
I Am An HP Employee

† The opinions expressed above are the personal opinions of the authors, not of HP. By using this site, you accept the <a href="https://www8.hp.com/us/en/terms-of-use.html" class="udrlinesmall">Terms of Use</a> and <a href="/t5/custom/page/page-id/hp.rulespage" class="udrlinesmall"> Rules of Participation</a>.