• ×
    Information
    Windows update impacting certain printer icons and names. Microsoft is working on a solution.
    Click here to learn more
    Information
    Need Windows 11 help?
    Check documents on compatibility, FAQs, upgrade information and available fixes.
    Windows 11 Support Center.
  • post a message
  • ×
    Information
    Windows update impacting certain printer icons and names. Microsoft is working on a solution.
    Click here to learn more
    Information
    Need Windows 11 help?
    Check documents on compatibility, FAQs, upgrade information and available fixes.
    Windows 11 Support Center.
  • post a message
Guidelines
We have new content about Hotkey issue, Click here to check it out!
Check out our WINDOWS 11 Support Center info about: OPTIMIZATION, KNOWN ISSUES, FAQs, VIDEOS AND MORE.
HP Recommended

Hi @Reffy,


There is some time being taken to upload the documentation. But i have the steps for you.


Hard Drive removal


Before you begin: Remove six of the bottom rubber pieces, the stand bottom cover, and the stand support bracket.


Steps


  1. Detach the torx 15 screw for the hard drive cage.
  2. Slide the hard drive cage up and partially remove it from the unit.
  3. Detach the combined power and data connector from the hard drive to fully remove the hard drive assembly from the unit.
  4. To remove the drive from the cage, detach the four Phillips #2 screws on the sides of the hard drive cage. Pull the drive out of the cage.


Hard Drive replacement


Steps


  1. Before installing any hard drive in the hard drive cage, make sure there is a rubber grommet on each side hole of the cage. Install a new grommet into any hole missing a grommet.
  2. To replace the hard drive in the cage, align the label side of the drive to the open side of the cage and the connector edge to the open edge of the cage.
  3. The hard drive cage has four tabs on the bottom sides that fit under four other tabs inside the stand.
  4. To replace the hard drive cage into the PC, first reattach the combined power and data connector to the drive.
  5. Place the tabs on the cage near their tabs on the stand, then slide the cage downwards until secure.
  6. Secure the cage to the stand base with its torx 15 screw.
I am an HP employee.

Make it easier for other people to find solutions, by marking my answer “Accept as Solution” if it solves your problem.

***Click on “Thumbs Up” STAR to say thanks!***
HP Recommended

Perfect!! No wonder I could not find the screws, there are under the rubber feet. Thank you very much for taking the time to answer my question! :LaughingTears:

HP Recommended

Hi,


Well, I have spent quite a bit of time trying to remove the bottom cover. If I go much farther, I am going to damage or destroy the bottom enclosure. I have already destoryed the 6 rubber/plastic feet which were so thin, they could not be removed without tearing.


As a side note, I have taken apart many different kinds of computers and put them back together for a long time and this really has me puzzled.


  • Do you have any diagrams or further instructions for removing the base cover?

  • I will need to replace the unusual rubber/plastic feet. Do you know where I could find a part number for these?

Otherwise, I have reached a point that I cannot go any further.


Thank you

HP Recommended

@Reffy, am so sorry to hear that.... I can give you an alternative. Can you take your unit to any HP Authoried Service Provider like Geeksquad where they will be able to help you out.

I am an HP employee.

Make it easier for other people to find solutions, by marking my answer “Accept as Solution” if it solves your problem.

***Click on “Thumbs Up” STAR to say thanks!***
HP Recommended

Hi,


Yes we have a Best Buy here, good suggestion. Would be a pain, but I understand what you are asking and might be the only way to get the cover off. The Envy 27-110 documents have appeared on the HP website, which is good, but they do not have detail needed.


Thank you for your help and I'll keep working with it.


HP Recommended

Hi All,


I was able to finally complete my task of replacing the HDD with an SSD. Finally solved my issues by scouring the Internet for a soloution.


Here is the magic PDF link:

Product End-of-Life Disassembly Instructions
http://h22235.www2.hp.com/hpinfo/globalcitizenship/environment/productdata/Countries/_MultiCountry/d...


Notes:

  • Attach the foam packing that came with the computer on either side of the monitor.
  • Lay computer on table, screen side up.
  • The top of the base does not need to be removed. There are two plates that need to be removed from the bottom of the base.
  • Remove/tear off rubber feet and remove phillips screws
  • There are also 4 hidden screws under the thin foil label that need to be removed. You will have to try and feel for a void under the label. Insert the pointed end of an X-acto knife in the center of the hollow sound and cut out the hole where the screw is inserted.
  • Remove the screws and the first plate will fall off.
  • Do not remove the speakers.
  • Remove the remaining screws on the second plate except for the two silver ones next to each speaker, they can be unscrewed but will remain attached to the plate. The plate will fall off.
  • Remove the HDD cage by removing a single screw with a straight edge screwdriver. Note the small black foam square - this will fall off and will need to be replaced when reattaching the cage.
  • Replace drive and reinstall in reverse order.
  • Attach some type of new rubber feet.
  • New drive will need to be initialized and formatted with the Disk Management program.
  • Now that wasn't so hard, was it? Getting the cover off has always been the harderst part of working on computers! :generic:

Thanks!

HP Recommended

@Reffy thats awesome news. You rock!!! 


I will take that link that you posted to my internal team at HP and see if we can add that. 

I am an HP employee.

Make it easier for other people to find solutions, by marking my answer “Accept as Solution” if it solves your problem.

***Click on “Thumbs Up” STAR to say thanks!***
HP Recommended

Thank you. I just hope this can help someone else. These are such beautiful computers, that those of us who appreciate the design will want to maintain that for as long as possible. Appreciate the help from everyone.:smileyvery-happy: 

HP Recommended

I bought the HP Envy All-in-One 27-b155qd which shipped with a slower Intel AC 3168 (1x1) wireless card, instead of the faster Intel AC 8260 (2x2) wireless card as advertised on the HP USA website.


I would like to upgrade the wireless card, but have encountered a ploblem trying to remove the first plate from the bottom of the base.


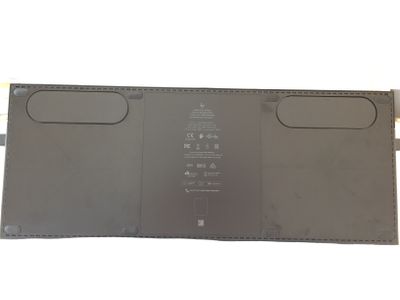
I cannot locate the 4 hidden screws as there is no thin foil label. Instead there appears to a be a plastic plate in the centre of the base plate (see picture below).


Does anyone know how to open the base of the HP Envy 27-b155qd please?


20170611_051910934_iOS.jpg

HP Recommended

> Does anyone know how to open the base ...


Welcome to this forum.


If you look at a previous message on this thread, posted at: ‎03-28-2017 09:55 AM              

it will answer your question.


† The opinions expressed above are the personal opinions of the authors, not of HP. By using this site, you accept the <a href="https://www8.hp.com/us/en/terms-of-use.html" class="udrlinesmall">Terms of Use</a> and <a href="/t5/custom/page/page-id/hp.rulespage" class="udrlinesmall"> Rules of Participation</a>.