-
×InformationNeed Windows 11 help?Check documents on compatibility, FAQs, upgrade information and available fixes.
Windows 11 Support Center. -
-
×InformationNeed Windows 11 help?Check documents on compatibility, FAQs, upgrade information and available fixes.
Windows 11 Support Center. -
- HP Community
- Printers
- Printing Errors or Lights & Stuck Print Jobs
- Carriage jam issues J6480

Create an account on the HP Community to personalize your profile and ask a question
Your account also allows you to connect with HP support faster, access a personal dashboard to manage all of your devices in one place, view warranty information, case status and more.
Check some of the most frequent questions about Instant Ink: HP INSTANT INK, HP+ PLANS: INK AND TONER.
Check out our Black or Color Ink Not Printing, Other Print Quality Issues info about: Print quality and Cartridge Issues.

It has been a while since anyone has replied. Simply ask a new question if you would like to start the discussion again.
02-11-2018 09:47 AM
 HP Recommended
Product: J6480
As I could no longer print yesterday, I did the HP trouble-shotting for this problem (useless), and then found this forum. Obviously the problem is widespread, have you found a real solution for it, HP? My printer cartridges are also docked on the right and will not move. No solutions were presented for this problem. My printer is not that old, I would like to see HP post a solution for all of us feeling obliged to buy a new printer, whether we can afford it or not.
3 REPLIES 3
02-12-2018 05:19 PM
HP Recommended
Welcome to the HP Forums, this is a great location to get assistance! I read your post and see that you are getting carriage jam error on HP Officejet J6480 Printer. I would like to help you resolve this issue.
Turn the All-in-One off and on again
-
Press the Power button (
 ) to turn off the product.
 -
Wait 60 seconds.
-
Press the Power button (
) to turn on the product.NOTE:
The product might go through a warm-up period. The product lights might flash and the carriage might move. Wait until the warm-up period finishes before proceeding.
-
Try to print a self-test report. Refer to the steps on how to print a self-test report at the top of this document.
Clear any jammed paper
Step one: Remove any loose paper
Remove any loose sheets of paper from the input tray and the output tray.
CAUTION:
Do not remove jammed paper at this stage. Trying to clear jammed paper from the front of the product can damage the print mechanism.
Step two: Clear the paper jam from the back of the All-in-One
Use the following steps to check for and remove jammed paper from the back of the HP product.
-
Press the Power button (
) to turn off the product. -
Disconnect the USB cable from the back of the product.
-
Disconnect the power cord from the back of the product.
-
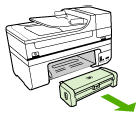
Remove the duplexer from the back of the product. Press the buttons on each side of the duplexer, and then pull it toward you.
Figure : Remove the duplexer
-
Gently remove any jammed paper from the rollers, inside the product.
CAUTION:
If the paper tears while removing it from the rollers, check the rollers for torn pieces of paper that might remain inside the product. If any torn pieces of paper remain inside the product, more paper jams are likely to occur.
-
Press the latch on the side of the duplexer, and then open its cover.
-
Gently remove any jammed paper from inside the duplexer.
-
Reattach the duplexer. Gently push the door forward until it snaps into place.
Step three: Clear the paper jam from the front of the All-in-One
If you cannot remove the paper jam from the back of the product, follow these steps to remove the paper jam from the front.
-
Open the cartridge door.
Figure : Open the cartridge door

-
Gently pull the paper out of the rollers.
NOTE:
Remove paper from the front of the product as carefully as possible. If any torn pieces of paper remain inside the product, more paper jams are likely to occur, and this could damage the print mechanism.
-
Close the cartridge door.
Figure : Close the cartridge door

-
Reconnect the power cord to the back of the product.
-
Press the Power button (
) to turn on the product.
Make sure that the carriage moves freely
-
Press the Power button (
) to turn on the product. -
Open the cartridge door.
Figure : Open the cartridge door
-
Without turning off the product, disconnect the power cord from the back of the product.
CAUTION:
You must disconnect the power cord to move parts by hand without the risk of an electrical shock.
-
Disconnect the power cord from the wall outlet.
-
Look inside the product to see where the carriage is stuck, and then check for any torn paper or other objects that might be restricting the carriage.
NOTE:
You might need a flashlight to illuminate areas for proper viewing.
-
Reach inside the product through the cartridge door, and then manually move the carriage.
-
If the carriage is stuck on the right side of the product, move the carriage to the left side of the product.
-
If the carriage is stuck on the left side of the product, move the carriage to the right side of the product.
-
If the carriage is stuck in the middle of the product, move the carriage to the right side of the product.
-
-
Remove any loose paper or obstructions found.
-
Make sure that the carriage can move freely across the width of the product by gently pushing the carriage to the left and then to the right.
-
Close the cartridge door.
Figure : Close the cartridge door
-
Reconnect the power cord to the back of the product.
-
Reconnect the power cord to the wall outlet.
-
Press the Power button (
) to turn on the product.
Remove and reinstall the cartridges
Step one: Remove the cartridges
-
Press the Power button (
) to turn on the product. -
Open the cartridge door. The carriage moves to the far right side of the product.
Figure : Open the cartridge door
CAUTION:
Wait until the carriage is idle and silent before proceeding.
-
Push down on the top of the cartridge to release it, and then pull it toward you to remove it from its slot.
Figure : Remove the cartridge
CAUTION:
Do not touch the copper-colored contacts or ink nozzles. Touching these parts can result in clogs, ink failure, and bad electrical connections.
Figure : Do not touch the contacts or ink nozzles

-
Check for obstructions under and around the carriage. Remove any obstructions.
Step two: Reinstall the cartridges
-
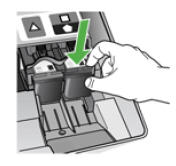
Slide the cartridge back into the slot, and then push it forward until it clicks into place.
Figure : Reinstall the cartridge

-
If you are installing the tri-color cartridge, slide it into the left slot.
-
If you are installing a black or photo cartridge, slide it into the right slot.
-
-
Close the cartridge door.
Figure : Close the cartridge door
-
Try to print a self-test report. Refer to the steps on how to print a self-test report at the top of this document.
Click here and refer the HP document for more assistance.
Let me know how it goes.
Cheers.
Sandytechy20
I am an HP Employee
02-14-2018 01:07 PM
HP Recommended
It looks like you were interacting with @sandytechy20, but he is out for the day & I'll be glad to help you out,
I'm the Riddle_Decipher & I'm at your service.
I reviewed your concern and the entire conversation, did some research and here's what I recommend:
- Power off printer.
- Open the printer
- Stop the carriage with your hand,
- Don't let the carriage move (block it) after a 10-15 seconds,
- Try moving the carriage slightly using your hand, if it doesn't move, it would confirm a hardware malfunction.
Please Contact HP to have the printer either repaired or replaced:
HP Support can be reached by clicking on the following link:
* Open link: www.hp.com/contacthp/
* Enter Product number or select to auto detect
* Scroll down to "Still need help? Complete the form to select your contact options"
* Scroll down and click on HP contact options - click on Get a Case & phone number.
They will be happy to assist you immediately.
If the unit is under warranty repair services under the manufacturer's warranty will be free of charge.
If you would like to thank me for my efforts to help you,
feel free to give me a virtual high-five by clicking the 'Thumbs Up' icon below,
Followed by clicking on the "Accept as solution".
Have a great day!
Riddle_Decipher
I am an HP Employee
Learning is a journey, not a destination.
Let's keep asking questions and growing together.
Be alert for scammers posting fake support phone numbers and/or email addresses on the community.
If you think you have received a fake HP Support message, please report it to us by clicking on "Flag Post".
† The opinions expressed above are the personal opinions of the authors, not of HP. By using this site, you accept the Terms of Use and Rules of Participation.


Didn't find what you were looking for?
Ask the community
† The opinions expressed above are the personal opinions of the authors, not of HP. By using this site, you accept the <a href="https://www8.hp.com/us/en/terms-of-use.html" class="udrlinesmall">Terms of Use</a> and <a href="/t5/custom/page/page-id/hp.rulespage" class="udrlinesmall"> Rules of Participation</a>.