-
×InformationNeed Windows 11 help?Check documents on compatibility, FAQs, upgrade information and available fixes.
Windows 11 Support Center. -
-
×InformationNeed Windows 11 help?Check documents on compatibility, FAQs, upgrade information and available fixes.
Windows 11 Support Center. -
- HP Community
- Printers
- Printer Ink Cartridges & Print Quality
- Re: Banding and Visible Dots on Color Printing

Create an account on the HP Community to personalize your profile and ask a question
03-01-2021 09:10 PM - edited 03-01-2021 09:14 PM
Hi, I'm having a lot of issue trying to print clean-looking images on my printer. I've already gone through all the basics - resetting, checking drivers, cleaning and aligning printheads, new cartridges, etc., and I still can't get the images to come out the way I want them to. I'm trying to print artwork, labels, and stickers that will be sold, so I'd like the quality to be nice. I've tried tons of printer settings, so I'm not sure if I just haven't found the right setting yet, or if it's something with the printer itself. I'm beginning to lose hope with this printer, and I'm about to purchase a new printer of a different kind if I can't figure this out. I'd rather not buy a printer if I don't need to, so that's why I wanted to see if anyone could help me before I do so.
Here's the issue (or several issues): I'm noticing some horizontal white banding occurring on printed images. It's very evenly spaced and I can see it mostly on lighter colors. I'm worried this is an issue with the printhead. It's especially noticeable in light pink, light blue, and grays on the test sheets. I'll attach pictures of this. When I adjusted my printing preferences, I noticed the banding improves when I select Max DPI Enabled and BEST quality. However, this causes different issues. I noticed the magenta is significantly darker and the black turns to a gray. I'll attach a picture of this, too. My third issue is that when I am printing images, I notice the tiny little dots that make up the image. It's driving me crazy - I thought it was just because I was printing gradients, so I printed an image with NO gradients to test it out, and I can still see the dots. It makes the image look fuzzy and not as crisp as I'd like it to be. I'll also attach a picture of a random smiley face that I printed out to test it. I was really hoping for smooth images, and no matter what printer settings I try, I either get no fuzzy dots with banding, or fuzzy dots without banding. If anyone could help me I'd appreciate it so much. If not, I'll just have to move on to a new printer entirely!
03-04-2021 01:04 PM
Welcome to the HP support community.
Clean the area around the ink nozzles
-
Gather the following materials:
-
Dry foam-rubber swabs, lint-free cloth, or any soft material that does not come apart or leave fibers (coffee filters work well)
-
Clean sheets of paper
-
Distilled, filtered, or bottled water (tap water might contain contaminants that can damage the print cartridges)
CAUTION:
Do not use platen cleaners or alcohol to clean the area. These can damage the cartridge or the printer.
-
-
Press the Power button to turn the printer on, if it is not already on.
-
Locate the slots on the left and right sides of the printer.
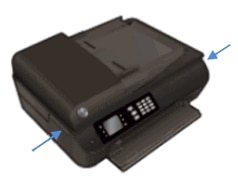
-
Slide your fingers into the two slots, and then gently lift up to open the ink cartridge access door. The carriage moves to the ink cartridge access area. Wait until the carriage is idle and silent before continuing.
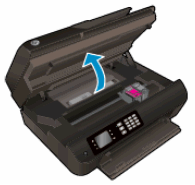
-
To release the ink cartridge, lift the lid on the ink cartridge slot, and then gently push the lid back until it stops.
-
Pull up on the ink cartridge to remove it from the slot.
-
-
Lift the lid
-
Gently push the lid back
-
Pull up on the ink cartridge
-
-
Place the ink cartridge on a piece of paper with the ink nozzles facing up.
-
Lightly moisten a clean, foam-rubber swab with distilled water.
-
Clean the face and edges around the ink nozzle with the swab.
-
-
Nozzle plate - DO NOT CLEAN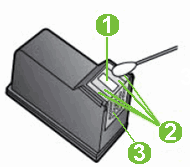
-
Area surrounding ink nozzle - Do clean
-
Ink cartridge contacts - DO NOT CLEAN
-
-
CAUTION:
Do not clean the ink nozzle plate.
-
Either let the ink cartridge sit for 10 minutes to allow the cleaned area to dry, or use a new swab to dry it.
-
Hold the ink cartridge at a slight upward angle with the ink cartridge contacts facing the rear of the printer, and then slide the ink cartridge into the empty slot.
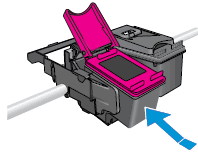
-
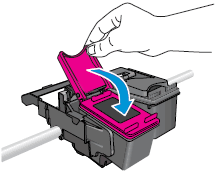
Close the lid on the ink cartridge slot to secure the ink cartridge into place.
-
Repeat these steps to clean the area surrounding the ink nozzle on the other ink cartridge.
-
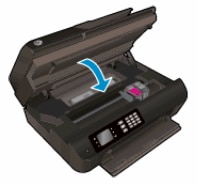
Close the ink cartridge access door.
-
Close the scanner lid.
You can refer this HP document for more assistance:- Click here
Let me know how it goes.
To thank me for my efforts to help you, please mark my post as an accepted solution so that it benefits several others.
Cheers.
Sandytechy20
I am an HP Employee


