-
×InformationNeed Windows 11 help?Check documents on compatibility, FAQs, upgrade information and available fixes.
Windows 11 Support Center. -
-
×InformationNeed Windows 11 help?Check documents on compatibility, FAQs, upgrade information and available fixes.
Windows 11 Support Center. -
- HP Community
- Printers
- Printer Ink Cartridges & Print Quality
- Color Ink Cartridge 3/4 full, but quality is bad despite tro...

Create an account on the HP Community to personalize your profile and ask a question
09-16-2020 07:59 PM
I have had this issue twice now. It seems HP is producing low quality ink cartridges that stop working before the ink runs out, forcing us to buy new cartridges to resolve the issue.
My current issue is with my color cartridge. The results of my "Print Quality Diagnostic" is showing missing and streaked blocks for the colors.
I have cleaned the printheads multiple times, but this has not resolved the issue.
I also have tried aligning the print heads, but the software will not accept my pattern choices inputs. I get stuck in a loop with the interface retrying to input the pattern choices, but they don't get accepted.
The only solution I have had work in the past is by replacing the ink cartridge with a new one.
I should not have to buy new cartridges to replace defective ones. How do I make a claim in order to get a refund or some type of compensation for faulty products?
If I can't get help I will look into pursuing legal actions.
09-17-2020 05:01 PM
@m-olo Welcome to HP Community!
I understand that you are facing print quality issue.
Please let us know if you are using HP genuine ink cartridges.
Manually clean the area around the ink nozzles
Do not perform these steps unless the Print Quality Diagnostic page or printout specifically shows smeared text or track marks. If you do not see track marks or smears, skip to the step to replace the problem ink cartridge.
If you see track marks or smears on the printouts, clean the area around the ink nozzles.
Figure : Example of smeared text

Figure : Example of text with track marks

-
Gather the following materials:
-
A clean, lint-free cloth or a clean, dry cotton swab
-
Distilled or bottled water
CAUTION:
Do not use tap water because it might contain contaminants that can damage the printhead.
-
-
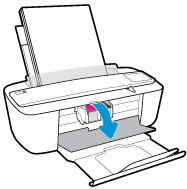
Open the ink cartridge access door.
The carriage moves to the center of the printer.
Figure : Opening the ink cartridge access door

-
Wait until the printer is idle and silent before you continue.
-
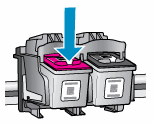
Lightly press down on one of the ink cartridges to release it, and then pull the ink cartridge toward you out of its slot.
Figure : Removing the ink cartridge

CAUTION:
Do not remove both ink cartridges at the same time. Remove and then clean each ink cartridge one at a time. Do not leave an ink cartridge outside the printer for more than 30 minutes.
-
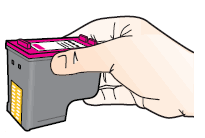
Hold the ink cartridge by its sides.
Figure : Holding the ink cartridge by its sides

-
Lightly dampen a clean, lint-free cloth or swab with bottled or distilled water.
-
Clean the face and edges around the ink nozzle with the cloth or swab.
CAUTION:
Do not clean the ink nozzle plate.
Figure : Cleaning the area around the ink nozzle
-
Nozzle plate - Do not clean
-
Area surrounding ink nozzle - Do clean
-
Ink cartridge contacts - Do not clean
-
-
Wait 10 minutes for the cleaned area to dry before you continue.
-
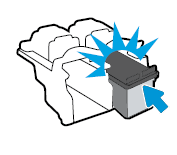
Hold the ink cartridge by its sides with the contacts toward the printer, insert the ink cartridge into its slot, and then gently push the ink cartridge until it snaps into place.
Figure : Snapping the ink cartridge into place

-
Repeat these steps to clean around the nozzles on the other ink cartridge.
-
Close the ink cartridge access door.
Try to print.
Please refre to the below link as well.
If the issue still persitss, please replace the ink cartridges.
Keep us posted,
If you would like to thank us for our efforts to help you,
Give us a virtual high-five by clicking the 'Thumbs Up' icon below, followed by clicking on the "Accept as solution" on this post,
Have a great day!
