-
×InformationNeed Windows 11 help?Check documents on compatibility, FAQs, upgrade information and available fixes.
Windows 11 Support Center. -
-
×InformationNeed Windows 11 help?Check documents on compatibility, FAQs, upgrade information and available fixes.
Windows 11 Support Center. -
- HP Community
- Printers
- Printing Errors or Lights & Stuck Print Jobs
- After recent driver update (1/18), Officejet 5744 will not l...

Create an account on the HP Community to personalize your profile and ask a question
Your account also allows you to connect with HP support faster, access a personal dashboard to manage all of your devices in one place, view warranty information, case status and more.
Check some of the most frequent questions about Instant Ink: HP INSTANT INK, HP+ PLANS: INK AND TONER.
Check out our Black or Color Ink Not Printing, Other Print Quality Issues info about: Print quality and Cartridge Issues.

It has been a while since anyone has replied. Simply ask a new question if you would like to start the discussion again.
02-05-2018 09:17 PM
 HP Recommended
Product: Officejet 5744
Operating System: Microsoft Windows 10 (64-bit)
After installing a driver update (recommended by HP on my HP laptop about my HP printer) recently, my wireless printer will no longer connect to my laptop wirelessly. I've downloaded the troubleshooter and gone through all the shutting down, unplugging, restarting, blah, blah, blah.
The printer works fine when it's connected by USB, but it won't install wirelessly. Before downloading the "updated" driver, I NEVER printed with USB. We printed from all over the house wirelessly with this printer and laptop.
~Frustrated
Solved! Go to Solution.
1 ACCEPTED SOLUTION
Accepted Solutions
02-07-2018 02:39 PM
HP Recommended
Hi @KenDS,
Thank you for posting on HP Forums,
Flower_Bud is at your service.
As I understand, your printer would not connect Wireless and only prints when connected using the USB cable.
No worries, as I'll be glad to help you, that said, I'll need a few more details to dissect your concern & provide an accurate solution:
What is the error message?
Is Wi-Fi light is blinking or steady on the printer control panel?
Let's try these steps to resolve the issue:
Step 1: Restore network defaults:
1. From the printer control panel, touch (Wireless).
2. Touch (Settings).
3. Touch Wireless Settings.
4. Touch Restore Network Defaults.
Once completed, let's reconnect the printer to Wi-Fi:
Step 2: Connect the printer to the wireless network
Use the Wireless Setup Wizard on the printer to connect it to your wireless network.
-
Turn on the printer.
-
On the printer control panel, touch the Wireless icon
 .
.Figure: Touching the Wireless icon

-
Touch the Settings icon
 .
.Figure: Touching the Settings icon

-
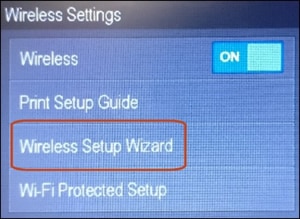
Touch Wireless Settings.
Figure: Touching Wireless Settings

-
Touch Wireless Setup Wizard.
Figure: Touching Wireless Setup Wizard
-
Follow the instructions on the control panel to connect the printer to your wireless network.
Step 3: Download and Run HP Print and Scan Doctor: ftp://ftp.hp.com/pub/printers/hppsdr/patches/HPPSdr.exe
Step 4: If the issue persists, try assigning a static IP address and a manual DNS address:
* Obtain the IP address of the printer – You can touch the “wireless” icon on the printer control panel to obtain the IP address.
* Type the IP address on your web browser to obtain the printer EWS page on your computer.
* Go to the “Network” tab – Click on “Wireless (802.11) – Then click on “Network address (IPv4)
* Click on the radio button which says “Manual IP” and then click “Suggest a manual IP address” to give a manual IP address to your printer.
* Click on radio button which says “Manual DNS Server” and under manual preferred type 8.8.8.8 and under manual alternate type 8.8.4.4 (This is Google DNS server address)
Let me know how this goes,
Have a great day 🙂
Cheers!
3 REPLIES 3
02-07-2018 02:39 PM
HP Recommended
Hi @KenDS,
Thank you for posting on HP Forums,
Flower_Bud is at your service.
As I understand, your printer would not connect Wireless and only prints when connected using the USB cable.
No worries, as I'll be glad to help you, that said, I'll need a few more details to dissect your concern & provide an accurate solution:
What is the error message?
Is Wi-Fi light is blinking or steady on the printer control panel?
Let's try these steps to resolve the issue:
Step 1: Restore network defaults:
1. From the printer control panel, touch (Wireless).
2. Touch (Settings).
3. Touch Wireless Settings.
4. Touch Restore Network Defaults.
Once completed, let's reconnect the printer to Wi-Fi:
Step 2: Connect the printer to the wireless network
Use the Wireless Setup Wizard on the printer to connect it to your wireless network.
-
Turn on the printer.
-
On the printer control panel, touch the Wireless icon
.Figure: Touching the Wireless icon
-
Touch the Settings icon
.Figure: Touching the Settings icon
-
Touch Wireless Settings.
Figure: Touching Wireless Settings
-
Touch Wireless Setup Wizard.
Figure: Touching Wireless Setup Wizard
-
Follow the instructions on the control panel to connect the printer to your wireless network.
Step 3: Download and Run HP Print and Scan Doctor: ftp://ftp.hp.com/pub/printers/hppsdr/patches/HPPSdr.exe
Step 4: If the issue persists, try assigning a static IP address and a manual DNS address:
* Obtain the IP address of the printer – You can touch the “wireless” icon on the printer control panel to obtain the IP address.
* Type the IP address on your web browser to obtain the printer EWS page on your computer.
* Go to the “Network” tab – Click on “Wireless (802.11) – Then click on “Network address (IPv4)
* Click on the radio button which says “Manual IP” and then click “Suggest a manual IP address” to give a manual IP address to your printer.
* Click on radio button which says “Manual DNS Server” and under manual preferred type 8.8.8.8 and under manual alternate type 8.8.4.4 (This is Google DNS server address)
Let me know how this goes,
Have a great day 🙂
Cheers!
02-07-2018 03:16 PM
HP Recommended
Thanks, @Flower_Bud.
I did all that, except step 4. That's a new one to me, so I'll try it.
Wi-fi light solid blue, on the same network, ran Scan Doctor (no problem detected), assigned IP address manually (printer not found), etc. I'll try your fix. If that doesn't do it, I'll just get an Epson or Canon. I've spent too much time on this printer already.
02-08-2018 11:16 AM
HP Recommended
Hi @KenDS,
Thank you for responding,
It's great to have you back 😉
Don't worry, I'll try my best to help you resolve this issue.
If the issue persists, I would suggest you try uninstalling and reinstall printer drivers to resolve this issue:
- Go to Control panel – Programs and feature – Select all the HP OfficeJet printer entries and uninstall them.
- Now go to Control panel – Devices and printer – Select all the printer entries and remove the device.
- Then press the "windows key" + "r" to get the "Run" window open - Type "printui.exe /s" and press enter.
- Under print server properties, go to drivers - remove any entry there as well.
- Again, go to run window, type – “c:/programdata” – Go to Hewlett Packard folder, remove any printer related folders & files.
To reinstall, click here.
Let me know how this goes!
Cheers 🙂
Be alert for scammers posting fake support phone numbers and/or email addresses on the community.
If you think you have received a fake HP Support message, please report it to us by clicking on "Flag Post".
† The opinions expressed above are the personal opinions of the authors, not of HP. By using this site, you accept the Terms of Use and Rules of Participation.


Didn't find what you were looking for?
Ask the community
† The opinions expressed above are the personal opinions of the authors, not of HP. By using this site, you accept the <a href="https://www8.hp.com/us/en/terms-of-use.html" class="udrlinesmall">Terms of Use</a> and <a href="/t5/custom/page/page-id/hp.rulespage" class="udrlinesmall"> Rules of Participation</a>.