-
×InformationNeed Windows 11 help?Check documents on compatibility, FAQs, upgrade information and available fixes.
Windows 11 Support Center. -
-
×InformationNeed Windows 11 help?Check documents on compatibility, FAQs, upgrade information and available fixes.
Windows 11 Support Center. -
- HP Community
- Printers
- Printing Errors or Lights & Stuck Print Jobs
- All pages print crooked. I have checked all settings and the...

Create an account on the HP Community to personalize your profile and ask a question
Your account also allows you to connect with HP support faster, access a personal dashboard to manage all of your devices in one place, view warranty information, case status and more.
Check some of the most frequent questions about Instant Ink: HP INSTANT INK, HP+ PLANS: INK AND TONER.
Check out our Black or Color Ink Not Printing, Other Print Quality Issues info about: Print quality and Cartridge Issues.

It has been a while since anyone has replied. Simply ask a new question if you would like to start the discussion again.
12-12-2018 01:30 PM - edited 12-12-2018 01:36 PM
 HP Recommended
Product: HP 6940
Operating System: Microsoft Windows 7 (64-bit)
I have used all settings but none will correct entire page. Would deleting driver and installing a new driver fix this -everything else is working fine. I have not installed any new sodtware that would cause this. I hate to mess things up and am hesitant to change things since prints look good. O yes, th tray is in correctly. Thanks much. One other hing-I printed a dianostic page but don't know what this tells me.
Solved! Go to Solution.
1 ACCEPTED SOLUTION
Accepted Solutions
12-15-2018 03:31 PM
HP Recommended
I deleted the old driver but could not find the driver for my printer going though windows update-it was not listed under HP,and other listings. I then took the cowards way out-I disconnecedt the printer from the USB and replugged it-Window thenafter some time found everything and the pages are now straight.Thanks
5 REPLIES 5
12-14-2018 04:09 AM
HP Recommended
Hi! @rletter, Thanks for stopping by the HP Support Forums!
I understand when you print from your printer you have print quality issues.
Don't worry I'll try to help you out.
Did you make any changes to your printer?
Have you tried checking with a different ink cartridge?
Have you tried printing from a different application? Does the issue persist?
Please share the complete printer model name to assist you better.
Replace low, empty or faulty ink cartridges on your printer.
Try printing a Print Quality Diagnostic report and check if the issue persists.
If the print quality diagnostic report prints fine uninstall the printer software from your PC and install the windows built in drivers.
Install the built-in print driver over a network connection with Windows 7 or Windows Vista.
-
Search Windows for devices, and then click Devices and Printers in the results.
-
Click Add a printer.

-
Select Add a network, wireless or Bluetooth printer.
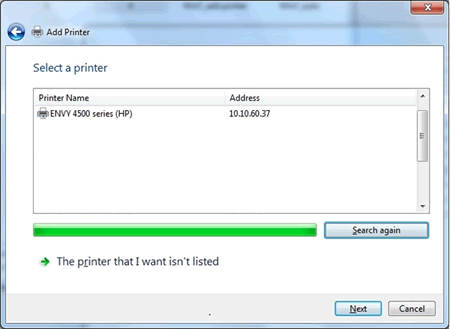
A Select a printer windows displays.
-
If your printer is in the list, select it, click Next, and then follow the on-screen instructions to install the driver.
-
If your printer is not in the list, click the back arrow in the upper left corner of the window to return to What type of printer do you want to install?. Continue to the next step.
-
-
Click Add a local printer.
-
Select Use an existing port (LPT1: Printer Port), and then click Next.
-
Click Windows Update, and then wait for the print drivers to update.
-
Click HP, Hewlett-Packard, or Hewlett Packard in the Manufacturer pane, and then click the name of your printer in the Printerspane.
-
If your printer is in the list, select it, click Next, and then follow the on-screen instructions to install the driver.
-
If your printer is not in the list, click the back arrow in the upper left corner of the window two times to return to What type of printer do you want to install?. Continue to the next step.
-
-
Click Add a network, wireless or Bluetooth printer window, and then click The printer that I want isn't listed.
-
Select Add a printer using TCP/IP address or hostname, and then click Next.

-
Select Autodetect from the Device type drop-down list.
-
Type your printer IP address into the text box, and then click Next.
To find the printer IP address, print a Wireless Network Test report or a Network Configuration pages.
-
Wait for the computer to connect to the printer, and then click Next to install the print driver.
Also, try the steps recommended below.
Clean the print cartridges automatically
-
Make sure the printer is on and connected to the computer.
-
Click Start.
-
Click Settings.
-
Click Printers and Faxes.
-
Right-click on the name of your printer and then select Printing Preferences.
-
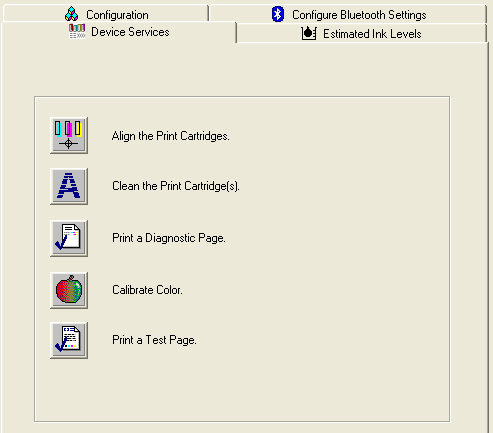
Click the Services tab and then click Service this Device.
-
The printer Toolbox displays. On the Device Services tab, click Clean the Print Cartridge(s).
Figure : Click Clean the Print Cartridge(s)
-
Click Clean, and then follow the onscreen instructions.
Refer this article to further troubleshoot print quality issues with your printer. Click Here
Let me know if this helps!
Have a wonderful day ahead! 🙂
Please click “Accept as Solution” if you feel my post solved your issue, it will help others find the solution.
Click the “Kudos, Thumbs Up" on the bottom right to say “Thanks” for helping!
A4Apollo
I am an HP Employee


12-15-2018 03:45 AM
HP Recommended
@rletter, thanks for your prompt response and time.
I appreciate your efforts in trying out the steps.
As you mentioned the test page too prints crooked when you print.
It looks like a driver issue try reinstalling the printer drivers on your PC.
Refer the previous post to know more information about installing the window built-in drivers.
Before installing uninstall the printer software from the root level on your PC and install the windows built-in drivers.
In Windows, search for and open Programs and Features.
Select your HP printer.
Select Uninstall.
In Windows, search for and open Devices and Printers.
In the Devices and Printers window look for your HP Printer. If you see it listed, right-click on it and choose "Delete" or "Remove Device.”
Open up the run command with the "Windows Key + R" key combo.
Type printui.exe /s and click OK.
Click on Drivers tab.
Look for HP Printer driver. If you see it click on it and click remove at the bottom.
Select OK.
Select Apply and OK on the Print Server Properties windows.
Close Devices and Printers.
Hope this helps!
Take Care! 🙂
Please click “Accept as Solution” if you feel my post solved your issue, it will help others find the solution.
Click the “Kudos, Thumbs Up" on the bottom right to say “Thanks” for helping!
A4Apollo
I am an HP Employee
12-15-2018 03:31 PM
HP Recommended
I deleted the old driver but could not find the driver for my printer going though windows update-it was not listed under HP,and other listings. I then took the cowards way out-I disconnecedt the printer from the USB and replugged it-Window thenafter some time found everything and the pages are now straight.Thanks
12-16-2018 02:03 PM
HP Recommended
I am responding on behalf of @A4Apollo as he is out for the day. It is great to have you back and your patience is greatly appreciated.
Perfect, I am really glad to hear that!
If any other questions arise, please feel free to write back to me.
Good day! Take care 🙂
Cheers!
The_Fossette
I am an HP Employee
Be alert for scammers posting fake support phone numbers and/or email addresses on the community.
If you think you have received a fake HP Support message, please report it to us by clicking on "Flag Post".
† The opinions expressed above are the personal opinions of the authors, not of HP. By using this site, you accept the Terms of Use and Rules of Participation.


Didn't find what you were looking for?
Ask the community
† The opinions expressed above are the personal opinions of the authors, not of HP. By using this site, you accept the <a href="https://www8.hp.com/us/en/terms-of-use.html" class="udrlinesmall">Terms of Use</a> and <a href="/t5/custom/page/page-id/hp.rulespage" class="udrlinesmall"> Rules of Participation</a>.