• ×
    Information
    Need Windows 11 help?
    Check documents on compatibility, FAQs, upgrade information and available fixes.
    Windows 11 Support Center.
  • post a message
  • ×
    Information
    Need Windows 11 help?
    Check documents on compatibility, FAQs, upgrade information and available fixes.
    Windows 11 Support Center.
  • post a message
Guidelines
Here is the solution for Blue screen error 83C0000B on HP OfficeJet Pro 8010e, 9020e Printer Series: Click here to view.
Check some of the most frequent questions about Instant Ink: HP INSTANT INK, HP+ PLANS: INK AND TONER.


Check out our Black or Color Ink Not Printing, Other Print Quality Issues info about: Print quality and Cartridge Issues.
HP Recommended
Deskjet 1510
Microsoft Windows 10 (32-bit)

Installed new color ink in August...haven't used much but light kept blinking. Then low black in light came on...installed new black cartridge and both lights are blinking continuously and I can't print anything. I tried cleaning printheads but the lights are still blinking.

2 REPLIES 2
HP Recommended

Hi,


Please follow the link below and see if this helps you


https://support.hp.com/us-en/product/hp-deskjet-1510-all-in-one-printer-series/5157551/document/c038...

Although I am an HP employee, I am speaking for myself and not for HP.

--Say "Thanks" by clicking the Kudos Star in the post that helped you.
--Please mark the post that solves your problem as "Accepted Solution
HP Recommended

Hi MB_p2,


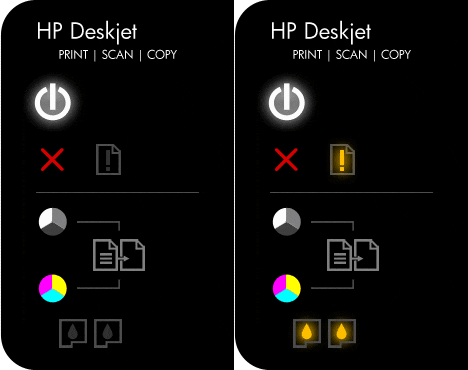
Am I right to map your error condition, the following control panel light pattern displays:
  • Power light: On
  • Attention light: Blinking
  • Check color cartridge light: Blinking
  • Check black cartridge light: Blinking
Figure : Control panel with lights indicated
Image: Control panel with lights indicated


I would think that most likely is that there is carriage jam in your printer:-


I would suggest you to try using the below guildlines for troubleshooting:-


Check the carriage path for obstructions
Follow these steps to make sure that the carriage can move freely.
  1. If the printer is not turned on, press the Power button to turn it on.
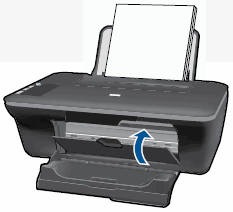
  2. Open the cartridge access door. The carriage moves to the center of the printer. Wait until the carriage is idle and silent before continuing.
    Figure : Open the cartridge access door
    Image: Opening the carriage access door
  3. With the printer turned on, disconnect the power cord from the rear of the printer.
  4. Unplug the power cord from the power source or electrical outlet.
       WARNING:
    You must unplug the power cord to move the carriage by hand and reset the paper feed mechanism without the risk of electrical shock.
  5. Check for any paper or objects that might be restricting the carriage, and then remove any paper or objects that you find.
       CAUTION:
    If the paper tears when you remove it from the rollers, check the rollers and wheels for torn pieces of paper that might remain inside the printer. If pieces of paper remain in the printer, more paper jams can occur.
  6. Reach inside the printer through the cartridge access door, and then manually move the carriage.
    • If the carriage is stuck on the right side of the printer, move the carriage to the left side of the printer.
    • If the carriage is stuck on the left side of the printer, move the carriage to the right side of the printer.
    • If the carriage is stuck in the middle of the printer, move the carriage to the right side of the printer.
  7. Remove any loose paper or obstructions found.
  8. Make sure that the carriage can move freely across the width of the printer. Firmly push the carriage to the left side of the printer, and then to the right side.
  9. Close the cartridge access door.
    Figure : Close the cartridge access door
    Image: Close the cartridge access door
  10. Reconnect the power cord to the rear of the printer.
  11. Plug the power cord back into the power source or electrical outlet.
  12. Press the Power button to turn on the printer.
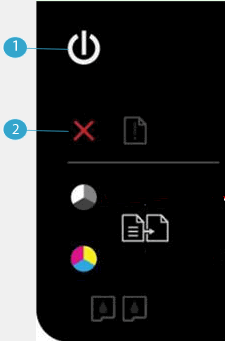
  13. Print a test page by
    Figure : Press and hold the Power and Cancel button
    Image: Press and hold the Power and Cancel button
    1. Power button
    2. Cancel button
 
If your problem is not resolved, you can look at the detailed video below which will show you step by step how to troubleshoot the printer with clearer instructions and demostrations:-
 
Hope that I am of help to your problem.:smileyhappy:
Click "Thumbs up"button on the bottom to say "Thanks/Give Encouragement"

Appreciate if you mark the post that solves your problem as "Accepted Solution"
(Although I am employed by HP, I am speaking for myself and not for HP)
† The opinions expressed above are the personal opinions of the authors, not of HP. By using this site, you accept the <a href="https://www8.hp.com/us/en/terms-of-use.html" class="udrlinesmall">Terms of Use</a> and <a href="/t5/custom/page/page-id/hp.rulespage" class="udrlinesmall"> Rules of Participation</a>.