-
×InformationNeed Windows 11 help?Check documents on compatibility, FAQs, upgrade information and available fixes.
Windows 11 Support Center. -
-
×InformationNeed Windows 11 help?Check documents on compatibility, FAQs, upgrade information and available fixes.
Windows 11 Support Center. -
- HP Community
- Printers
- Printing Errors or Lights & Stuck Print Jobs
- Cartridge stalls

Create an account on the HP Community to personalize your profile and ask a question
08-12-2019 09:33 AM
Welcome to the HP Support Community.
Let's try to reset the Printer here:
Turn the printer on, if it is not already on.
- Wait until the printer is idle and silent before you continue.
- With the printer turned on, disconnect the power cord from the rear of the printer.
- Unplug the power cord from the wall outlet.
- Wait at least 60 seconds.
- Plug the power cord back into the wall outlet.
- NOTE: HP recommends connecting the printer power cord directly to the wall outlet.
- Reconnect the power cord to the rear of the printer.
- Turn on the printer, if it does not automatically turn on.
- Wait until the printer is idle and silent before you proceed.
Also, try connecting the Printer to a different wall outlet directly.
Clean the electrical contacts:
-
Gather the following materials:
-
A clean, lint-free cloth
-
A clean, dry cotton swab
-
Distilled or bottled water
CAUTION:
Do not use platen cleaners or alcohol to clean the cartridge contacts. These can damage the ink cartridge or the printer.
-
-
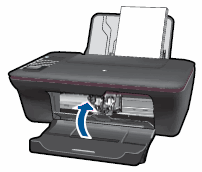
Open the ink cartridge access door.
The carriage moves to the center of the printer.
Figure : Opening the cartridge access door

-
Wait until the carriage is idle and silent before you continue.
-
Disconnect the power cord and any other cables from the back of the printer.
-
Press down on the ink cartridge to release it, and then pull the ink cartridge out to remove it from its slot.
Figure : Removing the ink cartridge

CAUTION:
Do not leave the ink cartridges outside of the printer for more than 30 minutes. If the ink cartridge is outside of the printer for too long, the ink can dry and clog the nozzles.
-
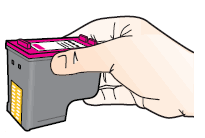
Hold the ink cartridge by its sides.
Figure : Holding the ink cartridge by its sides
-
Inspect the ink cartridge contacts for ink and debris buildup.
-
Dip a clean foam-rubber swab or lint-free cloth into distilled water, and then squeeze any excess water from it.
-
Clean only the copper-colored contacts.
Figure : Cleaning the contacts
-
Copper-colored contacts
-
Ink nozzles (do not clean)
-
-
Repeat these steps for the other ink cartridge.
-
Lightly moisten another cotton swab with distilled water, and then squeeze any excess water from the swab.
-
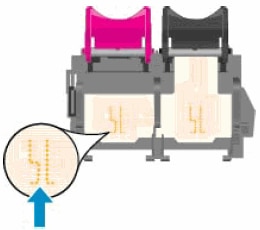
Use the swab to clean the electrical contacts in the carriage, located inside the printer.
Figure : The electrical contacts in the cartridge slots
-
Wait 10 minutes to allow the ink cartridge and carriage electrical contacts to dry.
-
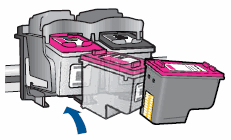
Hold the ink cartridge by its sides with the nozzles toward the printer, and then insert the ink cartridge into its slot. Make sure the icon on the ink cartridge matches the icon on the slot.
Figure : Inserting the ink cartridge into its slot
-
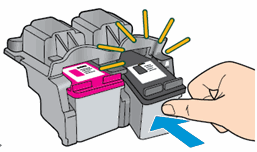
Push the ink cartridge forward into its slot until it snaps into place.
Figure : Snapping the ink cartridge into place
-
Repeat these steps for the other ink cartridge.
-
Close the ink cartridge access door.
Figure : Closing the ink cartridge access door
-
Reconnect the power cord to the back of the printer.
-
Try to print again.
-
If you are still unable to print, repeat these steps to clean and reseat the cartridges. Multiple cleanings might be necessary to restore printing.
Let me know if this helps.
If the information I've provided was helpful, give us some reinforcement by clicking the Accepted Solution button, that'll help us and others see that we've got the answers!
Thanks!
I am an HP Employee
