-
×InformationNeed Windows 11 help?Check documents on compatibility, FAQs, upgrade information and available fixes.
Windows 11 Support Center. -
-
×InformationNeed Windows 11 help?Check documents on compatibility, FAQs, upgrade information and available fixes.
Windows 11 Support Center. -
- HP Community
- Printers
- Printing Errors or Lights & Stuck Print Jobs
- Change SSID on HP Laserjet Pro MPF M148fdw

Create an account on the HP Community to personalize your profile and ask a question
07-20-2020 10:52 PM
I've changed my router and now printer does not recognize the network. The WPS button still won't connect the printer to the new router. Please help.
07-23-2020 09:37 AM - edited 07-23-2020 09:38 AM
Hi @Chuck2211
I'd like to help you with your query.
Connect the printer with WPS
Locate the WPS button on your router, but do not press it yet.
If your router does not support WPS, skip to the next step to connect the printer with the HP Smart app.
Turn on the printer. If the printer is in sleep mode, press the Cancel button on the control panel.
On the printer control panel, press and hold the Wireless button
for at least 3 seconds or until the wireless light starts to flash.
On the router, press and hold the WPS button for 3 to 5 seconds or until it shows that the WPS connection process has started.
Once the printer connects to the wireless network, the blue Wireless light on the control panel turns on solid.
Connect the printer with a temporary USB connection
Temporarily connect the printer to the Mac with a USB cable, and then change the connection to wireless in HP Utility.
Connect a USB cable to the USB port on the rear of the printer
and to the computer.
Click the Apple
menu, and then click System Preferences.
Depending on your OS version, click Print & Scan or Printers & Scanners.
Click the Plus sign
, and then click Add Printer or Scanner.
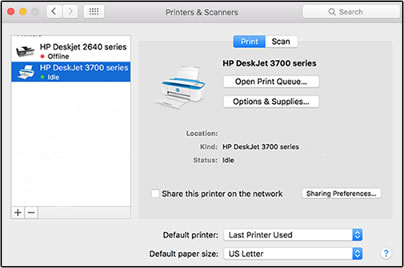
Click the name of your printer with USB under Kind.
On the Use menu, select the name of your printer, and then click Add.
NOTE:
AirPrint is the default driver. To access all printer features, including HP Utility, select the HP printer name.
Click the name of your printer, and then click Options & Supplies.
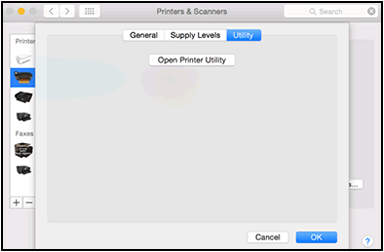
Click Utility, and then click Open Printer Utility.
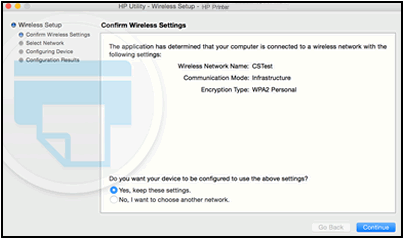
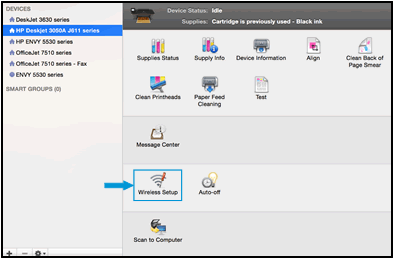
In HP Utility, click Wireless Setup.
Make sure your network displays on the Confirm Wireless Settings window, and then click Continue to complete the wireless configuration.
If your network does not display on the Confirm Wireless Settings window, connect to the correct network.
Select No, I want to choose another network, and then click Continue.
A list of available wireless networks displays.
Select your wireless network from the list or type your network SSID in the Wireless Network Name field, and then type your network password in the Password field.
If you do not know your network password, go to Find Your Wireless WEP, WPA, WPA2 Password.
Click Continue.
After the network connection is configured, click Done, and then disconnect the USB cable from the printer and the computer.
Once the printer connects to the wireless network, the blue Wireless light on the control panel turns on solid.
In the Printers & Scanners or Print & Scan window, click the name of your printer, click the Minus sign
, and then delete the USB installed printer.
Click the Plus sign
, and then click Add Printer or Scanner.
Click the name of your printer with the text Bonjour listed under Kind, click the Use or Print Using box, and then select the name of your printer in the pop-up menu.
Click Add to add the printer to the list.
Hope this helps! Keep me posted.
Welcome to the HP Support Community!
Please click “Accept as Solution” if you feel my post solved your issue, it will help others find the solution.
Click the “Kudos, Thumbs Up" on the bottom right to say “Thanks” for helping