-
×InformationNeed Windows 11 help?Check documents on compatibility, FAQs, upgrade information and available fixes.
Windows 11 Support Center. -
-
×InformationNeed Windows 11 help?Check documents on compatibility, FAQs, upgrade information and available fixes.
Windows 11 Support Center. -
- HP Community
- Printers
- Printing Errors or Lights & Stuck Print Jobs
- Damaged Cartridge Error

Create an account on the HP Community to personalize your profile and ask a question
12-18-2018 03:49 PM
I replaced my cartridges with new HP cartridges and the black cartridge is reported as damaged. I exchanged it for another new one and get the same message. I have had this printer for several years with no problems until now. I've tried all the fixes I can find and nothing works.
12-19-2018 04:40 PM
Welcome to HP forums, I see that you are getting damaged cartridge error.
Clean the cartridge contacts
-
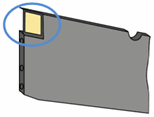
With a clean, lint-free cloth (eyeglass wipes or coffee filters work well), wipe the copper-colored contact on the cartridge.
Figure : Copper-colored contact on the cartridge

-
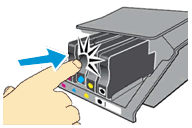
Carefully reinsert the cartridge into its slot, and then push the cartridge forward until it clicks into place.
Figure : Push the cartridge forward in the slot until it clicks into place

NOTE:
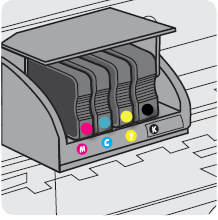
Make sure that the colored dot on the cartridge label matches the colored dot on the carriage slot.
-
Repeat these steps for other cartridges, if necessary.
-
Close the cartridge access door.
Make sure that the cartridges are inserted correctly
-
Slip your fingers into the slot on the left side of the printer, and then pull forward to open the cartridge access door. The carriage moves to the left side of the printer. Wait until the carriage is idle and silent you proceed.
Figure : Open the cartridge access door
-
-
Slot for opening the cartridge access door
-
-
Make sure that the colored dot on the cartridge label matches the colored dot on the carriage slot.
Figure : Colored dot on cartridge label should match the colored dot on the carriage slot

-
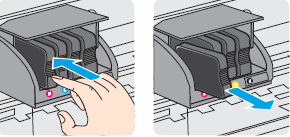
Push in on the front of the cartridge to release it, and then pull the cartridge toward you to remove it from its slot.
Figure : Remove the cartridge from its slot

-
Carefully reinsert the cartridge into its slot, and then push the cartridge forward until it clicks into place.
Figure : Push the cartridge forward in the slot until it clicks into place

-
Repeat these steps for other cartridges, if necessary.
-
Make sure that no cartridge is sticking out farther than the other cartridges. If a cartridge is sticking out, push it until it snaps into place.
-
Close the cartridge access door.
Check the carriage latch
-
Slip your fingers into the slot on the left side of the printer, and then pull forward to open the cartridge access door. The carriage moves to the left side of the printer. Wait until the carriage is idle and silent you proceed.
Figure : Open the cartridge access door
-
-
Slot for opening the cartridge access door
-
-
Make sure that the carriage latch is down. If the carriage latch is up, press it down until it clicks.
Figure : Carriage latch is down

-
Close the cartridge access door.
You can refer to this HP document for more assistance:- Click here
To thank me for my efforts to help you, please mark my post as an accepted solution so that it benefits several others.
Cheers.
Sandytechy20
I am an HP Employee
12-19-2018 06:12 PM
I have done this numerous times. I have used 1/4 of my color inks just restarting the printer. I peeled off the contact from the knock-off cartridge I was using and put it on the new HP cartridge. Sometimes this works.
12-20-2018 04:52 PM
Thanks for the reply.
I appreciate your time and effort.
I am sending you a private message. Please check the mailbox icon at the top-right corner of this screen.
I hope this helps resolve this issue completely.
Cheers.
Sandytechy20
I am an HP Employee
