-
×InformationNeed Windows 11 help?Check documents on compatibility, FAQs, upgrade information and available fixes.
Windows 11 Support Center. -
-
×InformationNeed Windows 11 help?Check documents on compatibility, FAQs, upgrade information and available fixes.
Windows 11 Support Center. -
- HP Community
- Printers
- Printing Errors or Lights & Stuck Print Jobs
- Deskjet 2130 failing to print with blinking lights

Create an account on the HP Community to personalize your profile and ask a question
12-05-2021 12:29 PM
I bought a new cartilage two moths ago and it was printing just fine, I even received a message telling me that I've inserted a genuine cartilage. But last week it was failing to print saying I have to remove the cartilage and replace it with a new genuine cartilage. And now am failing to print, but sometimes am able to photocopy. Every time I try to print it only prints half way and show an error notification saying, "Error Printing on HP Deskjet 2130 series. The printer couldn't print + document name". Also the cartilage and power lights start blinking.
Product name: HP Deskjet 2130
12-09-2021 05:20 AM
Welcome to the HP support community.
I understand that you are getting a cartridge error and the cartridge lights are blinking.
Reset the printer
Restarting the printer can sometimes resolve an ink cartridge error.
-
With the printer turned on, disconnect the power cord from the printer.
-
Unplug the power cord from the power source.
-
Wait 60 seconds.
-
Reconnect the power cord to a wall outlet and to the printer.
-
NOTE: HP recommends plugging the printer directly into a wall outlet.
Clean the electrical contacts
The printer might display an ink cartridge error if the ink cartridge contacts are dirty.
-
Gather the following materials:
-
Dry foam-rubber swabs, lint-free cloth, or any soft material that does not come apart or leave fibers (coffee filters work well)
-
Distilled, filtered, or bottled water (tap water might contain contaminants that can damage the ink cartridges)
CAUTION:
Do not use platen cleaners or alcohol to clean the ink cartridge contacts. These can damage the ink cartridge or the printer.
-
-
Press the Power button to turn on the printer, if it is not already on.
-
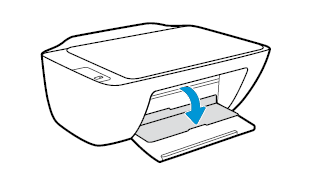
Lower the output tray.
-
Reach inside the printer, grasp the handle, and then lower the ink cartridge access door.
The carriage moves to the center of the printer.
Figure : Open the ink cartridge access door
-
Wait until the printer is idle and silent before you continue.
-
Disconnect the power cord from the rear of the printer.
-
Disconnect the USB cable.
-
Press down on the ink cartridge to release it, and then pull the ink cartridge out to remove it from its slot.
Figure : Remove the ink cartridge

CAUTION:
Do not remove both ink cartridges at the same time. Remove and then clean each ink cartridge one at a time. Do not leave an ink cartridge outside the printer for more than 30 minutes.
-
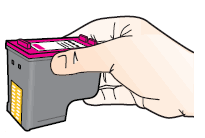
Hold the ink cartridge by its sides.
Figure : Hold the ink cartridge by its sides
-
Inspect the contacts for ink and debris buildup.
-
Wipe the contacts with a dry swab or other lint-free material until no debris remains on them.
CAUTION:
Be careful to wipe only the contacts. Do not smear any ink or debris elsewhere on the ink cartridge.
-
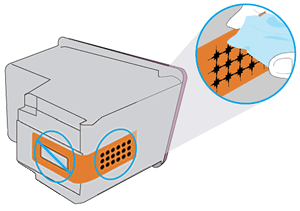
Dip a clean foam-rubber swab or lint-free cloth into distilled water, and then squeeze any excess water from it.
-
Clean only the copper-colored contacts, and then allow the ink cartridge to dry for approximately 10 minutes.
Figure : Clean the contacts
-
Lightly moisten another foam-rubber swab with distilled water, and then squeeze any excess water from the swab.
-
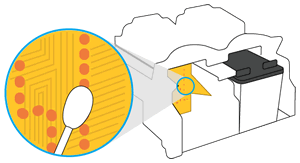
Use the swab to clean the electrical contacts in the carriage, located inside the printer.
-
Clean the carriage contacts.
Figure : The carriage contacts
-
Wait for the ink cartridge to dry (approximately 10 minutes), or use a new swab to dry it.
-
Hold the ink cartridge by its sides with the nozzles toward the printer, and then reinsert the ink cartridge into its proper slot.
-
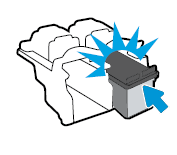
Slide the ink cartridge at a slight upward angle into the empty slot, and then gently push the ink cartridge until it snaps into place.
Figure : Snap the ink cartridge into place
-
Repeat these steps to clean, and then reinsert the other ink cartridge.
-
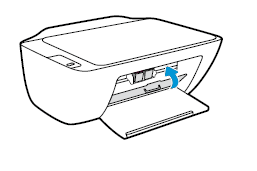
Close the ink cartridge access door.
Figure : Close the ink cartridge access door
-
Reconnect the power cord to the rear of the printer.
-
Reconnect the USB cable.
-
Press the Power button to turn on the printer if it does not turn on automatically.
Here is the HP document for your reference:- Click here
Keep me posted.
To thank me for my efforts to help you, please mark my post as an accepted solution so that it benefits several others.
Cheers.
Sandytechy20
I am an HP Employee
