• ×
    Information
    Need Windows 11 help?
    Check documents on compatibility, FAQs, upgrade information and available fixes.
    Windows 11 Support Center.
  • post a message
  • ×
    Information
    Need Windows 11 help?
    Check documents on compatibility, FAQs, upgrade information and available fixes.
    Windows 11 Support Center.
  • post a message
Guidelines
Here is the solution for Blue screen error 83C0000B on HP OfficeJet Pro 8010e, 9020e Printer Series: Click here to view.
Check some of the most frequent questions about Instant Ink: HP INSTANT INK, HP+ PLANS: INK AND TONER.


Check out our Black or Color Ink Not Printing, Other Print Quality Issues info about: Print quality and Cartridge Issues.
HP Recommended
Officejet Pro 8620
Microsoft Windows 10 (64-bit)

I'm having difficulty reinstalling the paper tray every time I add or change paper in my Officejet Pro 8620 printer.  I will go in, but it's very difficult, taking a lot of pressure.  This just started recently, before it was okay.   I fear this may damage the printer.  Is there some sort of lubricant or place to clean, if so, where and what?  Help!!!

Obviously this isn't a OS or software problem. But it's Win 10.


Thanks  for any advise

3 REPLIES 3
HP Recommended

Hi @chipscom


Welcome to the HP Support Community. I'd be happy to assist you


Due to the current global COVID-19 situation, we're seeing an influx of customers coming in for support. We appreciate your patience.


Load plain paper into Tray 1 or Tray 2 before you print.

NOTE: 

Load only U.S. letter, legal, or A4 size paper in Tray 2, if your printer includes Tray 2 as an optional accessory. Specialty paper is not supported in Tray 2.

Load plain paper in Tray 1

Load plain paper into Tray 1 before you print.

  1. Grasp the handle on the front of Tray 1, then pull the tray toward you to remove it.

    Figure : Pulling out Tray 1

    Image: Pulling out Tray 1.
  2. Slide out the paper width guides as far as possible.

    If you are loading larger-sized paper, pull out the input tray extender to lengthen the tray.

    Figure : Pulling out the input tray extender

    Image: Pulling out the input tray extender.
  3. Tap a stack of plain paper on a flat surface to align the edges.

  4. Make sure all the paper in the stack is the same size and type. Do not load mixed types of paper in the tray. The printer can process only one type of paper at a time.

    NOTE: 

    Do not use paper with paper clips or staples attached. Do not use paper that is bent, torn, dusty, damp, wrinkled, curled, or paper that does not lie flat.

  5. With Tray 1 outside of the printer, load the stack of paper in portrait orientation with the print-side facing down in the center of the input tray, then slide the stack forward until it stops.

    Figure : Loading paper into Tray 1

    Image: Loading paper into Tray 1.
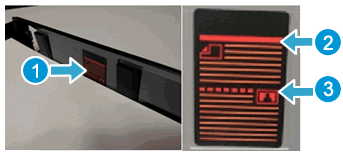
  6. Make sure the paper height does not exceed the maximum height lines on the sides of the tray.

    Figure : Examples of the paper fill guides inside Tray 1

    Image: Example of the paper fill guides inside Tray 1.
    1. Location of paper fill guides

    2. Maximum height for plain paper

    3. Maximum height for specialty paper

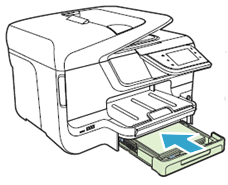
  7. Slide in the paper guides so that they rest against the edges of the paper, then push the tray into the printer until it clicks into place.

    Figure : Sliding in the paper guides and reinserting the tray into the printer

    Image: Sliding in the paper guides and reinserting the tray into the printer.
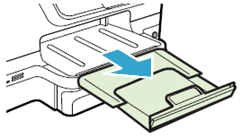
  8. Pull out the tray extender on the output tray, then lift the paper catch.

    Figure : Pulling out the tray extender on the output tray

    Image: Pulling out the tray extender on the output tray.

Load paper in optional Tray 2

Load plain paper into Tray 2 before you print.

  1. Grasp the underside of Tray 2, then pull out the tray from the bottom of the printer.

    Figure : Pulling out the tray from the bottom of the printer

    Image: Pulling out Tray 2 from the bottom of the printer.
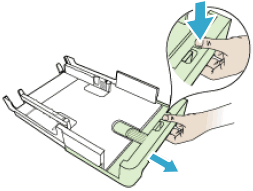
  2. Slide out the paper width guides as far as possible.

    If you are loading larger-sized paper, pull out the input tray extender to lengthen the tray.

    Figure : Pulling out the input tray extender

    Image: Pulling out the input tray extender.
  3. With Tray 2 outside of the printer, load the stack of paper in portrait orientation with the print-side facing down in the center of the input tray, then slide the stack forward until it stops.

       CAUTION: 

    Do not load paper while the printer is printing. Jams or paper feed issues might occur.

  4. Make sure the paper height does not exceed the maximum height line on the sides of the tray.


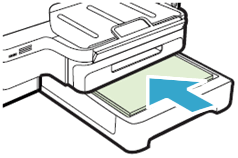
  5. Slide in the paper guides so that they rest against the edges of the paper, then push the tray into the printer until it clicks into place.

    Figure : Reinserting Tray 2 into the printer

    Image: Reinserting Tray 2 into the printer.
  6. Pull out the tray extender on the output tray, then lift the paper catch.

    Figure : Pulling out the tray extender on the output tray

    Image: Pulling out the tray extender on the output tray.

Also, refer to this document to change the try settings-Print Driver Settings Guide (Windows)


Hope this helps! Keep me posted. 


Please click “Accept as Solution” if you feel my post solved your issue, it will help others find the solution.

Click the “Kudos, Thumbs Up" on the bottom right to say “Thanks” for helping!


Have a great day! 

HP Recommended

Thanks, but I've loaded paper in this printer for over 4 years now and know the proper standard procedures.  This is a new problem, I've never experienced in the 4 years.  Previously there was a little pressure required to re-insert the tray.  Now it feels like it doesn't want to go in without excessive force and I fear damaging the printer. It's obviously a hardware issue.  Something needs fixed, lubricated or cleared   ANY OTHER SUGGESTIONS, ANYONE?

HP Recommended

Try the steps in the document to check for jams or broken parts in the Printer- Paper Jam Error


Keep me posted!

† The opinions expressed above are the personal opinions of the authors, not of HP. By using this site, you accept the <a href="https://www8.hp.com/us/en/terms-of-use.html" class="udrlinesmall">Terms of Use</a> and <a href="/t5/custom/page/page-id/hp.rulespage" class="udrlinesmall"> Rules of Participation</a>.