-
×InformationNeed Windows 11 help?Check documents on compatibility, FAQs, upgrade information and available fixes.
Windows 11 Support Center. -
-
×InformationNeed Windows 11 help?Check documents on compatibility, FAQs, upgrade information and available fixes.
Windows 11 Support Center. -
- HP Community
- Archived Topics
- Printers Archive
- Error Code Oxc19a0024

Create an account on the HP Community to personalize your profile and ask a question
Your account also allows you to connect with HP support faster, access a personal dashboard to manage all of your devices in one place, view warranty information, case status and more.
5 REPLIES 5
01-08-2019 06:59 PM
 HP Recommended
Welcome to HP forums, I see that you are getting Oxc19a0024 error code.
Reset the printer
-
Turn the printer on, if it is not already on.
-
Wait until the printer is idle and silent before you continue.
-
With the printer turned on, disconnect the power cord from the rear of the printer.
-
Unplug the power cord from the wall outlet.
-
Wait at least 60 seconds.
-
Plug the power cord back into the wall outlet.
NOTE:
HP recommends connecting the printer power cord directly to the wall outlet.
-
Reconnect the power cord to the rear of the printer.
-
Turn on the printer, if it does not automatically turn on.
-
Wait until the printer is idle and silent before you proceed.
Manually clean the printhead
-
Gather the following materials:
-
A clean, lint-free cloth
-
A clean, dry cotton swab
-
Distilled or bottled water
CAUTION:
Do not use tap water because it might contain contaminants that can damage the printhead.
-
-
Open the ink cartridge access door.
-
To remove the ink cartridge, press the tab on the front of the ink cartridge to release it, and then remove it.
Figure : Example of removing an ink cartridge from the printhead

-
Place the ink cartridges on a clean piece of paper with the ink opening pointing up.
CAUTION:
Do not leave the ink cartridges outside the printer longer than 30 minutes. Doing so can result in damage to both the printer and the ink cartridges.
-
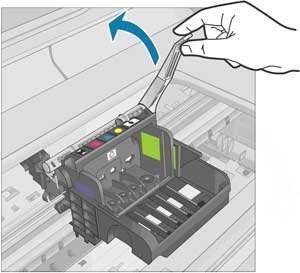
Lift the latch handle on the ink carriage until it stops.
Figure : Lifting the ink carriage latch handle
-
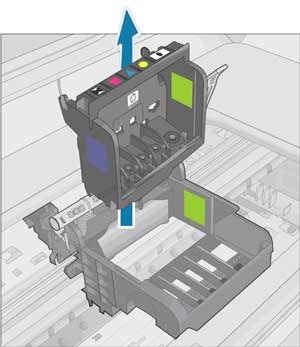
Lift up to remove the printhead from the ink carriage.
Figure : Removing the printhead
-
Review the three areas of the printhead that need to be cleaned.
Figure : Example of the three areas to clean on the printhead
-
-
Plastic ramp on the side of the ink nozzles
-
Edge between nozzles and contacts
-
Electrical contacts
CAUTION:
Do not touch the nozzles or the electrical contacts with your fingers. Touch the electrical contact areas only with the cleaning materials.
-
-
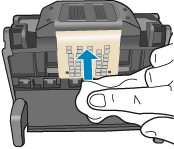
Use a fresh, lightly dampened, lint-free cloth to wipe the electrical contact area from the bottom to the top until no new ink shows on the cloth.
Use as many fresh, lightly dampened, lint-free cloths as necessary.
Figure : Cleaning the electrical contacts
-
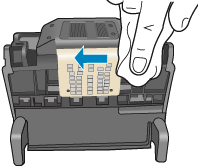
Use a fresh, lightly dampened, lint-free cloth to wipe any accumulated ink and debris from the edge between the nozzles and the contacts.
Figure : Cleaning the edge of the printhead
-
Use a fresh, lightly dampened, lint-free cloth to wipe the plastic ramps on both sides, away from the nozzles.
Figure : Cleaning the printhead ramps

-
Wipe the previously cleaned areas dry with a dry, lint-free cloth.
-
Use a fresh, lightly dampened, lint-free cloth to wipe the electrical contact area inside the printer from bottom to the top until no new ink shows on the cloth.
Use as many fresh, lightly dampened, lint-free cloths as necessary.
Figure : Cleaning the electrical contacts inside the printer
-
Wipe the electrical contact area dry with a dry, lint-free cloth.
-
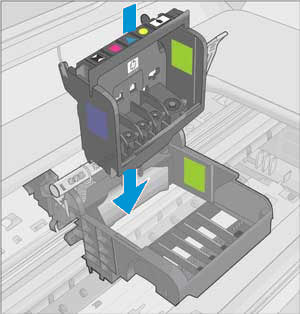
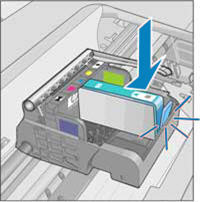
Make sure the ink carriage latch handle is up, then reinstall the printhead.
Figure : Reinstalling the printhead
-
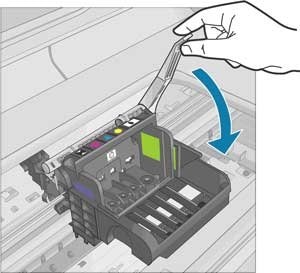
Carefully lower the ink carriage latch handle.
Figure : Lowering the ink carriage latch handle
-
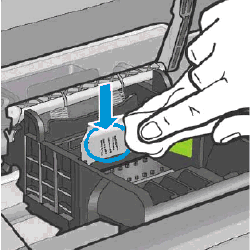
Reinsert the ink cartridge into the matching letter and colored dot slot, then push the ink cartridge down and forward until it snaps into place.
Figure : Example of sliding the ink cartridge into the correct slot
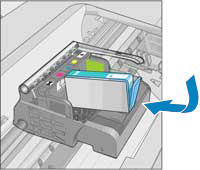
Figure : Example of snapping the ink cartridge into place
-
Run your finger along the top of the ink cartridges to make sure none of them protrude.
If any ink cartridges protrude, then press down firmly until each ink cartridge snaps into place.
-
Close the ink cartridge access door.
-
Check the printer control panel display for the error message.
You can refer this HP document for more assistance:- Click here
Let me know how it goes.
To thank me for my efforts to help you, please mark my post as an accepted solution so that it benefits several others.
Cheers.
Sandytechy20
I am an HP Employee
01-08-2019 09:02 PM
HP Recommended
Well, now after unplugging from unit thne the wall outlet, then powering up again, no change. Also now the error Code is Oxc19a0023, before it was .....0024 and also just OxO, or 0x0. As for the print head cleaning instructions; reading through them before starting the cleaning I notice that the photo/diagrams to remove the print head assembly are quite different that the HP 6978 that I have. So I didn't do those steps. I noticed dust, (paper dust?) on the inside horizontal surfaces. Looks like a big job to clean all those complex surfaces. Would a small vacuum device work, one with a long hose? This printer was purchased in June of 2017, out of warrenty, but has served me nicely with just a few equally complex poblems. Printers of this type are rather complex and amazing pieces of equipment. I hope I don't have to buy another one after just 1.5 years.
01-09-2019 12:16 PM - edited 01-10-2019 10:53 AM
HP Recommended
Thanks for the reply.
I appreciate your time and effort.
Yes, clean the dust and then restart the printer and check if that resolved this issue.
Feel free to contact us in future if you need more assistance, I will be more than glad to assist you.
Cheers.
Sandytechy20
I am an HP Employee
01-10-2019 07:36 AM
HP Recommended
I've spent too many hours on this project already. If you look at my previous questions, it is clear HP gave me a set of impossible instructons to clean the printer head on a machine whose printer head cannot be removed. Why would you give me such impossible tasks? Cleaning the interior of dust for which I devised a safe nozzle made from a plastic soda straw through a cork that fint in the hose of a household vacuum cleaner with an adjustable slit to help control the amount of air, thus pressure, that passes through the straw. After all that effort the appearance of dust was decreased as expected but the Error Message remained on the screen when the printer was sent a print message. I eventually talked to an Indian, I assume in India, who was patient enough to slow his speech on occasion so I could understand his English. (I taught Chemistry for 45 years interacting with lots of Indian students and those from other countries as well, so this encounter with kind of communication problem is not new to me.) Eventually he told me the way to fix the problem was to buy a new printer, something I had decided on my own.
I'm looking for a company that sells a better quality printer that can be repaired instead of just throwing it away and buying a new printer. I just purchased a 902 XL and a set of color cartridges, more money down the drain. So I don't accept your solution.
01-10-2019 10:57 AM
HP Recommended
Thanks for writing back to us.
As we have limited support boundaries in the support community as of now. In order to resolve the issue we have to elevate the case to next level, I will share you few details through a private message.
Cheers.
Sandytechy20
I am an HP Employee
† The opinions expressed above are the personal opinions of the authors, not of HP. By using this site, you accept the Terms of Use and Rules of Participation.


Didn't find what you were looking for?
Ask the community
† The opinions expressed above are the personal opinions of the authors, not of HP. By using this site, you accept the <a href="https://www8.hp.com/us/en/terms-of-use.html" class="udrlinesmall">Terms of Use</a> and <a href="/t5/custom/page/page-id/hp.rulespage" class="udrlinesmall"> Rules of Participation</a>.