-
×InformationNeed Windows 11 help?Check documents on compatibility, FAQs, upgrade information and available fixes.
Windows 11 Support Center. -
-
×InformationNeed Windows 11 help?Check documents on compatibility, FAQs, upgrade information and available fixes.
Windows 11 Support Center. -
- HP Community
- Printers
- Printing Errors or Lights & Stuck Print Jobs
- Error message after replacing ink cartridge

Create an account on the HP Community to personalize your profile and ask a question
04-10-2020 07:27 AM
I replaced the black and magenta ink cartridges on my Ink Jet 6600 printer. Now I am getting an error message that says "There is a problems with the printer or ink system." Cartridges are new HP products. Anybody know what's going on?
04-14-2020 02:09 PM
Hi @MIKE-R1
Welcome to the HP Support Community. I'd be happy to assist you with the "Problem with Ink System" issue.
Try the steps below to resolve the error -
Step 1: Check the ink cartridges for leaks
Replace any ink cartridges that leak.
CAUTION:Do not use leaking ink cartridges.
To find your cartridge number and to purchase ink or toner supplies, go to HP Store or a local retailer. Make sure you are using the correct genuine HP ink or toner supplies for your printer. HP cannot guarantee the quality or reliability of non-HP cartridges or refilled HP cartridges. To check the authenticity of your cartridges, go to the HP anti-counterfeit webpage (in English).
If you have a defective cartridge or printhead, it might be under warranty. To check the warranty on your ink or toner supplies, go to Printer and Page Yield Overview, and then review the limited warranty information for your supplies.
-
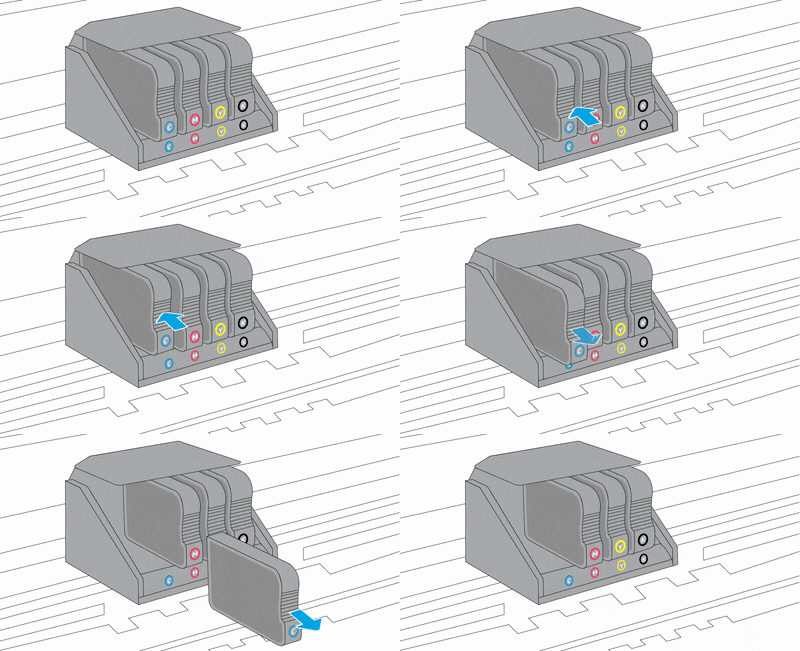
Open the door to access to the ink cartridges.
-
Wait until the carriage stops moving before you continue.
-
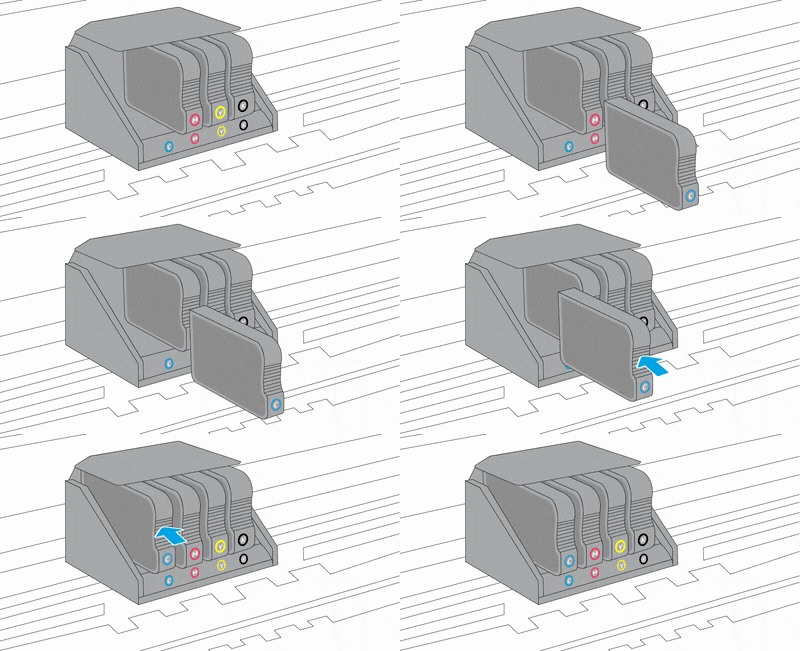
Remove an ink cartridge, and then inspect the ink cartridge for leaking ink.

-
If the ink cartridge leaks, replace the ink cartridge. If the ink cartridge is not leaking, insert the ink cartridge into its slot.

-
Repeat these steps for the other three ink cartridges.
-
Close the ink cartridge access door.
If the error message persists, continue to the next step.
Step 2: Reset the printer
Resetting the printer might clear the error message.
-
With the printer turned on, disconnect the power cord from the printer.
-
Unplug the power cord from the power source.
-
Wait 60 seconds.
-
Reconnect the power cord to a wall outlet and to the printer.
NOTE:
HP recommends plugging the printer directly into a wall outlet.
If the error message persists, continue to the next step.
Step 3: Check the carriage for a printhead latch
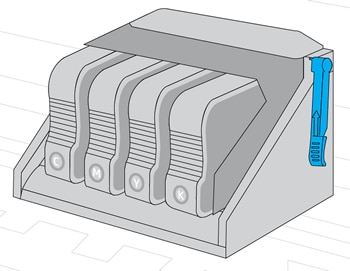
Open the door to access to the ink cartridges, and then determine if the carriage inside the printer has a printhead latch.
Example of a carriage with a latch

-
If your carriage has a printhead latch, continue to the next step.
-
If your carriage does not have a printhead latch, skip to Service the printer.
Step 4: Reseat the printhead up to three times
To clear the error message, you might need to reseat the printhead up to three times.
-
Open the door to access to the ink cartridges.
-
Wait until the carriage stops moving before you continue.
-
Unplug the power cord from the rear of the printer.
WARNING:
You must disconnect the power cord before reaching inside the printer.
-
Lift the carriage latch, slightly lift the printhead, lower the printhead back into the carriage, wiggle the printhead left and right, and then lower the carriage latch to lock the printhead into place.

-
Close the ink cartridge access door.
-
Reconnect the power cord to the rear of the printer, and then check the control panel for the error message.
-
Sometimes error messages persist after inserting the printhead. If the error message persists, repeat the steps to reseat the printhead up to three times.
Hope this helps! Keep me posted.
Please click “Accept as Solution” if you feel my post solved your issue, it will help others find the solution.
Click the “Kudos, Thumbs Up" on the bottom right to say “Thanks” for helping!
Have a great day!
