-
×InformationNeed Windows 11 help?Check documents on compatibility, FAQs, upgrade information and available fixes.
Windows 11 Support Center. -
-
×InformationNeed Windows 11 help?Check documents on compatibility, FAQs, upgrade information and available fixes.
Windows 11 Support Center. -
- HP Community
- Printers
- Printing Errors or Lights & Stuck Print Jobs
- Error: yellow cartridge missing

Create an account on the HP Community to personalize your profile and ask a question
08-14-2019 01:03 PM
I have a HP Deskjet 3070 B611 series. I get the Error: yellow cartridge missing. I use genuine HP cartridges. Replacing by a brandnew cartridge does not help. Cleaning the contact points does not help. Resetting the printer by disconnecting the power cable does not help.
What can I do?
08-17-2019 06:13 AM
Welcome to the HP Support Community!
I recommend you follow the below steps and check if it helps.
-
Gather the following materials:
-
Clean, lint-free swabs that will not come apart or leave fibers
-
A sheet of paper to place the cartridges on
-
-
Press the Power button (
 ) to turn on the product.
 -
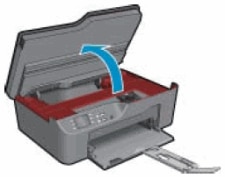
Open the cartridge access door. The carriage moves to the access area.
Figure : Open the cartridge access door

-
Disconnect the power cord from the rear of the product.
-
Press the tab on the front of the cartridge in to release it, and then pull up on the cartridge to remove it from the slot.
Figure : Remove the cartridge from the slot

-
Hold the cartridge by its sides, and then find the electrical contacts on the bottom of the cartridge. The electrical contacts are four small rectangles of copper-colored metal.
Figure : Cartridge contacts
-
Cartridge contacts
-
-
Inspect the contacts for ink and debris buildup.
-
Wipe the contacts with a swab until no debris remains on them.
CAUTION:
Be careful to wipe only the contacts. Do not smear any ink or debris elsewhere on the cartridge.
-
Turn the cartridge on its side, and then place it onto the sheet of paper.
-
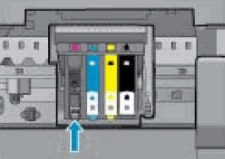
Locate the electrical contacts in the cartridge slot. The contacts are four copper-colored pins.
Figure : Location of the cartridge slot contacts

-
Wipe the contacts with a swab until no debris remains on them.
-
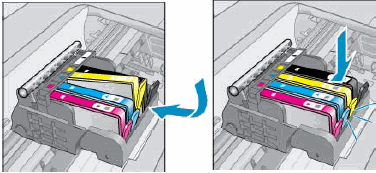
With the contacts facing down, slide the cartridge into its slot. Press down on the cartridge until it clicks into place.
Figure : Insert the cartridge

-
Repeat these steps to clean and reinsert any of the other cartridges.
-
Close the cartridge access door.
Figure : Close the cartridge access door

-
Reconnect the power cord to the rear of the product.
-
Press the Power button (
 ) to turn on the product if it does not turn on automatically.
If you continue facing the issue, follow the steps in the below article.
Let me know how it goes and you have a great day!
If you wish to show appreciation for my efforts, mark my post as Accept as Solution. Your feedback counts!
Cheers!
The_Fossette
I am an HP Employee
