-
×InformationNeed Windows 11 help?Check documents on compatibility, FAQs, upgrade information and available fixes.
Windows 11 Support Center. -
-
×InformationNeed Windows 11 help?Check documents on compatibility, FAQs, upgrade information and available fixes.
Windows 11 Support Center. -
- HP Community
- Printers
- Printing Errors or Lights & Stuck Print Jobs
- Event Code 72234

Create an account on the HP Community to personalize your profile and ask a question
06-25-2018 08:49 AM
The window on my printer says "There is a problem with or ink system." Restarting does not solve the problem. On the printer homepage I see the event code 72234 associated with the problem. I'd like to know what the problem is and how I can fix it.
06-26-2018 01:04 PM
Thank you for posting on HP Forums,
The Barachiel is at your service.
I understand you are facing issues with the printer's ink system.
I'll be glad to help you out, however, for an accurate solution I will need more details:
Have you attempted any steps on your own before posting on the HP Forums?
When was the last time it worked without these issues?
did you try to re-seat the printheads?
In the meantime, please try the steps mentioned below:
Solution one: Check the ink cartridges for leaks
 Important: To avoid startup failures at initial printer setup or when replacing a printhead, use the SETUP cartridges that came with the printer or replacement printhead.
If you have a defective cartridge or printhead, it might be under warranty. To check the warranty on your ink or toner supplies, go to hp.com/go/learnaboutsupplies, and then review the limited warranty information for your supplies.
-
Turn on the printer.
-
Open the ink cartridge access door.
Figure : Opening the ink cartridge access door
-
Location of the ink cartridge access door slot
-
-
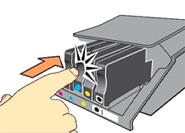
Press the front of the first cartridge to release it, and then pull it out of the carriage.
Figure : Press to release the cartridge
-
Check the cartridge for leaking ink. Be careful not to get ink on your skin or clothing.
-
If the cartridge is leaking, replace the cartridge.
-
If the cartridge is not leaking, continue to the next step.
note:
If you see a small amount of ink on the ring where the ink exits the cartridge, the cartridge is not leaking.
-
-
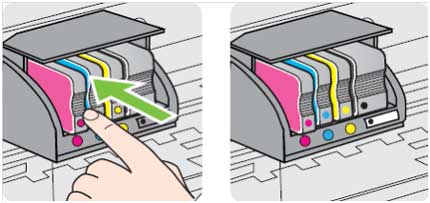
Slide the cartridge back into its color-coded slot, and then gently push it forward until it clicks into place.
Figure : Insert the cartridge into its color-coded slot
-
Repeat these steps to check the other cartridges for leaking ink.
-
Close the cartridge access door.
Solution two: Reset the printer
Follow these steps to reset the printing mechanism.
-
Turn the printer on, if it is not already on.
-
Wait until the printer is idle and silent before you continue.
-
With the printer turned on, disconnect the power cord from the rear of the printer.
-
Unplug the power cord from the wall outlet.
-
Wait at least 60 seconds.
-
Plug the power cord back into the wall outlet.
note:
HP recommends connecting the printer power cord directly to the wall outlet.
-
Reconnect the power cord to the rear of the printer.
-
Turn on the printer, if it does not automatically turn on.
-
Wait until the printer is idle and silent before you proceed.
Solution three: Remove and then reinsert the printhead
The 'Problem with Ink System' error message is sometimes caused by poor electrical contact between the printhead and the printer. Removing and reinserting the printhead can help. Follow these steps in the order presented to remove, and then reinsert the printhead.
Step 1: Remove the printhead
-
Turn on the printer.
-
Wait until the warm-up period finishes and your printer is idle and silent before you proceed.
-
Open the ink cartridge access door.
Figure : Opening the ink cartridge access door
-
Location of the ink cartridge access door slot
-
-
Disconnect the power cord from the rear of the printer. Unplugging the printer prevents the carriage from moving.
warning:
You must disconnect the power cord before reaching inside the printer to avoid risk of injuries or electric shock.
-
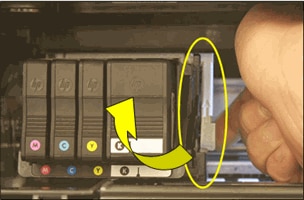
Lift the carriage latch.
Figure : Lift the carriage latch
-
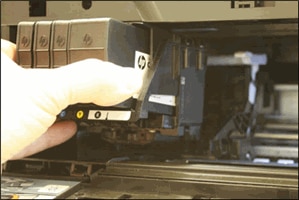
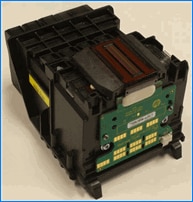
Grasp the sides of the printhead, gently lift and remove the printhead from the carriage.
note:
Do not remove the cartridges from the printhead. You can safely remove the printhead with all of the cartridges inserted.
Figure : Remove the printhead
caution:
The nozzle area on the bottom of the printhead is fragile! Make sure that the bottom of the printhead does not bump or rub on the printer. Do not touch the nozzles or electrical contacts. Touching these areas can cause electrical failures or print quality problems.
Figure : Nozzles and electrical contacts
-
Nozzles
-
Electrical contacts
-
-
Place the printhead assembly (with the cartridges still installed) upside down on a clean sheet of paper.
caution:
Do not leave the printhead assembly outside of the printer for an extended period. Doing so can result in damage to the printhead or the printer.
Figure : Printhead upside down on a clean sheet of paper
Step 2: Inspect the carriage path where the printhead sits
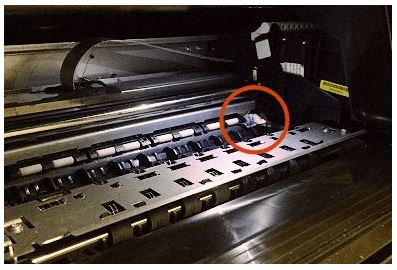
Inside the printer, look for and remove any obstructions from the printhead compartment. If necessary, use a flashlight to thoroughly check for any obstructions.
Figure : Check for paper jammed in the carriage path
Step 3: Insert the printhead, and then lower the carriage latch
-
Grasp the sides of the printhead and turn it right side up with the nozzles facing down and the electrical contacts facing away from you.
-
On the front of the printer, insert the printhead into the carriage, ensuring that the electrical contacts face the inside of the printer. As you guide the printhead into the carriage, it lowers into the carriage as it seats.
caution:
The nozzle area on the bottom of the printhead is fragile! Make sure that the bottom of the printhead does not bump or rub on the printer. Do not touch the nozzles or electrical contacts. Touching these areas can cause electrical failures or print quality problems.
Figure : Insert the printhead

-
Gently rock the printhead to the left and right to make sure that the printhead fully seats in the carriage.
-
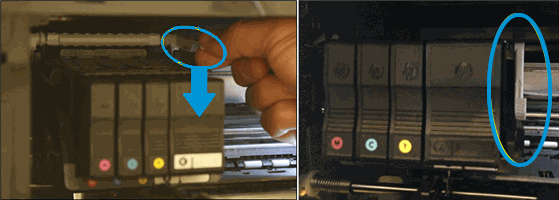
Carefully lower the carriage latch to secure the printhead.
Figure : Lower the carriage latch
-
Verify that the carriage latch is down.
Figure : Carriage latch positions
-
Carriage latch is up
-
Carriage latch is down
-
-
Close the cartridge access door.
-
Reconnect the power cord to the rear of the printer.
-
If the printer does not turn on by itself, press the Power button to turn it on.
note:
The printer might go through a warm-up period. The printer lights might flash, and the carriage might move.
-
Wait until the warm-up period finishes and your printer is idle and silent before you proceed.
-
If these steps resolved the issue, skip to the step to clean the printhead.
-
If the issue persists, see the next step.
Step 4: Re-seat the printhead up to three times
Sometimes error messages persist after inserting the printhead. To clear any error messages, reseat the printhead up to three times.
Step 5: Use the automated tool to clean the printhead
-
Load unused, plain white paper into the input tray.
-
On the printer control panel, touch the Right Arrow (
 ) to display additional options.
 -
Touch Setup (
 ), touch Tools, and then touch Clean Printhead.
 -
Wait until the printhead cleaning sequence completes and the report prints.
Let me know how that pans out.
I hope you have a good day ahead,
And Feel free to ask any other queries as well,
Considering, this forum has some of the best people in the world available and ready to help. 😉
Barachiel
I am an HP Employee
