-
×InformationNeed Windows 11 help?Check documents on compatibility, FAQs, upgrade information and available fixes.
Windows 11 Support Center. -
-
×InformationNeed Windows 11 help?Check documents on compatibility, FAQs, upgrade information and available fixes.
Windows 11 Support Center. -
- HP Community
- Printers
- Printing Errors or Lights & Stuck Print Jobs
- Getting double image when printing

Create an account on the HP Community to personalize your profile and ask a question
11-20-2019 01:02 PM
i'm getting a double image print. both in color and black
I have been printing fine for the pass 4 years with this printer. Only recently has it started acting up. its been 3 weeks of buying new ink cartridges, re-alignments, remaking images, cleaning the insides, and reinstalling software. I dont know what else to do. Any help would be appreciated.
installed driver :OJ_AIO_4500_G510g-m_Full_Win_WW_140_408-5
11-23-2019 09:37 AM
Welcome to HP support community.
Did you make a copy and check if that prints fine?
Meanwhile:
Manually clean the area around the ink nozzles
-
Gather the following materials:
-
Dry foam-rubber swabs, lint-free cloth, or any soft material that does not come apart or leave fibers (coffee filters work well)
-
Distilled, filtered, or bottled water (tap water might contain contaminants that can damage the ink cartridges)
CAUTION:
Do not use platen cleaners or alcohol to clean the area. These can damage the ink cartridge or the printer.
-
-
Make sure the printer is on.
-
Open the scanner lid.
-
Open the ink cartridge access door.
The carriage moves to the ink cartridge access area.
Figure : Open the ink cartridge access door
-
Wait until the carriage is idle and silent before continuing.
-
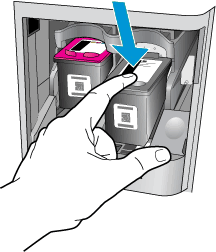
Push down on the top of the ink cartridge to release it, and then pull it toward you to remove it from its slot.
Figure : Remove the ink cartridge
-
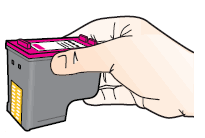
Hold the ink cartridge by its sides.
Figure : Hold the ink cartridge by its sides
-
Inspect the ink cartridge contacts for ink and debris buildup.
CAUTION:
Do not touch the copper-colored contacts or the ink nozzles. Touching these parts can result in clogs, ink failure, and bad electrical connections.
Figure : Do not touch the contacts or nozzles
-
Lightly moisten a clean, foam-rubber swab with distilled water, and then squeeze any excess water from it.
-
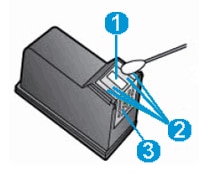
Clean the face and edges around the ink nozzle with the swab.
CAUTION:
Do not clean the ink nozzle plate.
Figure : Clean the area around the ink nozzle
-
-
Nozzle plate - Do not clean -
Area surrounding ink nozzle - Do clean
-
Ink cartridge contacts - Do not clean
-
-
Either let the ink cartridge sit for 10 minutes to allow the cleaned area to dry, or use a new swab to dry it.
-
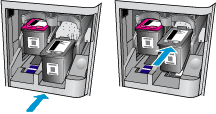
Slide the ink cartridge forward into the empty slot, and then gently push on the upper part of the ink cartridge until it clicks into place.
Figure : Install the ink cartridge
-
Repeat these steps to clean the area surrounding the ink nozzle on the other ink cartridge.
-
Close the ink cartridge access door.
-
Close the scanner lid.
-
Try printing again.
You can refer this HP document for more assistance:- Click here
I hope that helps.
To thank me for my efforts to help you, please mark my post as an accepted solution so that it benefits several others.
Cheers.
Sandytechy20
I am an HP Employee