-
×InformationNeed Windows 11 help?Check documents on compatibility, FAQs, upgrade information and available fixes.
Windows 11 Support Center. -
-
×InformationNeed Windows 11 help?Check documents on compatibility, FAQs, upgrade information and available fixes.
Windows 11 Support Center. -
- HP Community
- Printers
- Printing Errors or Lights & Stuck Print Jobs
- Grinding noises and frequent jams in HP Photosmart 6520

Create an account on the HP Community to personalize your profile and ask a question
Your account also allows you to connect with HP support faster, access a personal dashboard to manage all of your devices in one place, view warranty information, case status and more.
Check some of the most frequent questions about Instant Ink: HP INSTANT INK, HP+ PLANS: INK AND TONER.
Check out our Black or Color Ink Not Printing, Other Print Quality Issues info about: Print quality and Cartridge Issues.

It has been a while since anyone has replied. Simply ask a new question if you would like to start the discussion again.
01-15-2015 12:24 PM - edited 01-15-2015 02:37 PM
 HP Recommended
Operating System: OS X 10.9
A piece of paper tore in the printer the other day and required a bit of tugging to get both pieces out. Since then, the printer has made grinding noises as it prints and every 2nd or 3rd piece of paper jams. And ALL pieces of paper have a notch or small rip at the same point after going through the printer. I checked under the printer and it's at the spot where a small stick of plastic teeth contacts the paper. I think this piece isn't moving at the right time (I can tell it's on a spring), causing the paper to catch on it as it gets pulled up into the machine.
The standard "Paper Jam" routine isn't helping. Anyone have advice for this kind of problem?
BTW, the printer prints photos just fine. It's a problem with paper feeding out of the tray.
I've also been having frequent network problems with this printer for about a month, but I assume those are unrelated...
6 REPLIES 6
01-16-2015 12:36 PM
HP Recommended
Hi @RadioJeff , and welcome to the HP Forums!
I understand you're getting jams, alongside some grinding noises. I would like to help!
I would recommend removing the ink cartridges from the printer, and perform a power reset. Disconnect the power cord from the printer and the power outlet, then wait 60 seconds. After 60 seconds, plug the printer back in. Ensure you plug the printer directly to a wall outlet. Make sure to bypass any sort of surge protector or power bar.
I would also recommend the steps in the following documents:
Good luck and please let me know the results of your troubleshooting steps. Thank you for posting on the HP Forums!
Please click “Accept as Solution " if you feel my post solved your issue, it will help others find the solution.
Click the “Kudos, Thumbs Up" on the right to say “Thanks" for helping!
Jamieson
I work on behalf of HP
"Remember, I'm pulling for you, we're all in this together!" - Red Green.
Click the “Kudos, Thumbs Up" on the right to say “Thanks" for helping!
Jamieson
I work on behalf of HP
"Remember, I'm pulling for you, we're all in this together!" - Red Green.
04-04-2017 10:47 AM
HP Recommended
I tried all suggestions but my issue didn't get resolved. Then one paper sheet got stuck in an area where I had to pull it our from under the printer. That resulted in another issue - the roller with a spring - the spring is not connected to anything but the roller part and I have no idea where it is to be connected. Can't even lay it flat on the bottom. So I guess it is time to get a new printer.
06-02-2017 05:41 AM
HP Recommended
This procedure worked like a charm - really surprised and was about to junk the printer:
https://support.hp.com/us-en/document/c00255558
HP Deskjet Printers - The Printer Makes a Grinding Noise When It is Turned On or Printing
Issue
A grinding sound is heard when the printer is turned on or when it is printing. Blinking lights may accompany the noise. The problem can be caused by a carriage stall or a paper jam. To resolve this issue, follow the instructions below.
Solution
- Turn the printer on.
- For the 800, 900, 3820, 5500, and 6000 series, open the top cover of the printer. Verify that the carriage moves to the center of the printer. If the carriage does not move to the center, proceed to step 2.
- For the 5100, 5600, and 5800 series printers, open the top cover of the printer. Verify that the service station (the piece below the cartridges) lowers, allowing access to the cartridges. If the service station does not lower, proceed to step 2.
- Unplug the power cable from the back of the printer.
- If the carriage moved to the center, or if the service station lowered, remove the cartridges. Check inside the printer for any broken parts.If the carriage did not move to the center, try to manually slide the carriage to the center. If the carriage is locked either in the left or right position, proceed to step 5.
- Close the top cover of the printer.
- If the printer is a HP Deskjet 900 series printer, refer to the HP support document Removing the Cartridges if the Printer will not Turn On or the Carriage is Locked (bpd50074). This document will provide information for unlocking the carriage from the right side of the printer. If the issue is on another model of printer, proceed to step 6.
- Remove the rear access door, or the automatic two-sided printing accessory, and check for any paper jams or paper obstructions. Remove any obstructions.
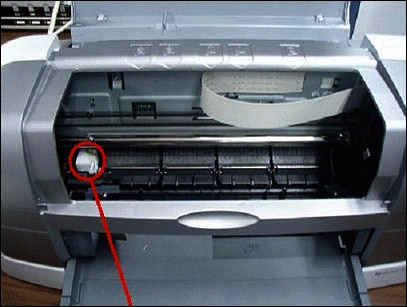
- Check to make certain the carriage is on the right side of the printer. Rotate the rear paper guide rollers upwards five times, then downwards four times. If the rollers will not move, open the top cover and slide the carriage to the right (if it is not already there and if carriage can move). Try to roll the rollers again while pushing the clutch in. If the rollers do not move, continue on to the next step.Figure : Location of the clutch
- Replace the rear access door accessory, or the automatic two-sided printing accessory. Close the top cover.
- Plug the power cable back in.
- Turn the printer on, and replace the cartridges if possible. If the carriage moves, but there is still a grinding noise, there may be a paper feed issue. If the carriage will not move, then it is a carriage stall issue.
- After installing the cartridge, if the printer has a solid power light, perform a self-test on the printer.
01-07-2018 09:46 AM
HP Recommended
I have the same problems and have not solved them but in the case of the “loose spring” I did fix that but it had no effect on the printer jamming and failure to operate as designed. The spring goes over the long plastic post near it. It easily slips over the post and then acts to keep the two rollers in place. THC
Be alert for scammers posting fake support phone numbers and/or email addresses on the community.
If you think you have received a fake HP Support message, please report it to us by clicking on "Flag Post".
† The opinions expressed above are the personal opinions of the authors, not of HP. By using this site, you accept the Terms of Use and Rules of Participation.


Didn't find what you were looking for?
Ask the community
† The opinions expressed above are the personal opinions of the authors, not of HP. By using this site, you accept the <a href="https://www8.hp.com/us/en/terms-of-use.html" class="udrlinesmall">Terms of Use</a> and <a href="/t5/custom/page/page-id/hp.rulespage" class="udrlinesmall"> Rules of Participation</a>.