-
×InformationNeed Windows 11 help?Check documents on compatibility, FAQs, upgrade information and available fixes.
Windows 11 Support Center. -
-
×InformationNeed Windows 11 help?Check documents on compatibility, FAQs, upgrade information and available fixes.
Windows 11 Support Center. -
- HP Community
- Printers
- Printing Errors or Lights & Stuck Print Jobs
- HP 2132 Won't Print Black

Create an account on the HP Community to personalize your profile and ask a question
08-05-2018 08:02 PM
My HP Officejet 2132 (connected to computer via usb) won't print black ink. Every paper comes out with little to no black ink. Rather than just looking faded like it is running low, it will also completely skip lines, look stripey, or cut off the tops of lines in both portrait and landscape mode. I have tried:
1. Replacing the HP black ink cartridge with a new one (still HP)
2. Aligning the cartridges
3. Cleaning the Cartridges
4. Cleaning the Printer
5. Cleaning the black ink cartridge with a dollar bill as suggested on another post
6. Running the diagnostic software and then:
a. cleaning the printheads
b. aligning the printheads
7. Printing in "Best Quality" mode
I have no idea what to do. I'm a college student, and I've used it regularly for the past three years with no problems. It hasn't been used the past three months until today, and I kept it stored over the summer in the box in decent temperature conditions inside. Thank you in advance!
Solved! Go to Solution.
Accepted Solutions
08-05-2018 10:16 PM
The troubleshooting steps in the document here may help resolve black not printing properly on your Deskjet 2132. The symptoms you described would be consistent with an electrical connection issue between the cartridge and printer. Go through steps 3-5.
- Gather the following materials:
- Clean, dry foam-rubber swabs or a clean, lint-free cloth
- Distilled or bottled water (tap water might damage the ink cartridge or the printer)
- Turn on the printer, if it is not already on.
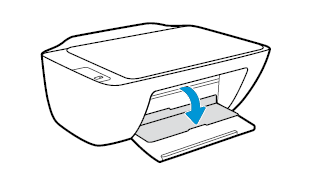
- Lower the output tray, reach inside the printer, and then grasp the handle and lower the ink cartridge access door to open it.The carriage moves to the center of the printer.Figure : Open the ink cartridge access door
- Wait until the printer is idle and silent before you continue.
- Disconnect the power cord from the rear of the printer.
- Disconnect the USB cable.
- Press down on the ink cartridge to release it, and then pull the ink cartridge out to remove it from its slot.
CAUTION:
Do not remove both ink cartridges at the same time. Remove and then clean each ink cartridge one at a time. Do not leave an ink cartridge outside the printer for more than 30 minutes.Figure : Remove the ink cartridge
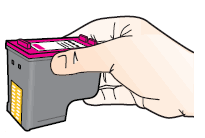
- Hold the ink cartridge by its sides.Figure : Hold the ink cartridge by its sides
- Inspect the contacts for ink and debris buildup.
- Wipe the contacts with a dry swab or other lint-free material until no debris remains on them.
CAUTION:
Be careful to wipe only the contacts. Do not smear any ink or debris elsewhere on the ink cartridge. - Dip a clean foam-rubber swab or lint-free cloth into distilled water, and then squeeze any excess water from it.
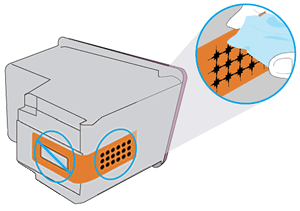
- Clean only the copper-colored contacts, and then allow the ink cartridge to dry for approximately 10 minutes.Figure : Clean the contacts
- Lightly moisten another foam-rubber swab with distilled water, and then squeeze any excess water from the swab.
- Use the swab to clean the electrical contacts in the carriage, located inside the printer.
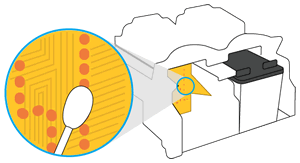
- Clean the carriage contacts.Figure : The carriage contacts
- Either let the ink cartridge sit for 10 minutes to allow the cleaned area to dry, or use a new swab to dry it.
- Hold the ink cartridge by its sides with the contacts toward the printer, and then reinsert the ink cartridge into its proper slot.
- Slide the ink cartridge at a slight upward angle into the empty slot, and then gently push the ink cartridge until it snaps into place.Figure : Snap the ink cartridge into place
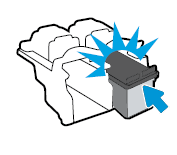
- Push the ink cartridge forward into its slot until it snaps into place.
- Repeat these steps to clean and then reinsert the other ink cartridge.
- Close the ink cartridge access door.Figure : Close the ink cartridge access door
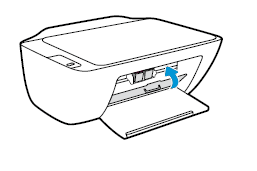
- Reconnect the power cord to the rear of the printer.
- Reconnect the USB cable.
- Turn on the printer if it does not turn on automatically.If the error persists, continue to the next step.
NOTE:Make sure the ink cartridges snap firmly into place.
I am not an employee of HP, I am a volunteer posting here on my own time.
If your problem is solved please click the "Accept as Solution" button
If my answer was helpful please click "Yes" to the "Was this post helpful" question.
08-05-2018 10:16 PM
The troubleshooting steps in the document here may help resolve black not printing properly on your Deskjet 2132. The symptoms you described would be consistent with an electrical connection issue between the cartridge and printer. Go through steps 3-5.
- Gather the following materials:
- Clean, dry foam-rubber swabs or a clean, lint-free cloth
- Distilled or bottled water (tap water might damage the ink cartridge or the printer)
- Turn on the printer, if it is not already on.
- Lower the output tray, reach inside the printer, and then grasp the handle and lower the ink cartridge access door to open it.The carriage moves to the center of the printer.Figure : Open the ink cartridge access door

- Wait until the printer is idle and silent before you continue.
- Disconnect the power cord from the rear of the printer.
- Disconnect the USB cable.
- Press down on the ink cartridge to release it, and then pull the ink cartridge out to remove it from its slot.
CAUTION:
Do not remove both ink cartridges at the same time. Remove and then clean each ink cartridge one at a time. Do not leave an ink cartridge outside the printer for more than 30 minutes.Figure : Remove the ink cartridge
- Hold the ink cartridge by its sides.Figure : Hold the ink cartridge by its sides

- Inspect the contacts for ink and debris buildup.
- Wipe the contacts with a dry swab or other lint-free material until no debris remains on them.
CAUTION:
Be careful to wipe only the contacts. Do not smear any ink or debris elsewhere on the ink cartridge. - Dip a clean foam-rubber swab or lint-free cloth into distilled water, and then squeeze any excess water from it.
- Clean only the copper-colored contacts, and then allow the ink cartridge to dry for approximately 10 minutes.Figure : Clean the contacts

- Lightly moisten another foam-rubber swab with distilled water, and then squeeze any excess water from the swab.
- Use the swab to clean the electrical contacts in the carriage, located inside the printer.
- Clean the carriage contacts.Figure : The carriage contacts

- Either let the ink cartridge sit for 10 minutes to allow the cleaned area to dry, or use a new swab to dry it.
- Hold the ink cartridge by its sides with the contacts toward the printer, and then reinsert the ink cartridge into its proper slot.
- Slide the ink cartridge at a slight upward angle into the empty slot, and then gently push the ink cartridge until it snaps into place.Figure : Snap the ink cartridge into place

- Push the ink cartridge forward into its slot until it snaps into place.
- Repeat these steps to clean and then reinsert the other ink cartridge.
- Close the ink cartridge access door.Figure : Close the ink cartridge access door

- Reconnect the power cord to the rear of the printer.
- Reconnect the USB cable.
- Turn on the printer if it does not turn on automatically.If the error persists, continue to the next step.
NOTE:Make sure the ink cartridges snap firmly into place.
I am not an employee of HP, I am a volunteer posting here on my own time.
If your problem is solved please click the "Accept as Solution" button
If my answer was helpful please click "Yes" to the "Was this post helpful" question.
