-
×InformationNeed Windows 11 help?Check documents on compatibility, FAQs, upgrade information and available fixes.
Windows 11 Support Center. -
-
×InformationNeed Windows 11 help?Check documents on compatibility, FAQs, upgrade information and available fixes.
Windows 11 Support Center. -
- HP Community
- Printers
- Printing Errors or Lights & Stuck Print Jobs
- HP ENVY 4500 All IN ONE. Black Ink keeps drying out/not work...

Create an account on the HP Community to personalize your profile and ask a question
10-09-2018 09:03 PM
HI, i am on my third ink replacment within 2 months. I purchased the genuine 301 XL Black, it works great for week or two then stops working. Until i replace it with a new one again. the colour one is fine and has lasted well over 6 months. So far ive spent over £60 on ink so far, that all i got out of it is a few pages of printing. Any help would be gratfully appreciated. On every occasion i have cleaned the heads but it desont make any difference.
10-10-2018 06:17 PM
Welcome to HP Forums,
This is a great place to get support, find answers and tips to your technical queries.
To provide you with an accurate solution, I'll need a few more details:
Are you printing document or pictures?
Are you using genuine HP ink cartridges?
How many pages do you print on a monthly basis?
In the meantime, Update the printer firmware using this link: https://support.hp.com/us-en/product/hp-envy-4500-e-all-in-one-printer-series/5304875/document/c0291...
Restart the printer.
Eager to assist you!
Cheers:)
Raj1788
I am an HP Employee
10-12-2018 12:51 PM
I'm the Riddle_Decipher & I'm writing on behalf of my colleague @Raj1788, as the tech is out for the day, that said, I have reviewed your concern and the entire conversation, did some research and here's what you need to know:
The printer cartridges and the printhead needs to be cleaned by turning it on, at least ones in every week or two, if not done regularly the ink would dry out, I'm afraid that's how any printer works, that said, I suggest you follow the below steps to clean the electric contacts of the cartridges and get them ready for use:
-
Gather the following materials:
-
Dry foam-rubber swabs, lint-free cloth, or any soft material that does not come apart or leave fibers (coffee filters work well)
-
Distilled, filtered, or bottled water (tap water might contain contaminants that can damage the ink cartridges)
CAUTION:
Do not use platen cleaners or alcohol to clean the area. These can damage the ink cartridge or the printer.
-
-
Make sure the printer is on.
-
Open the scanner lid.
-
Open the ink cartridge access door.
The carriage moves to the ink cartridge access area.
Figure: Open the ink cartridge access door
-
Wait until the carriage is idle and silent before continuing.
-
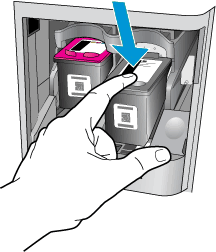
Push down on the top of the ink cartridge to release it, and then pull it toward you to remove it from its slot.
Figure: Remove the ink cartridge
-
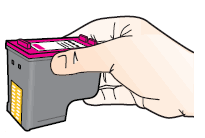
Hold the ink cartridge by its sides.
Figure: Hold the ink cartridge by its sides
-
Inspect the ink cartridge contacts for ink and debris buildup.
CAUTION:
Do not touch the copper-colored contacts or the ink nozzles. Touching these parts can result in clogs, ink failure, and bad electrical connections.
Figure: Do not touch the contacts or nozzles
-
Lightly moisten a clean, foam-rubber swab with distilled water, and then squeeze any excess water from it.
-
Clean the face and edges around the ink nozzle with the swab.
CAUTION:
Do not clean the ink nozzle plate.
Figure: Clean the area around the ink nozzle
-
Nozzle plate - Do not clean
-
The area surrounding the ink nozzle - Do clean
-
Ink cartridge contacts - Do not clean
-
-
Either let the ink cartridge sit for 10 minutes to allow the cleaned area to dry, or use a new swab to dry it.
-
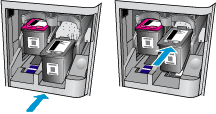
Slide the ink cartridge forward into the empty slot, and then gently push on the upper part of the ink cartridge until it clicks into place.
Figure: Install the ink cartridge
-
Repeat these steps to clean the area surrounding the ink nozzle on the other ink cartridge.
-
Close the ink cartridge access door.
-
Close the scanner lid.
-
Try printing again.
If the issue persists, you may want to replace the cartridges with the issue and maintain the new cartridges with regular usage as you may want to turn on the printer at least one in a week or ones in two weeks to resolve the issue.
Keep us posted,
(We shall troubleshoot as a team, fight till the end and emerge - "victorious")
If you would like to thank us for our efforts to help you,
Feel free to give us a virtual high-five by clicking the 'Thumbs Up' icon below,
Followed by clicking on the "Accept as solution" button.
Have a great day!
Riddle_Decipher
I am an HP Employee
Learning is a journey, not a destination.
Let's keep asking questions and growing together.