• ×
    Information
    Need Windows 11 help?
    Check documents on compatibility, FAQs, upgrade information and available fixes.
    Windows 11 Support Center.
  • post a message
  • ×
    Information
    Need Windows 11 help?
    Check documents on compatibility, FAQs, upgrade information and available fixes.
    Windows 11 Support Center.
  • post a message
Guidelines
Experiencing 'Printer Blocked' or 'Printer Error' message? Click here for more information.
Check some of the most frequent questions about Instant Ink: HP INSTANT INK, HP+ PLANS: INK AND TONER.


Check out our Black or Color Ink Not Printing, Other Print Quality Issues info about: Print quality and Cartridge Issues.
HP Recommended
Example:HP ENVY 4520
Microsoft Windows 10 (64-bit)

I bought this HP ENVY with a desktop that I bought back in September 2017 and i have not used it very much at all but when I do print form it the printing of words is smeared and is not nice and clean looking.  I ahve tried to clean print heads, realign the alignment, do updates, and the correct ink cartridges are iinstalled and new, the ran the Print and Scan Doctor adn yet i still get these less than acceptable print  quality.  I am really loosing the little faith that I do have that HP is actaully a quality product nd leaning more to that is more cheap junk. Any recommendations before this paper weight grows wings and flies out the window?

3 REPLIES 3
HP Recommended

@Avenger77,


Thanks for reaching out to the HP Support community!


Does this issue occur when you make a copy?


Let's try these steps to clean page smears.


Step 1: Clean page smears

  • Make sure the printer is loaded with plain white paper.

  • On the printer control panel, swipe the display to the left, and then touch Setup.

  • Touch Tools.

  • Swipe up on the display, and then touch Clean Page Smears.

    The printer slowly feeds a blank page.

  • Wait for the printer to eject the blank page.

  • Try to print. If the print quality is unacceptable, continue to the next step to make sure you are using the appropriate paper for your print job.

Step 2: Make sure you are using the appropriate paper for your print job

  • Load the paper print side down in the input tray. Many papers have printing and nonprinting sides, like photo paper and other special media. Usually, the smoother side is the "print side," and sometimes the non-print side has a logo of the paper manufacturer on it.
  • Do not use wrinkled or curled paper. Load only clean, wrinkle-free paper into the product.
  • Use the correct paper type for your project. 
  • Try using a different paper.


Step 3: Manually clean the area around the ink nozzles.

  • Gather the following materials:
    • Dry foam rubber swabs, lint-free cloth, or any soft material that does not come apart or leave fibers (coffee filters work well)

    • Distilled, filtered, or bottled water (tap water might contain contaminants that can damage the ink cartridges)

  • Turn on the printer, if it is not already on.

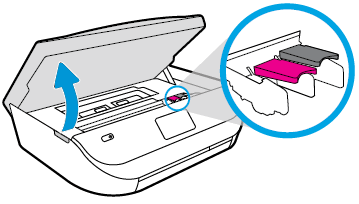
  • Gently grasp the handles on either side of the printer, then raise the ink cartridge access door until it locks into place.

    The carriage moves to the center of the printer.

                     Image: Opening the ink cartridge access door.

  • Wait until the carriage is idle and silent before you continue.
  • Disconnect the power cord from the rear of the printer.
  • To release the ink cartridge, lift the lid on the ink cartridge slot, then gently push the lid back until it stops.
  • Pull up on the ink cartridge to remove it from the slot.

      Image: Removing the ink cartridge.

  1. Lift the lid

  2. Gently push the lid back

  3. Pull up on the ink cartridge

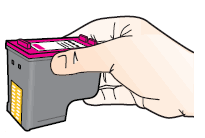
  • Hold the ink cartridge by its sides.

       Image: Hold the ink cartridge by its sides.

  • Lightly moisten a foam-rubber swab or lint-free cloth with distilled water, and then squeeze any excess water from it

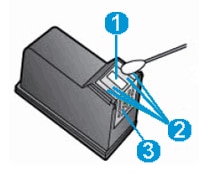
  • Clean the face and edges around the ink nozzle with the swab.

      Image: The ink nozzle and ink cartridge contacts.

  1. Nozzle plate - Do not clean

  2. The area surrounding ink nozzle - Do clean

  3. Ink cartridge contacts - Do not clean

  • Let the ink cartridge sit for 10 minutes to allow the cleaned area to dry and use a new swab to clean it.​​​​​​​

  • Insert the ink cartridges back

       Image: Inserting the ink cartridges

  1. Insert the ink cartridge

  2. Close the lid

  3. The color ink cartridge is on the left, and the black ink cartridge is on the right

  • Close the ink cartridge access door, reconnect power.

  • Try to print.


Let me know if this helps. 


Please click “Accept as Solution” if you feel my post solved your issue, it will help others find the solution.

Click the “KudosThumbs Up" on the bottom right to say “Thanks” for helping.


ATHARVA_GP
I am an HP Employee

HP Recommended

Atharva_GP,

     I tried what you recommend it cleaned up but now there is a horizontal white line thru all the words as if you would type a word on microsoft word documents and use the "strikethru" option to cross a word out.  Hope you uinderstand as that is the best description I can provide.  Would be nice if can uplaod a picture to show.

HP Recommended

@Avenger77,


This issue could be a possible hardware defect with the ink cartridge.

You have already tried cleaning the cartridges (manually & using the automated tool), aligning the printer etc. But still, the issue persists.


The cartridge could be under warranty and you can get a free replacement if that is the case.

You can check the end of warranty date on the cartridge (refer below image.)


Contact HP Support for further assistance on getting the ink cartridge replacement if it is under warranty.

Use this link and Follow the onscreen instructions.


Cheers!

ATHARVA_GP
I am an HP Employee

† The opinions expressed above are the personal opinions of the authors, not of HP. By using this site, you accept the <a href="https://www8.hp.com/us/en/terms-of-use.html" class="udrlinesmall">Terms of Use</a> and <a href="/t5/custom/page/page-id/hp.rulespage" class="udrlinesmall"> Rules of Participation</a>.