-
×InformationNeed Windows 11 help?Check documents on compatibility, FAQs, upgrade information and available fixes.
Windows 11 Support Center. -
-
×InformationNeed Windows 11 help?Check documents on compatibility, FAQs, upgrade information and available fixes.
Windows 11 Support Center. -
- HP Community
- Printers
- Printing Errors or Lights & Stuck Print Jobs
- HP ENVY PHOTO 6220 black set up cartridge NOT WORKING

Create an account on the HP Community to personalize your profile and ask a question
08-15-2019 01:26 PM
Hi. I have bought a HP ENVY PHOTO 6220, and the black setup cartridge doesn't work. I have also extra cartridge, but cant use this for first time setup. Is there a way to bypass the message Use Setup Cartridge?
Solved! Go to Solution.
Accepted Solutions
08-16-2019 06:35 PM
@Studentnurse Welcome to HP Community!
I have a few steps that should help resolve the issue:
Step 1: Update printer firmware
Some releases of ink cartridges are not compatible with older versions of printer firmware. Update the firmware to resolve this problem.
FOR DETAILS & FURTHER INSTRUCTIONS, USE THIS LINK: CLICK HERE
(By the end of this article all the issues should be resolved)
Step 2: Make sure the ink cartridges are correctly installed
The printer displays an error if the ink cartridges are not correctly installed. Remove the ink cartridges, check them for any plastic tape, reinstall the ink cartridges, and then try to print again.
-
Turn on the printer.
-
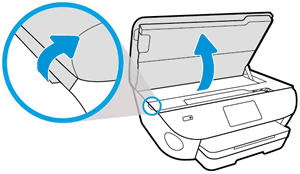
Open the ink cartridge access door.
-
Wait until the carriage is idle and silent before you continue.
-
Lightly press down on the ink cartridge to release it, and then pull the ink cartridge out of its slot.
CAUTION:
Do not touch the copper-colored contacts or the ink nozzles. Touching these parts can result in clogs, ink failure, and bad electrical connections.

-
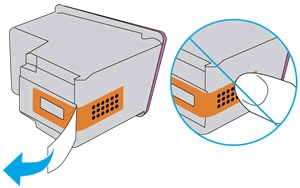
Remove any protective tape that still might be on the contacts.
CAUTION:
Do not try to remove the copper electrical strip.
-
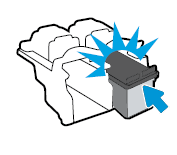
Hold the ink cartridge by its sides with the contacts toward the printer, insert the ink cartridge into its slot, and then gently push the ink cartridge until it snaps into place.
NOTE:
Install the color ink cartridge on the left and the black ink cartridge on the right.
-
Repeat these steps to install the other ink cartridge.
-
Close the ink cartridge access door.
Try to print. If the error persists, continue to the next step.
Step 3: Clean the electrical contacts
The printer might display an ink cartridge error if the ink cartridge contacts are dirty. Unplug any cords or cables, remove the ink cartridges, and then clean the electrical contacts on the ink cartridges and print carriage.
-
Gather the following materials:
-
Dry foam-rubber swabs or lint-free cloth (eyeglass wipes or coffee filters work well)
-
Distilled, filtered, or bottled water (tap water might contain contaminants that can damage the ink cartridges)
CAUTION:
Do not use platen cleaners or alcohol to clean the ink cartridge contacts. These can damage the ink cartridge or the printer.
-
-
Open the ink cartridge access door.

-
Wait until the printer is idle and silent before you continue.
-
Disconnect the power cord and any Ethernet or USB cables.
-
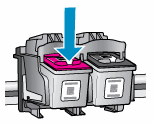
Lightly press down on the ink cartridge to release it, and then pull the ink cartridge out of its slot.
CAUTION:
Do not remove both ink cartridges at the same time. Remove and then clean each ink cartridge one at a time. Do not leave an ink cartridge outside the printer for more than 30 minutes.
-
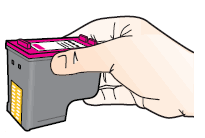
Hold the ink cartridge by its sides.
-
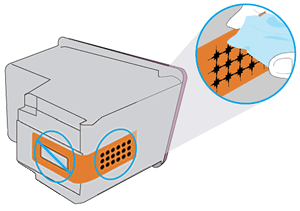
Dip a clean foam-rubber swab or lint-free cloth into distilled water, and then squeeze any excess water from it.
-
Clean only the copper-colored contacts, and then allow the ink cartridge to dry for approximately 10 minutes.
-
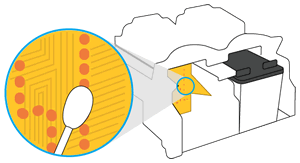
Lightly moisten another foam-rubber swab or lint-free cloth with distilled water, and then squeeze any excess water from the swab or cloth.
-
Use the swab or cloth to clean the electrical contacts in the carriage, located inside the printer.
-
Either let the ink cartridge sit for 10 minutes to allow the cleaned area to dry, or use a new swab or cloth to dry it.
NOTE:
Make sure the ink cartridge is not left out of the printer for more than 30 minutes.
-
Hold the ink cartridge by its sides with the contacts toward the printer, insert the ink cartridge into its slot, and then gently push the ink cartridge until it snaps into place.

-
Repeat these steps to clean and reinsert the other ink cartridge.
-
Close the ink cartridge access door.
-
Reconnect the power cord and any Ethernet or USB cables, unless your printer is connected to a wireless network.
-
Turn on the printer, if it does not turn on automatically.
Try to print. If the error persists, continue to the next step.
Step 4: Reset the printer
Resetting the printer can sometimes resolve an ink cartridge error.
-
Turn the printer on, if it is not already on.
-
Wait until the printer is idle and silent before you continue.
-
With the printer turned on, disconnect the power cord from the rear of the printer.
-
Unplug the power cord from the wall outlet.
-
Wait at least 60 seconds.
-
Plug the power cord back into the wall outlet.
NOTE:
HP recommends connecting the printer power cord directly to the wall outlet.
-
Reconnect the power cord to the rear of the printer.
-
Turn on the printer, if it does not automatically turn on.
-
Wait until the printer is idle and silent before you proceed.
Let me know how that pans out,
If you feel I was helpful, simply click on Accept as Solution to help the community grow,
That said, I will have someone follow-up on this to ensure you've been helped,
Just in case you don't get back to us within 24 - 48hrs, and have a good day, ahead.
Riddle_Decipher
I am an HP Employee
Learning is a journey, not a destination.
Let's keep asking questions and growing together.
08-16-2019 06:35 PM
@Studentnurse Welcome to HP Community!
I have a few steps that should help resolve the issue:
Step 1: Update printer firmware
Some releases of ink cartridges are not compatible with older versions of printer firmware. Update the firmware to resolve this problem.
FOR DETAILS & FURTHER INSTRUCTIONS, USE THIS LINK: CLICK HERE
(By the end of this article all the issues should be resolved)
Step 2: Make sure the ink cartridges are correctly installed
The printer displays an error if the ink cartridges are not correctly installed. Remove the ink cartridges, check them for any plastic tape, reinstall the ink cartridges, and then try to print again.
-
Turn on the printer.
-
Open the ink cartridge access door.

-
Wait until the carriage is idle and silent before you continue.
-
Lightly press down on the ink cartridge to release it, and then pull the ink cartridge out of its slot.
CAUTION:
Do not touch the copper-colored contacts or the ink nozzles. Touching these parts can result in clogs, ink failure, and bad electrical connections.

-
Remove any protective tape that still might be on the contacts.
CAUTION:
Do not try to remove the copper electrical strip.

-
Hold the ink cartridge by its sides with the contacts toward the printer, insert the ink cartridge into its slot, and then gently push the ink cartridge until it snaps into place.
NOTE:
Install the color ink cartridge on the left and the black ink cartridge on the right.

-
Repeat these steps to install the other ink cartridge.
-
Close the ink cartridge access door.
Try to print. If the error persists, continue to the next step.
Step 3: Clean the electrical contacts
The printer might display an ink cartridge error if the ink cartridge contacts are dirty. Unplug any cords or cables, remove the ink cartridges, and then clean the electrical contacts on the ink cartridges and print carriage.
-
Gather the following materials:
-
Dry foam-rubber swabs or lint-free cloth (eyeglass wipes or coffee filters work well)
-
Distilled, filtered, or bottled water (tap water might contain contaminants that can damage the ink cartridges)
CAUTION:
Do not use platen cleaners or alcohol to clean the ink cartridge contacts. These can damage the ink cartridge or the printer.
-
-
Open the ink cartridge access door.

-
Wait until the printer is idle and silent before you continue.
-
Disconnect the power cord and any Ethernet or USB cables.
-
Lightly press down on the ink cartridge to release it, and then pull the ink cartridge out of its slot.

CAUTION:
Do not remove both ink cartridges at the same time. Remove and then clean each ink cartridge one at a time. Do not leave an ink cartridge outside the printer for more than 30 minutes.
-
Hold the ink cartridge by its sides.

-
Dip a clean foam-rubber swab or lint-free cloth into distilled water, and then squeeze any excess water from it.
-
Clean only the copper-colored contacts, and then allow the ink cartridge to dry for approximately 10 minutes.

-
Lightly moisten another foam-rubber swab or lint-free cloth with distilled water, and then squeeze any excess water from the swab or cloth.
-
Use the swab or cloth to clean the electrical contacts in the carriage, located inside the printer.

-
Either let the ink cartridge sit for 10 minutes to allow the cleaned area to dry, or use a new swab or cloth to dry it.
NOTE:
Make sure the ink cartridge is not left out of the printer for more than 30 minutes.
-
Hold the ink cartridge by its sides with the contacts toward the printer, insert the ink cartridge into its slot, and then gently push the ink cartridge until it snaps into place.

-
Repeat these steps to clean and reinsert the other ink cartridge.
-
Close the ink cartridge access door.
-
Reconnect the power cord and any Ethernet or USB cables, unless your printer is connected to a wireless network.
-
Turn on the printer, if it does not turn on automatically.
Try to print. If the error persists, continue to the next step.
Step 4: Reset the printer
Resetting the printer can sometimes resolve an ink cartridge error.
-
Turn the printer on, if it is not already on.
-
Wait until the printer is idle and silent before you continue.
-
With the printer turned on, disconnect the power cord from the rear of the printer.
-
Unplug the power cord from the wall outlet.
-
Wait at least 60 seconds.
-
Plug the power cord back into the wall outlet.
NOTE:
HP recommends connecting the printer power cord directly to the wall outlet.
-
Reconnect the power cord to the rear of the printer.
-
Turn on the printer, if it does not automatically turn on.
-
Wait until the printer is idle and silent before you proceed.
Let me know how that pans out,
If you feel I was helpful, simply click on Accept as Solution to help the community grow,
That said, I will have someone follow-up on this to ensure you've been helped,
Just in case you don't get back to us within 24 - 48hrs, and have a good day, ahead.
Riddle_Decipher
I am an HP Employee
Learning is a journey, not a destination.
Let's keep asking questions and growing together.
