-
×InformationNeed Windows 11 help?Check documents on compatibility, FAQs, upgrade information and available fixes.
Windows 11 Support Center. -
-
×InformationNeed Windows 11 help?Check documents on compatibility, FAQs, upgrade information and available fixes.
Windows 11 Support Center. -
- HP Community
- Printers
- Printing Errors or Lights & Stuck Print Jobs
- Re: HP OfficeJet 4650 - Service Station Stalled

Create an account on the HP Community to personalize your profile and ask a question
Your account also allows you to connect with HP support faster, access a personal dashboard to manage all of your devices in one place, view warranty information, case status and more.
Check some of the most frequent questions about Instant Ink: HP INSTANT INK, HP+ PLANS: INK AND TONER.
Check out our Black or Color Ink Not Printing, Other Print Quality Issues info about: Print quality and Cartridge Issues.

It has been a while since anyone has replied. Simply ask a new question if you would like to start the discussion again.
01-04-2018 11:31 AM
 HP Recommended
Product: HP OfficeJet 4650 All-in-One Printer series
Operating System: Microsoft Windows 10 (64-bit)
My HP OfficeJet 4650 printer suddenly stopped printing and is showing this error on the printer:
Service Station Stalled
Press the OK button to have the printer automatically attempt its recovery process.
After pressing "OK" the cartridges move back and forth and then stop and the error message is displayed again. There does not appear to be a way out of this loop. I have attempted re-starting the printer (both with the power button and unplugging it) and moving the cartridges around manually (there is no obstruction). The cartridges are HP and there is no paper jam.
Any further advice or assistance would be appreciated.
Solved! Go to Solution.
1 ACCEPTED SOLUTION
Accepted Solutions
01-05-2018 02:01 PM
HP Recommended
Welcome to the HP Forums, this is a great location to get assistance! I read your post and see that your HP OfficeJet 4650 printer shows service station stalled. I would like to help you resolve this issue.
However, I will need a few details to provide an accurate solution,
When did this issue start?
Did you do any hardware or software changes?
How is the printer connected to computer, wired or wireless?
Meanwhile
Remove and reinstall the ink cartridges
-
Turn on the printer, if it is not on already.
-
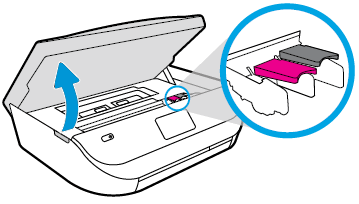
Gently grasp the handles on either side of the printer, then raise the ink cartridge access door until it locks into place.
The carriage moves to the center of the printer.
Figure : Opening the ink cartridge access door
-
Wait until the carriage is idle and silent before you proceed.
-
To release the ink cartridge, lift the lid on the ink cartridge slot, then gently push the lid back until it stops.
-
Pull up on the ink cartridge to remove it from the slot.
Figure : Removing the ink cartridge
-
Lift the lid
-
Gently push the lid back
-
Pull up on the ink cartridge
-
-
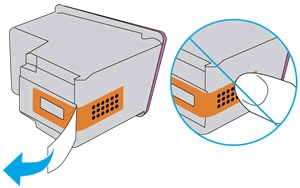
Inspect the contacts for any protective tape that still might be on the nozzles.
CAUTION:
Do not touch the copper-colored contacts or the ink nozzles. Touching these parts can result in clogs, ink failure, and bad electrical connections.
-
Remove the protective tape from the contacts, if necessary.
CAUTION:
Do not try to remove the copper electrical strip.
Figure : Removing the plastic tape
-
Hold the ink cartridge by its sides with the nozzles toward the printer, then slide the ink cartridge forward into the slot.
-
Close the lid on the ink cartridge slot to secure the ink cartridge into place.
Figure : Inserting the ink cartridges
-
Insert the ink cartridge
-
Close the lid
-
The color ink cartridge is on the left, and the black ink cartridge is on the right
-
-
Repeat the previous steps to remove, inspect, and reseat the other ink cartridge, if necessary.
-
Close the ink cartridge access door.
Figure : Closing the ink cartridge access door.
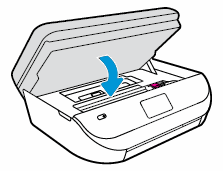
Try to print.
Plug the printer directly into a wall outlet
-
Disconnect the power cord from the rear of the printer.
-
Unplug the power cord from any power strips or surge suppressors.
-
Plug the power cord directly into an electrical outlet.
-
Reconnect the power cord to the rear of the printer.
-
Turn on the printer.
Reset the printer
-
Turn the printer on, if it is not already on.
-
Wait until the printer is idle and silent before you continue.
-
With the printer turned on, disconnect the power cord from the rear of the printer.
-
Unplug the power cord from the wall outlet.
-
Wait at least 60 seconds.
-
Plug the power cord back into the wall outlet.
NOTE:
HP recommends connecting the printer power cord directly to the wall outlet.
-
Reconnect the power cord to the rear of the printer.
-
Turn on the printer, if it does not automatically turn on.
The printer might go through a warm-up period. The printer lights might flash, and the carriage might move.
-
Wait until the warm-up period finishes and your printer is idle and silent before you proceed.
Try to print.
Click here and refer the document to perform the above steps.
Let me know how it goes.
Cheers.
Sandytechy20
I am an HP Employee
9 REPLIES 9
01-05-2018 02:01 PM
HP Recommended
Welcome to the HP Forums, this is a great location to get assistance! I read your post and see that your HP OfficeJet 4650 printer shows service station stalled. I would like to help you resolve this issue.
However, I will need a few details to provide an accurate solution,
When did this issue start?
Did you do any hardware or software changes?
How is the printer connected to computer, wired or wireless?
Meanwhile
Remove and reinstall the ink cartridges
-
Turn on the printer, if it is not on already.
-
Gently grasp the handles on either side of the printer, then raise the ink cartridge access door until it locks into place.
The carriage moves to the center of the printer.
Figure : Opening the ink cartridge access door
-
Wait until the carriage is idle and silent before you proceed.
-
To release the ink cartridge, lift the lid on the ink cartridge slot, then gently push the lid back until it stops.
-
Pull up on the ink cartridge to remove it from the slot.
Figure : Removing the ink cartridge
-
Lift the lid
-
Gently push the lid back
-
Pull up on the ink cartridge
-
-
Inspect the contacts for any protective tape that still might be on the nozzles.
CAUTION:
Do not touch the copper-colored contacts or the ink nozzles. Touching these parts can result in clogs, ink failure, and bad electrical connections.
-
Remove the protective tape from the contacts, if necessary.
CAUTION:
Do not try to remove the copper electrical strip.
Figure : Removing the plastic tape
-
Hold the ink cartridge by its sides with the nozzles toward the printer, then slide the ink cartridge forward into the slot.
-
Close the lid on the ink cartridge slot to secure the ink cartridge into place.
Figure : Inserting the ink cartridges
-
Insert the ink cartridge
-
Close the lid
-
The color ink cartridge is on the left, and the black ink cartridge is on the right
-
-
Repeat the previous steps to remove, inspect, and reseat the other ink cartridge, if necessary.
-
Close the ink cartridge access door.
Figure : Closing the ink cartridge access door.
Try to print.
Plug the printer directly into a wall outlet
-
Disconnect the power cord from the rear of the printer.
-
Unplug the power cord from any power strips or surge suppressors.
-
Plug the power cord directly into an electrical outlet.
-
Reconnect the power cord to the rear of the printer.
-
Turn on the printer.
Reset the printer
-
Turn the printer on, if it is not already on.
-
Wait until the printer is idle and silent before you continue.
-
With the printer turned on, disconnect the power cord from the rear of the printer.
-
Unplug the power cord from the wall outlet.
-
Wait at least 60 seconds.
-
Plug the power cord back into the wall outlet.
NOTE:
HP recommends connecting the printer power cord directly to the wall outlet.
-
Reconnect the power cord to the rear of the printer.
-
Turn on the printer, if it does not automatically turn on.
The printer might go through a warm-up period. The printer lights might flash, and the carriage might move.
-
Wait until the warm-up period finishes and your printer is idle and silent before you proceed.
Try to print.
Click here and refer the document to perform the above steps.
Let me know how it goes.
Cheers.
Sandytechy20
I am an HP Employee
01-07-2018 09:24 AM
HP Recommended
Hello thank you very much for the advice. I turned the printer back on to check it one more time and this time it said that an update was waiting to be installed; so I let the update proceed. After it rebooted and went through its calibration it started working again. If the problems re-occcur I will go through your steps but hopefully it will continue to work without problems.
thanks again,
dave
08-06-2018 12:14 AM
HP Recommended
Hi there. I have the same problem. All was fine until I did a recommended update this morning. Now I can't print at all. I tried all the advice on this thread. Opened every possible place to look for paper jams, unplugged from printer and wall, removed & replaced ink cartridges, even checked for software updates. Nothing is working. Do you have any other ideas?
The only other stange thing I noticed is that when I lifted the lid to access the ink cartridges, I hear a noise - as if the arm on the right side is rubbing as it moves up with the lid. Like the fit is too tight.
The printer has not been moved or touched. The only new thing that was done was the update.
Thanks
09-24-2018 03:17 PM
HP Recommended
I get the "Service Station Stalled" after I get a message which states "Improper Shutdown" every time I turn on the printer. I have tried all the steps recommended (unplugging the power cable from back of printer while the printer is on, plugging the printer directly into a wall recepticle, removing the ink cartridges, etc) but still get the same messages. Please help!
10-17-2018 09:41 AM
HP Recommended
Same issue for me completely out of the blue. I get the "Service Station Stalled" after I get a message which states "Improper Shutdown" every time I turn on the printer. I have tried all the steps recommended (unplugging the power cable from back of printer while the printer is on, plugging the printer directly into a wall recepticle, removing the ink cartridges, etc) but still get the same messages.
I am glad that the issue was "solved" for the initial post but that solution does not work for me and it seems for many others.
Please respond on how to resolve!
Tags (3)
- Tags:
- I am experiencing the exact same thing for two months I have not been able to print'
- I am having the same problem. Can’t get the error message to go away no matter what I try. To the point where buying a new printer seems like a better option than trying to get this issue resolved.
- Same here. Please help
Be alert for scammers posting fake support phone numbers and/or email addresses on the community.
If you think you have received a fake HP Support message, please report it to us by clicking on "Flag Post".
† The opinions expressed above are the personal opinions of the authors, not of HP. By using this site, you accept the Terms of Use and Rules of Participation.


Didn't find what you were looking for?
Ask the community
† The opinions expressed above are the personal opinions of the authors, not of HP. By using this site, you accept the <a href="https://www8.hp.com/us/en/terms-of-use.html" class="udrlinesmall">Terms of Use</a> and <a href="/t5/custom/page/page-id/hp.rulespage" class="udrlinesmall"> Rules of Participation</a>.