-
×InformationNeed Windows 11 help?Check documents on compatibility, FAQs, upgrade information and available fixes.
Windows 11 Support Center. -
-
×InformationNeed Windows 11 help?Check documents on compatibility, FAQs, upgrade information and available fixes.
Windows 11 Support Center. -
- HP Community
- Printers
- Printing Errors or Lights & Stuck Print Jobs
- HP OfficeJet 4650 all in one, used to scan and print duplex,...

Create an account on the HP Community to personalize your profile and ask a question
01-19-2019 07:06 PM
I used to be able to print and scan duplex on the 4650 All-in-one.
Lately however, I am prompted for "manual" duplex where I have to flip the page!!
I have followed suggestions in other forum posts about updating driver and checking if the "duplex module is installed".
My driver version is 20.79.1.6594, duplex module appears INSTALLED.
Help!
01-21-2019 10:13 AM
Welcome to the HP Support Community!
I assure you I will try my best to get this sorted.
I recommend you follow the below steps and check if it helps.
-
To avoid page ordering issues, load enough blank paper into the input tray to complete your print job.
-
Open the document, click File, and then click Print.
-
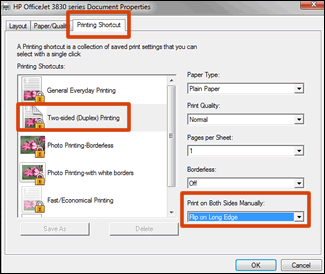
Select your printer, and then click Printer Properties, Preferences, or Printer Setup, depending on what displays.
The Document Properties or Printing Preferences window opens.
-
If a Printing shortcuts tab is available, select the Print on Both Sides or Two-sided (Duplex) Printing option.
-
If a Printing Shortcut tab or a duplexing shortcut is not available, click the Layout, Features, or Finishing tab, depending on which tab displays.
-
-
Locate the Print on Both Sides or Two-sided printing menu or option, then select the binding or page flip option.
-
Booklet style (flip on long edge)
-
Tablet style (flip on short edge)
-
-
Click OK, and then click Print.
NOTE:
If the printer automatically pulls the pages back in and prints the other side, your printer supports automatic duplexing. The print job completes, and you do not need to continue with these steps.
-
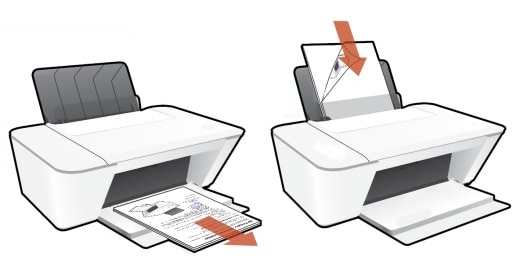
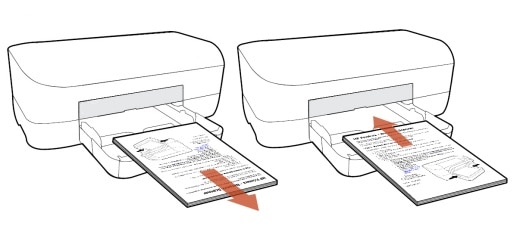
Remove the printed first side pages from the output tray, and then tap the stack on a flat surface to align the pages.
-
Load the printed first side pages into the main input tray.
NOTE:
Many print drivers display a pop-up window on the computer with instructions on how to reload the paper. Use the steps in the window if they display.
-
For most rear loading printers, flip the pages over so that the printed side is facing down, and load the bottom short edge into the printer.
-
For most front loading printers, load the stack printed side facing up (Inkjets) or facing down (LaserJets) with the bottom edge into the printer or the top edge into the printer.
-
-
Click Continue.
The other side of the pages print.
Please refer to the below link for detailed instructions.
Let me know how it goes and you have a great day!
If you wish to show appreciation for my efforts, mark my post as Accept as Solution. Your feedback counts!
Cheers!
The_Fossette
I am an HP Employee
01-22-2019 01:50 PM
Dear The_Fossette, thank you for taking the time to answer.
The issue I described above is not about "page ordering" is about my printer not doing automatic duplexing even though it used to work. Also the solution explains how to manually flip the page which is exactly what I am reporting the printer should do on its own!!
Your help solving the issue described in my original post is highly appreciated, again, thank you in advance.
01-23-2019 12:51 PM
It is great to have you back and your patience is greatly appreciated.
I would like to know whether you are facing the issue when printing or making a copy?
Meanwhile, I recommend you root uninstall the printer and then reinstall it and check if it helps.
Here is how it is done.
- In Windows, search for and open Programs and features
- Select your HP Printer
- Select Uninstall
- In Windows, search for and open Devices and printers
- In the Devices and Printers windows look for your HP printer. If you see it listed right-click on it and choose ‘Delete’ or ‘Remove Device’
- Open up the run command with the “Windows key + R” key combo.
- Type printui.exe /s and click Ok. (Note: there is a space in between “printui.exe” and “/s”)
- Click on the “Drivers” tab
- Look for HP Printer driver. If you see it Click on it and click Remove at the bottom
- Select Ok
- Select Apply and Ok on the Print Server Properties windows
- Close Devices and Printers
- Restart the PC
- Download and install the printer software from the below link.
- https://support.hp.com/in-en/drivers
- Connect the USB cable ONLY when prompted and follow the on-screen instructions.
Let me know how it goes and you have a great day!
If you wish to show appreciation for my efforts, mark my post as Accept as Solution. Your feedback counts!
Cheers!
The_Fossette
I am an HP Employee