-
×InformationNeed Windows 11 help?Check documents on compatibility, FAQs, upgrade information and available fixes.
Windows 11 Support Center. -
-
×InformationNeed Windows 11 help?Check documents on compatibility, FAQs, upgrade information and available fixes.
Windows 11 Support Center. -
- HP Community
- Printers
- Printing Errors or Lights & Stuck Print Jobs
- HP OfficeJet Pro 7740

Create an account on the HP Community to personalize your profile and ask a question
06-22-2023 05:32 PM
I can't get this machine to recognize tray 2. I have it stocked with tabloid size paper and have input the same in the settings tray options. Any ideas?
06-25-2023 03:19 PM
Hi @glenncarter44,
Welcome to the HP Support Community
I understand you are facing an issue with your HP OfficeJet Pro 7740. Not to worry I will help you to get a resolution to resolve the issue.
Let's perform a power drain:
- With the printer turned on, disconnect the power cord from the rear of the printer and also unplug the power cord from the wall outlet.
- Remove USB cable, if present.
- Wait for 2-3 minutes, press and hold the power button on your printer for about 30 seconds to remove any additional charge.
- Now plug back the power cable straight to a wall outlet without any surge protector or an extension cord (This is important) and then plug back the power cord to the printer.
- Turn on the printer and wait till warm-up period finishes and the printer is idle
Update the printer firmware
- Click here to download and install the latest printer firmware from your product
- Click here to know different methods of updating printer firmware.
Step 1: Reinstall Tray 2, and then reinsert the Tray 2 paper tray
Completely remove Tray 2 from the printer, reinstall Tray 2, and then remove and reinsert the Tray 2 paper tray.
NOTE:
The images in this document might not look exactly like your printer, but the steps are the same.
Turn off the printer, and then disconnect the power cord and any other cables.
Lift the printer off of Tray 2.
Figure : Removing Tray 2

Lower the printer back onto Tray 2.
CAUTION:
Keep your fingers and hands clear of the bottom of the printer.
Figure : Installing Tray 2

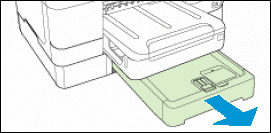
Grasp the underside of the paper tray in Tray 2, and then pull it out of the printer.
Figure : Removing the Tray 2 paper tray

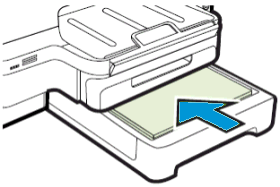
Reinsert the paper tray into Tray 2, and then push the tray into the printer until it clicks into place.
Figure : Reinserting the paper tray

Reconnect the power cord and any other cables to the printer.
Turn on the printer.
Continue to the next step.
Step 2: Enable Tray 2 in the printer software
Open the printer software, and then enable printing from Tray 2.
Search Windows for devices and printers, and then select it in the list of results.
Right-click your printer, and then select Printing Preferences.
The Printing Preferences window opens.
Click the Paper/Quality tab.
From the Paper Source drop-down menu, select Tray 2.
From the Paper Size drop-down menu, select the appropriate paper size for the print job.
Click Apply, and then click OK.
Try to print from Tray 2.
If these steps resolved the issue, you do not need to continue troubleshooting.
Step 3: Update the device settings
Open the printer properties, and then update the device settings.
Search Windows for Devices and Printers, and then select it in the list of results.
Right-click your printer, and then select Printer Properties.
Click the Device Settings tab, and then click Update Now.
Try to print from Tray 2.
If the issue persists, then please follow the steps mentioned in this document:
Hope this helps! Keep me posted.
Please click “Accepted Solution” if you feel my post solved your issue, it will help others find the solution. Click the “Kudos/Thumbs Up" on the bottom right to say “Thanks” for helping!
A_Gayathri
HP Support Community Administrator.
