• ×
    Information
    Need Windows 11 help?
    Check documents on compatibility, FAQs, upgrade information and available fixes.
    Windows 11 Support Center.
  • post a message
  • ×
    Information
    Need Windows 11 help?
    Check documents on compatibility, FAQs, upgrade information and available fixes.
    Windows 11 Support Center.
  • post a message
Guidelines
Experiencing 'Printer Blocked' or 'Printer Error' message? Click here for more information.
Check some of the most frequent questions about Instant Ink: HP INSTANT INK, HP+ PLANS: INK AND TONER.


Check out our Black or Color Ink Not Printing, Other Print Quality Issues info about: Print quality and Cartridge Issues.
HP Recommended
HP Officejet 7110 A3 thermal printer
Microsoft Windows 10 (64-bit)

Only 14 months old, out of warranty. Replaced printheads correctly, possibly needlessly. Installed Genuine HP black ink cartridge but alert light, power button light and black ink warning light all 3 are flashing. Tried factory reset and tried hard reset (pulling out power lead with printer switched on) neither clear the error. All 3 lights still flashing. Can anybody help ??

KInd Regards - Tony


1 REPLY 1
HP Recommended

@hp Officejet 7110


Welcome to the HP support community.


I understand that the power and the cartridge lights are blinking,I am glad to assist you.

Follow these steps to remove and then inspect the problem cartridge.

  1. Find a clean, lint-free cloth (eyeglass wipes or coffee filters work well) that you can use to clean the cartridge contacts.

  2. Press the Power button to turn on the printer.

  3. Open the cartridge access door. The carriage moves to the left side of the printer. Wait until the carriage is idle and silent before proceeding.

    Figure : Open the cartridge access door

    Image: Open the cartridge access door.
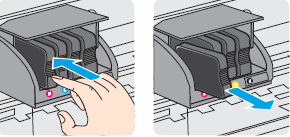
  4. Push in on the front of the problem cartridge to release it, and then pull the cartridge toward you to remove it from its slot.

    Figure : Remove the problem cartridge from its slot

    Image: Remove the cartridge from its slot.
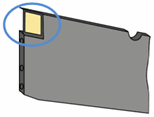
  5. Inspect the copper-colored cartridge contact for ink buildup or debris.

    Figure : Copper-colored contact on the cartridge

    Image: Copper-colored contact on the cartridge.

Clean the cartridge contacts

  1. With a clean, lint-free cloth (eyeglass wipes or coffee filters work well), wipe the copper-colored contact on the cartridge.

    Figure : Copper-colored contact on the cartridge

    Image: Copper-colored contact on the cartridge.
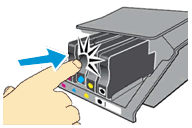
  2. Carefully reinsert the cartridge into its slot, and then push the cartridge forward until it clicks into place.

    Figure : Reinsert the cartridge

    Image: Reinsert the cartridge.
    NOTE: 

    Make sure that the colored dot on the cartridge label matches the colored dot on the carriage slot.

  3. Repeat these steps for other problem cartridges, if necessary.

  4. Close the cartridge access door.

    Figure : Close the cartridge access door

    Image: Close the cartridge access door.

Here is the HP document for your future reference:- Click here


Let me know how it goes.

To thank me for my efforts to help you, please mark my post as an accepted solution so that it benefits several others.

Cheers.

Sandytechy20
I am an HP Employee

† The opinions expressed above are the personal opinions of the authors, not of HP. By using this site, you accept the <a href="https://www8.hp.com/us/en/terms-of-use.html" class="udrlinesmall">Terms of Use</a> and <a href="/t5/custom/page/page-id/hp.rulespage" class="udrlinesmall"> Rules of Participation</a>.