• ×
    Information
    Need Windows 11 help?
    Check documents on compatibility, FAQs, upgrade information and available fixes.
    Windows 11 Support Center.
  • post a message
  • ×
    Information
    Need Windows 11 help?
    Check documents on compatibility, FAQs, upgrade information and available fixes.
    Windows 11 Support Center.
  • post a message
Guidelines
Here is the solution for Blue screen error 83C0000B on HP OfficeJet Pro 8010e, 9020e Printer Series: Click here to view.
Check some of the most frequent questions about Instant Ink: HP INSTANT INK, HP+ PLANS: INK AND TONER.


Check out our Black or Color Ink Not Printing, Other Print Quality Issues info about: Print quality and Cartridge Issues.
HP Recommended
HP PHOTOsmart Plus e-All in One B210a
macOS 10.15 Catalina

Where to find the correct black ink cartridge for HP PHOTOsmart Plus e-All in One B210a because the 564 ink cartridge for black no longer fits and is rejected by printer?

1 REPLY 1
HP Recommended

Hi @merleCeed


Welcome to the HP Support Community. I'd be happy to assist you with the "cartridge no longer fits in the printer" issue.


Follow the steps below to know how to insert the cartridge in your printer-


Replacing cartridges


  1. Press the Power button to turn on the printer, if it is not already turned on.

  2. Wait until the printer is idle and silent before continuing.

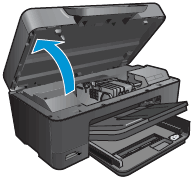
  3. Open the ink cartridge access door.

    The carriage moves to the center of the printer.

    Figure : Opening the ink cartridge access door

    Graphic: Open the ink cartridge access door
  4. Wait until the carriage is idle and silent before continuing.

  5. To release the old ink cartridge, press the tab on the front of the ink cartridge, and then remove it from the slot.

    Figure : Removing the ink cartridge from the slot

    Graphic: Remove the ink cartridge from the slot
      caution:

    Do not lift the latch next to the carriage to install the ink cartridges. Doing so can result in incorrectly seated ink cartridges and printing problems. The latch must remain down to install the ink cartridges correctly.

    note:

    Never turn off the printer when ink cartridges are missing. Make sure you replace any missing ink cartridges as soon as possible to avoid print quality issues and possible extra ink usage or damage to the ink system.

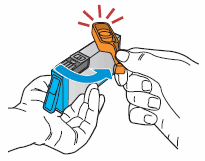
  6. On the new ink cartridge, pull the orange pull-tab straight back to remove the plastic wrap.

    Figure : Removing the plastic wrap

    Graphic: Unwrap the new ink cartridge
      caution:

    Make sure you remove the orange pull-tab and plastic wrap completely before you twist the orange cap in the next step. Otherwise, ink might leak from the ink cartridge. When you remove the plastic wrap, the paper label on the top of the ink cartridge tears slightly, which is necessary to properly vent the ink cartridge.

  7. Twist the orange cap counter clockwise to snap it off the ink cartridge.

    Figure : Removing the orange cap

    Graphic: Twist the orange cap to remove it
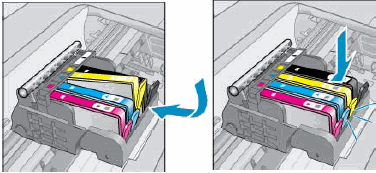
  8. With the ink cartridge contacts facing the printhead, slide the ink cartridge into the empty slot. Press down on the ink cartridge until it is firmly seated.

      caution:

    Do not lift the carriage latch handle to install the ink cartridges. Doing so can result in incorrectly seated ink cartridges and printing problems. The latch must remain down to install the ink cartridges correctly.

    Figure : Reinstalling the ink cartridge

    Graphic: Install the new ink cartridge
  9. If the ink cartridge does not snap into place, remove the ink cartridge from the carriage. Gently bend the tab away from the cartridge, and then reinsert the ink cartridge into the carriage.

      caution:

    Be careful not to bend the tab out more than 1.27 cm (0.5 in). Moving the tab too far might damage the ink cartridge or cause the tab to break off.

    Figure : Bending out the ink cartridge tab

    1. Bend the tab away from the cartridge

    2. Do not bend the tab more than 1.27 cm (0.5 in)

  10. Repeat these steps to replace other ink cartridges, if necessary.

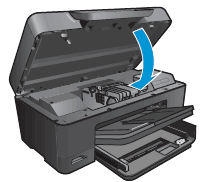
  11. Close the ink cartridge door. The carriage returns to the right side of the printer.

    Figure : Closing the ink cartridge access door

    Graphic: Close the ink cartridge access door
  12. When you insert a new ink cartridge, the printer automatically prompts you to align the ink cartridges.

You can also view the video replacing ink cartridges


To find which ink or toner cartridges work with your HP printer, refer to Which Cartridges Work with My HP Printer?


Hope this helps! Keep me posted. 


Please click “Accept as Solution” if you feel my post solved your issue, it will help others find the solution.

Click the “Kudos, Thumbs Up" on the bottom right to say “Thanks” for helping!


Have a great day!

† The opinions expressed above are the personal opinions of the authors, not of HP. By using this site, you accept the <a href="https://www8.hp.com/us/en/terms-of-use.html" class="udrlinesmall">Terms of Use</a> and <a href="/t5/custom/page/page-id/hp.rulespage" class="udrlinesmall"> Rules of Participation</a>.