-
×InformationNeed Windows 11 help?Check documents on compatibility, FAQs, upgrade information and available fixes.
Windows 11 Support Center. -
-
×InformationNeed Windows 11 help?Check documents on compatibility, FAQs, upgrade information and available fixes.
Windows 11 Support Center. -
- HP Community
- Printers
- Printing Errors or Lights & Stuck Print Jobs
- HP Photosmart 5510 doesn't print 4x6 photo out properly

Create an account on the HP Community to personalize your profile and ask a question
Your account also allows you to connect with HP support faster, access a personal dashboard to manage all of your devices in one place, view warranty information, case status and more.
Check some of the most frequent questions about Instant Ink: HP INSTANT INK, HP+ PLANS: INK AND TONER.
Check out our Black or Color Ink Not Printing, Other Print Quality Issues info about: Print quality and Cartridge Issues.

It has been a while since anyone has replied. Simply ask a new question if you would like to start the discussion again.
10-11-2018 07:12 PM
 HP Recommended
Product: HP Photosmart 5510
Operating System: macOS 10.13 High Sierra
I try to print photos on 4x6 photo paper but it doesn't come out properly. The pictures below show some issues: the top part is lost and the side isn't aligned.
-I do use the right tray.
-I followed all the instructions on this video "Fixing Paper Pick-Up Issues - HP Photosmart 5510 e-All-in-One Printer (B111a)"
I just wast some ink and photo papers, but still, I don't know what else it could be done to solve the problem.


Solved! Go to Solution.
1 ACCEPTED SOLUTION
Accepted Solutions
10-13-2018 01:58 PM - edited 10-13-2018 02:04 PM
HP Recommended
Hey there! @Thitiwat, Welcome to HP forum.
I understand you have issues printing 4x6 photos from your printer.
Don't worry I'll try to help you out.
Did you make any changes to your printer?
Have you tried printing using a different brand paper?
Have you tried printing from a different application?
Are you make a 4x6 copy from your printer?
Try few steps recommended below.
MAC OS X Printer settings:
- In Safari press Command ⌘ + P keys to open the Print Dialog window.
Click the menu next to Paper Size, then select Manage custom sizes.

Click the + sign (bottom left) to create a new paper size.

- Change the name by double clicking on "Untitled". We recommend changing the name to something you will remember, such as "4x6".

- Leave the "Non-Printable Area" set to "User Defined" and change the margins if necessary - we suggest a very small margin or no margin.
Click OK to return to the print dialogue box.

- Back on the Print Dialog screen, click Cancel.
- Navigate to System Preferences on your Mac.

- Click on Printers & Scanners.

- Set the Default paper size to the 4x6 template you just created, by selecting the name you assigned it. You can also set the default printer if you prefer.
- Return to Safari and press Command ⌘ + P keys to open the Print Dialog window.
- Click the Print button to print your photos.
Refer this article to know more information about printer driver settings. Click Here
Let me know if this helps!
Have a great day ahead! 🙂
Please click “Accept as Solution” if you feel my post solved your issue, it will help others find the solution.
Click the “Kudos, Thumbs Up" on the bottom right to say “Thanks” for helping!
A4Apollo
I am an HP Employee
3 REPLIES 3
10-13-2018 01:58 PM - edited 10-13-2018 02:04 PM
HP Recommended
Hey there! @Thitiwat, Welcome to HP forum.
I understand you have issues printing 4x6 photos from your printer.
Don't worry I'll try to help you out.
Did you make any changes to your printer?
Have you tried printing using a different brand paper?
Have you tried printing from a different application?
Are you make a 4x6 copy from your printer?
Try few steps recommended below.
MAC OS X Printer settings:
- In Safari press Command ⌘ + P keys to open the Print Dialog window.
Click the menu next to Paper Size, then select Manage custom sizes.
Click the + sign (bottom left) to create a new paper size.
- Change the name by double clicking on "Untitled". We recommend changing the name to something you will remember, such as "4x6".
- Leave the "Non-Printable Area" set to "User Defined" and change the margins if necessary - we suggest a very small margin or no margin.
Click OK to return to the print dialogue box.
- Back on the Print Dialog screen, click Cancel.
- Navigate to System Preferences on your Mac.
- Click on Printers & Scanners.
- Set the Default paper size to the 4x6 template you just created, by selecting the name you assigned it. You can also set the default printer if you prefer.
- Return to Safari and press Command ⌘ + P keys to open the Print Dialog window.
- Click the Print button to print your photos.
Refer this article to know more information about printer driver settings. Click Here
Let me know if this helps!
Have a great day ahead! 🙂
Please click “Accept as Solution” if you feel my post solved your issue, it will help others find the solution.
Click the “Kudos, Thumbs Up" on the bottom right to say “Thanks” for helping!
A4Apollo
I am an HP Employee
10-14-2018 08:39 AM
HP Recommended
That seems to be a solution but it's not the best yet. In addition, the problem seems to fix itself and it depends on my luck; I will never know how the printer is going to pickup a paper. What I did for that is
**- I just add some more papers and wish that would increase the ability to pick up.**
These are the photos I just printed: Another problem is here....


10-16-2018 09:02 AM
HP Recommended
@Thitiwat, Thanks for your prompt response and time.
I appreciate your efforts for writing back to us.
I'm glad to know your issue is resolved now, but you have alignment issues while printing.
Have you placed the photo paper correctly into the photo tray?
Check if it the problem persist only while printing pictures or with other applications too.
Use an automated tool to align the printer.
If there were defects on the print quality diagnostic report, follow these steps to align the printheads.
NOTE:
After you load the cartridges and close the cartridge access door, the product automatically prompts you to print an alignment page.
-
On the product control panel, touch OK. The product prints an alignment page.
-
Open the lid.
Figure : Open the lid

-
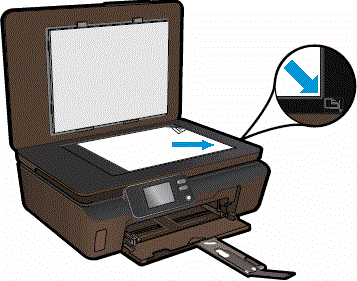
Place the alignment page on the scanner glass with the printed side down, and then position it on the front right corner of the glass.
Figure : Place the alignment page on the scanner glass
-
Close the lid, and then touch OK. The alignment page scans.
If the product does not automatically print an alignment page, follow these steps:
-
From the control panel home screen, touch the Right Arrow (
 ), and then touch the Setup icon (
 ).
). -
Touch Tools.
-
Touch the Down Arrow (
 ), and then touch Align Printer. The product prints an alignment page.
 -
Open the lid.
Figure : Open the lid
-
Place the alignment page on the scanner glass with the printed side down, and then position it along the front right corner of the glass.
Figure : Place the alignment page on the scanner glass
-
Close the lid, and then touch OK. The alignment page scans.
-
Hope this helps!
Take Care! 🙂
Please click “Accept as Solution” if you feel my post solved your issue, it will help others find the solution.
Click the “Kudos, Thumbs Up" on the bottom right to say “Thanks” for helping!
A4Apollo
I am an HP Employee
Be alert for scammers posting fake support phone numbers and/or email addresses on the community.
If you think you have received a fake HP Support message, please report it to us by clicking on "Flag Post".
† The opinions expressed above are the personal opinions of the authors, not of HP. By using this site, you accept the Terms of Use and Rules of Participation.


Didn't find what you were looking for?
Ask the community
† The opinions expressed above are the personal opinions of the authors, not of HP. By using this site, you accept the <a href="https://www8.hp.com/us/en/terms-of-use.html" class="udrlinesmall">Terms of Use</a> and <a href="/t5/custom/page/page-id/hp.rulespage" class="udrlinesmall"> Rules of Participation</a>.